Panasonic TH50PHW5UZ TH42PHW5UZ User Guide - Page 10
Basic Controls
 |
View all Panasonic TH50PHW5UZ manuals
Add to My Manuals
Save this manual to your list of manuals |
Page 10 highlights
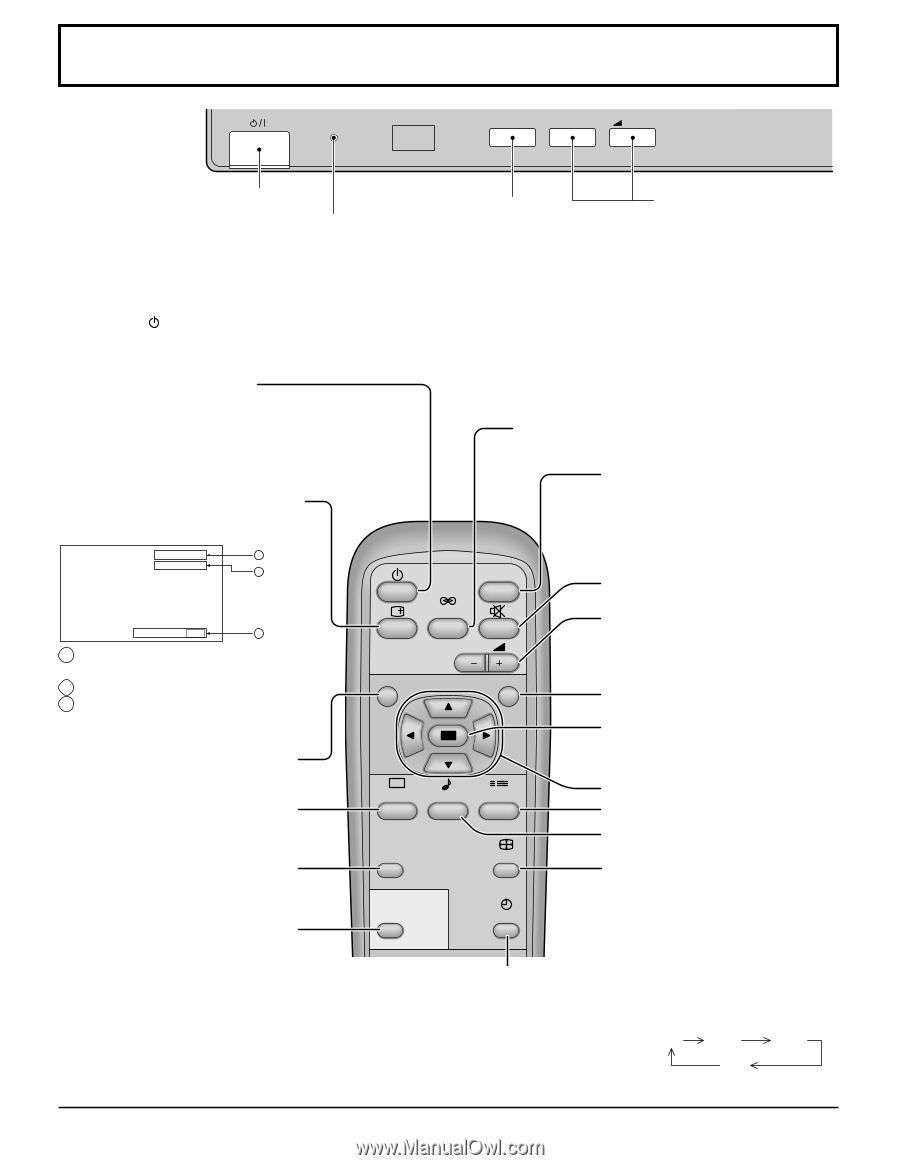
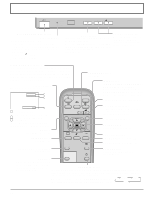
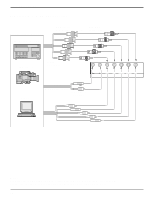
Basic Controls R - STANDBY G POWER ON TH-50PHW5 INPUT - VOL + Main POWER ON/OFF Switch Power Indicator The Power Indicator will light. • POWER-OFF Indicator not illuminated (The unit will still consume some power as long as the power cord is inserted into the wall outlet.) • STAND-BY .....Red • POWER-ON.....Green INPUT button (VIDEO(S VIDEO), COMPONENT/RGB, PC Mode Selection) Press the "INPUT" button to select VIDEO (S VIDEO), COMPONENT/RGB, PC input VOLUME Adjustment Press the Volume Up "+" or Down "-" button to increase or decrease the sound volume level. signal modes sequentially. (see page 19) STAND-BY(ON/OFF) button The Plasma Display must first be plugged into the wall outlet and turned on at the power switch (see page 18). Press this button to turn the Plasma Display ON, from STANDBY mode. Press it again to turn the High Definition Plasma Display OFF to STAND-BY mode. STATUS button Press the "STATUS" button to display the current system status. VIDEO 1 NORMAL 2 SURROUND button (see page 27) INPUT button (VIDEO(S VIDEO), COMPONENT/ RGB, PC Mode Selection) Press to select VIDEO(S VIDEO), COMPONENT/RGB, PC input signal modes sequentially. (see page 19) INPUT Sound mute On/Off (see page 26) SURROUND VOLUME Adjustment OFF TIMER 90 3 1 VIDEO(S VIDEO), COMPONENT/RGB, PC mode 2 ASPECT mode (see page 22) 3 OFF TIMER VOL N R Press the Volume Up "+" or Down "-" button to increase or decrease the sound volume level. R button (see page 21) The off timer indicator is displayed only when the off timer has been set. ACTION button Press to make selections N button (see page 25, 26, 28) PICTURE SOUND SET UP POSITION buttons PICTURE button SET UP button (see page 20) (see page 28) PICTURE POS. /SIZE ASPECT SOUND button (see page 26) PICTURE POS./SIZE button ASPECT button (see page 24) Press to adjust the aspect. (see page 22) PC OFF TIMER PC button Press the "PC" mode selection button to select the PC mode. This button is used to switch OFF TIMER button directly to PC mode. The Plasma Display can be preset to switch to stand-by after a fixed period. The setting changes to 30 minutes, 60 minutes, 90 minutes and 0 minutes (off timer cancelled) each time the button is pressed. When three minutes remain, "OFF TIMER 3" will flash. 30 60 90 The off timer is cancelled if a power interruption occurs. 0 10
-
 1
1 -
2
-
3
-
4
-
 5
5 -
 6
6 -
 7
7 -
 8
8 -
 9
9 -
 10
10 -
 11
11 -
 12
12 -
 13
13 -
 14
14 -
 15
15 -
16
-
17
-
18
-
19
-
20
-
21
-
22
-
23
-
24
-
25
-
26
-
27
-
28
-
29
-
30
-
31
-
32
-
33
-
34
-
35
-
36
-
37
-
38
-
39
-
40
 |
 |