Panasonic WVNP472 WVNP472 User Guide - Page 25
NETWORK SETUP OF THE CAMERA, Click Internet Protocol TCP/IP, and then click
 |
View all Panasonic WVNP472 manuals
Add to My Manuals
Save this manual to your list of manuals |
Page 25 highlights
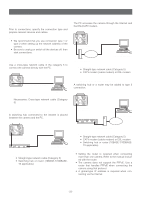
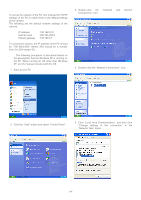
6. Click "Internet Protocol (TCP/IP)", and then click the [Properties] button. ■ Network Setup of the Camera On completion of the network setup of the PC, begin the network setup of the camera. If multiple cameras are connected, it is required to set up each camera individually. The following information is necessary for the network setup of the camera. If you do not have the following information, refer to your network administrator or your Internet service provider. • IP address • Subnet mask • Default gateway (when using a gateway server or a router) • Port number • DNS server address 1 and/or 2 (when using DNS) 1. Start up Internet Explorer on your PC. 7. Click the "Use the following IP address" radio button and enter the IP address and the subnet mask as follows. IP address Subnet mask : 192.168.0.9 : 255.255.255.0 8. Click the [OK] button, and the window dialog box closes. 2. Enter "192.168.0.10" (the default IP address of the camera) in the address bar. The main page of the camera appears. -25-
-
 1
1 -
2
-
3
-
4
-
5
-
6
-
7
-
8
-
9
-
10
-
11
-
12
-
13
-
14
-
15
-
16
-
17
-
18
-
19
-
 20
20 -
 21
21 -
 22
22 -
 23
23 -
 24
24 -
 25
25 -
 26
26 -
 27
27 -
 28
28 -
 29
29 -
 30
30 -
31
-
32
-
33
-
34
-
35
-
36
-
37
-
38
-
39
-
40
-
41
-
42
-
43
-
44
-
45
-
46
-
47
 |
 |
