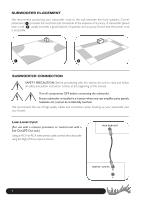
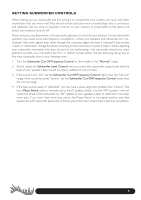
Paradigm Cinema Sub Manual - Page 7
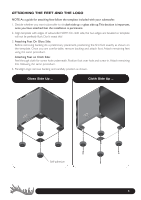
Attaching The Feet And The Logo
 |
View all Paradigm Cinema Sub manuals
Add to My Manuals
Save this manual to your list of manuals |
Page 7 highlights
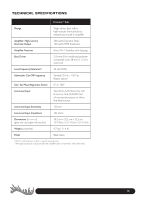
ATTACHING THE FEET AND THE LOGO NOTE: As a guide for attaching feet follow the template included with your subwoofer. 1. Decide whether you want subwoofer to sit cloth side up or gloss side up.This decision is important, once you have attached feet the installation is permanent. 2. Align template with edges of subwoofer. NOTE: On cloth side, the two edges are beveled so template will not lie perfectly flush. Don't sweat this! 3. Attaching Feet On Gloss Side: Before removing backing do a preliminary placement, positioning the first foot exactly as shown on the template. Once you are comfor table, remove backing and attach foot. Attach remaining feet using the same procedure. Attaching Feet on Cloth Side: Feel through cloth for screw hole underneath. Position foot over hole and screw in. Attach remaining feet following the same procedure. 4. Paradigm logo: remove backing and carefully position as shown. Gloss Side Up ... Cloth Side Up ... Self-adhesive 6
-
 1
1 -
 2
2 -
 3
3 -
 4
4 -
 5
5 -
 6
6 -
 7
7 -
 8
8 -
 9
9 -
 10
10 -
 11
11 -
 12
12 -
13
-
14
-
15
-
16
-
17
-
18
-
19
-
20
-
21
-
22
-
23
-
24
 |
 |
