Pentax 19033 Operation Manual - Page 92
Press the four-way controller, to change the number of recorded, pixels., Press the, button.
 |
UPC - 027075117075
View all Pentax 19033 manuals
Add to My Manuals
Save this manual to your list of manuals |
Page 92 highlights
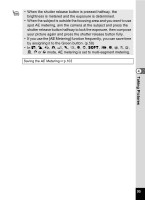
3 4 5 6 4 Press the four-way controller (5). A pull-down menu appears. Use the four-way controller (23) to change the number of recorded pixels. Press the 4 button. Storage Capacity 6M Recorded Pixels Quality Level AWB White Balance AE Metering ISO AUTO Sensitivity MENU Cancel 1319 6M 5M 4M 3M 2M 1024 640 OK OK The Recorded Pixels setting is saved. Press the 3 button. The camera returns to capture status with the current setting. • When shooting mode is set to Y, the number of recorded pixels is set to h and quality level is set to D. • When drive mode is set to c the number of recorded pixels is set to h, and when Capture mode is set to R, the number of recorded pixels is set to V (1280×960). • If you use the [Recorded Pixels] function frequently, you can save time by assigning it to the Green button. (p.58) Recorded Pixels and Quality Level of Still Pictures 1p.31 Taking Pictures 90
-
 1
1 -
2
-
3
-
4
-
5
-
6
-
7
-
8
-
9
-
10
-
11
-
12
-
13
-
14
-
15
-
16
-
17
-
18
-
19
-
20
-
21
-
22
-
23
-
24
-
25
-
26
-
27
-
28
-
29
-
30
-
31
-
32
-
33
-
34
-
35
-
36
-
37
-
38
-
39
-
40
-
41
-
42
-
43
-
44
-
45
-
46
-
47
-
48
-
49
-
50
-
51
-
52
-
53
-
54
-
55
-
56
-
57
-
58
-
59
-
60
-
61
-
62
-
63
-
64
-
65
-
66
-
67
-
68
-
69
-
70
-
71
-
72
-
73
-
74
-
75
-
76
-
77
-
78
-
79
-
80
-
81
-
82
-
83
-
84
-
85
-
86
-
 87
87 -
 88
88 -
 89
89 -
 90
90 -
 91
91 -
 92
92 -
 93
93 -
 94
94 -
 95
95 -
 96
96 -
 97
97 -
98
-
99
-
100
-
101
-
102
-
103
-
104
-
105
-
106
-
107
-
108
-
109
-
110
-
111
-
112
-
113
-
114
-
115
-
116
-
117
-
118
-
119
-
120
-
121
-
122
-
123
-
124
-
125
-
126
-
127
-
128
-
129
-
130
-
131
-
132
-
133
-
134
-
135
-
136
-
137
-
138
-
139
-
140
-
141
-
142
-
143
-
144
-
145
-
146
-
147
-
148
-
149
-
150
-
151
-
152
-
153
-
154
-
155
-
156
-
157
-
158
-
159
-
160
-
161
-
162
-
163
-
164
-
165
-
166
-
167
-
168
-
169
-
170
-
171
-
172
-
173
-
174
-
175
-
176
-
177
-
178
-
179
-
180
-
181
-
182
-
183
-
184
-
185
-
186
-
187
-
188
-
189
-
190
-
191
-
192
-
193
-
194
-
195
-
196
-
197
-
198
-
199
-
200
-
201
-
202
-
203
-
204
-
205
-
206
-
207
-
208
 |
 |
