Pentax IQZoom 120MI IQZoom 120MI Manual - Page 37
Pushing
 |
View all Pentax IQZoom 120MI manuals
Add to My Manuals
Save this manual to your list of manuals |
Page 37 highlights
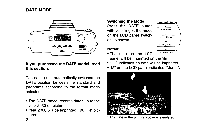
Correcting the date Switch the power on. 1. Pressing the DATE button for 3 seconds: the "Year" digits and (x D) will blink. 2. Each time the DATE button is depressed, the blinking digits changes in the following manner: Year - Month - Day - Hours - Minutes Release the button when the desired digits appear. 3. Push the zoom button on the right or left side when you wish to change the blinking digits. The digits increase by one each time the right zoom button is pushed and the digits decreases by one each time the left zoom button is pushed. Pushing the zoom button for about one second will change the data continuously. 4. After the data has been adjusted, depress the DATE button repeatedly until blinking stops. • The blinking "minutes" allows precise fine-tuning of the internal clock to the beginning of a specified minute. When "minutes digits" are blinking, depress the DATE button in sync with a time signal. • If you release the shutter while the blinking data is being corrected, the data will not be imprinted. • When the shutter is released, the bar ( - ) mark on the display blinks for a few seconds, indicating the data has been imprinted. • If there is a white or yellow object in the corner of the picture where the data is imprinted, the data may be difficult to read. When composing your photographs, try to avoid brightly-colored subjects in that corner. 35
-
 1
1 -
2
-
3
-
4
-
5
-
6
-
7
-
8
-
9
-
10
-
11
-
12
-
13
-
14
-
15
-
16
-
17
-
18
-
19
-
20
-
21
-
22
-
23
-
24
-
25
-
26
-
27
-
28
-
29
-
30
-
31
-
 32
32 -
 33
33 -
 34
34 -
 35
35 -
 36
36 -
 37
37 -
 38
38 -
 39
39 -
 40
40 -
 41
41 -
 42
42 -
43
-
44
 |
 |
