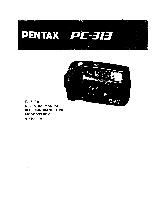
Pentax PC-313 PC-313 Manual - Page 3
SA96Seeee9Ge0000
 |
View all Pentax PC-313 manuals
Add to My Manuals
Save this manual to your list of manuals |
Page 3 highlights
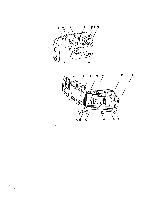
SA(96Seeee9Ge0000 DESCRIPTION OF PARTS 01 Shutter release button ▪ Auto-focus window O Exposure counter O Viewfinder window O Light-sensor window Flash Flash switch Lens Lens protector Film-information window Back cover Flash ready lamp Film-leader-end mark Viewfinder eyepiece Film chamber Back-cover release lever Battery-chamber cover Take-up spool Sprocket Film-speed-set lever Film rewind lever Rewind shaft INSERTING BATTERIES IFig.1) You need two "AA" batteries to operate this camera. Although both manganese and alkaline batteries are suitable for this camera, the latter is recommended for longer battery life. Ni-Cd batteries are not suitable. Insert two batteries by aligning (+1 and (-) marks of the batteries with the marks on the cover, then close the cover. CHECKING BATTERIES BEFORE USE (Fig.2-3) 1. Open the lens protector completely. Now the camera is operable. *Unless the protector is fully opened, the shutter is not operable to avoid accidental shooting. 2. Depress the shutter release button 0 halfway while covering the light-sensor window as shown. 3. A red lamp lights up when batteries are properly loaded. Replace the batteries with fresh ones when film advance becomes slow or flash recycling takes more than 30 seconds. *When replacing, use batteries of the same type and make. •Do not leave batteries in the camera to avoid possible leakage when storing the camera for a long period. 0 00 SETTING FILM SPEED IFig.4) Align the index of the film-speed-set lever (1) with the corresponding film speed (ISO) of the film in use. •This camera is designed to use the film with ISO 100, 200 or 400. *The film speed is indicated on the film package. LOADING FILM (Fig.5-8) When loading or unloading the film, avoid the direct sunlight. f. 1. Open the back cover by sliding the back-cover release lever 2. Place the film cartridge by first fitting its flat side on the rewind shaft. 3. Pull the film leader out and place it on the film- leader-end mark ® II 1. *Make sure that the film is properly placed between the guide rails while taking up any slack left in the film. 4. Close the back cover. Release the shutter four times until the exposure counter reaches "1". TAKING PICTURES IFig.9-11) 1. Open the lens protector. Look through the viewfinder and compose your image. 2. Depress the shutter release button halfway. Make sure that a red lamp does not come on inside the viewfinder. When the red lamp lights up, use the flash. 3. When you are ready, release the shutter. The shooting range is from 1.2m (3.9 ft.) to infinity. FOCUSING (Fig.12-14) Place the subject at the center of the viewfinder when you take a picture. To focus on the subject in a peripheral area, point the center of the viewfinder at the subject first, then depress the shutter release button halfway, recompose the picture and release the shutter. USING FLASH IFig.15-16) The red lamp in the viewfinder recommends you to use the flash. 1. Slide the flash switch 0 in the direction of the e arrow. 2. When the flash ready lamp lights up, you are ready to take a picture using the flash. Keep your finger off the shutter release button until the ready lamp comes on. Make sure to keep your finger off the flash head when taking a picture. Slide the flash switch backafter shooting. The flash helps take brilliant pictures of backlit subjects. Flash Control Range The flash covers following ranges: ISO 100 film = approx. 1.2-3.1m (3.9-10.2 ft.) ISO 200 film = approx. 1.2-4.4m (3.9-14.4 ft.( ISO 400 film = approx. 1.6-6.3m 15.2-20.7 ft.) REWINDING FILM (Fig.17-18) The motor stops automatically at the end of the film. e 1. To rewind the film, push the film rewind lever in the direction of the arrow and hold it there until rewind finishes. 2. The motor stops automatically with the exposure counter showing "S". 3. Open the back cover and remove the film cartridge from the chamber.
-
 1
1 -
 2
2 -
 3
3 -
 4
4 -
 5
5 -
 6
6
 |
 |
