Pfaff 1196 - 1199 Owner's Manual - Page 42
Pfaff 1196 - 1199 Manual
 |
View all Pfaff 1196 - 1199 manuals
Add to My Manuals
Save this manual to your list of manuals |
Page 42 highlights
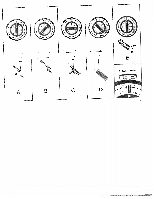
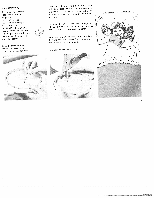
wing buttonhoes tach buttonhole foot 93-040 924-91. Use No. 50 achine embroidery thread as edle and bobbin thread. heck to make sure that all nctional-stitch Jttons are out (see page 15). ark the buttonhole on the bric, urn knob 10 clockwise until buttonhole ymbol A is positioned below the setting iark (Fig. A) and the knob snaps into .osition. I I J Turn the outer ring of the stitch selector until its buttonhole symbol is positioned above the setting mark (Fig. A). The machine is now set for a medium stitch density. We recommend to sew a buttonhole to try out the stitch density which should be select ed in accordance with the fabric and the thread to be used. When you turn the stitch selector toward -, the stitches are packed together more closely when you turn it to ward ± they are spaced further apart. Depending on the type of fabric used, it may be advisable to ease the needle thread tension somewhat. Place the fabric under the buttonhole foot, pull the filler cord over the lug at the back of the buttonhole foot and place both strands under the two grooves in the sole of the foot. Lower the buttonhole foot. Then sew in reverse until the second seam C is the same length as the first seam. Turn the balance wheel toward you until the needle has risen clear of the fabric. Turn knob 10 clockwise again until button hole symbol D is positioned below the setting mark LI and the knob snaps into position (Fig. D). Agan sew 4-6 bartacking stitches (0). and ro tate the balance wheel toward you until the needle has risen clear of the fabric. Turn knob 10 in clockwise direction once more until buttonhole symbol E is positioned below the setting mark and the knob snaps into position (Fig. E). Sew a few tying stitches. Turn the balance wheel toward you until the take-up lever is at its highest point. Raise the presser bar lifter to its highest position, and remove the material from the machine. Sew the first seam A until the buttonhole is the right length. as marked on the fabric. Turn the balance wheel toward you until the needle has risen clear of the fabric. Turn knob 10 clockwise until buttonhole symbol B is positioned below setting mark (Fig. 8) and the knob snaps into position. Now sew 4-6 bartacking stitches (B). Rotate the balance wheel toward you until the needle has risen clear of the fabric. Again turn knob 10 clockwise until button hole symbol C is positioned below the setting mark LI (Fig. C) and the knob snaps into position. Pull the filler thread into buttonhole E completely and trim both ends. Open the buttonhole with your seam ripper which is included in the accessory box. To set the machine for sewing the next buttonhole, turn knob 10 clockwise until buttonhole symbol A is again positoned below the setting mark and the knob snaps into position (Fig. A). After you have sewn all buttonholes, turn knob 10 clockwise until the symbol for the central needle position is positioned under the setting mark LI (normal position). 40
-
 1
1 -
2
-
3
-
4
-
5
-
6
-
7
-
8
-
9
-
10
-
11
-
12
-
13
-
14
-
15
-
16
-
17
-
18
-
19
-
20
-
21
-
22
-
23
-
24
-
25
-
26
-
27
-
28
-
29
-
30
-
31
-
32
-
33
-
34
-
35
-
36
-
 37
37 -
 38
38 -
 39
39 -
 40
40 -
 41
41 -
 42
42 -
 43
43 -
 44
44 -
 45
45 -
 46
46 -
 47
47 -
48
-
49
-
50
-
51
-
52
-
53
-
54
-
55
-
56
-
57
-
58
-
59
-
60
-
61
-
62
-
63
-
64
-
65
-
66
-
67
-
68
 |
 |
