Pfaff 73 Owner's Manual - Page 25
Changing, Light, Replacing
 |
View all Pfaff 73 manuals
Add to My Manuals
Save this manual to your list of manuals |
Page 25 highlights
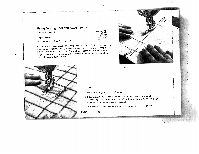
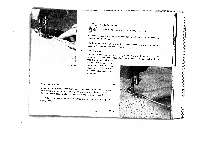
OR 024 Changing the Light Bulb sTTsloohidceekcebhbtua,uinlltbtgu-eirpnnitnh1sle5ef-intw,ltioagathtnstodscebkwupeulibtlnl,gsloroeultimtsg..hotPWvreihellseutsnhmebiinunfalsabteecrsietnintachgnoedvneaterruw,eranpluirogisfghhhtstt.tibhtucehlbi,nbgublbepesirnufterocetliyttos. I L Removing the Face Cover To change the light bulb or oil the parts at the needle-bar end, remove the face cover by pulling it upwards. Replacing the Face Cover 4 Slip tip d into slot e and push face cover up until it snaps into place. l3R12 24 0R505
-
 1
1 -
2
-
3
-
4
-
5
-
6
-
7
-
8
-
9
-
10
-
11
-
12
-
13
-
14
-
15
-
16
-
17
-
18
-
19
-
 20
20 -
 21
21 -
 22
22 -
 23
23 -
 24
24 -
 25
25 -
 26
26 -
 27
27 -
 28
28 -
 29
29 -
 30
30 -
31
-
32
-
33
-
34
-
35
-
36
-
37
-
38
-
39
-
40
-
41
-
42
-
43
-
44
-
45
-
46
-
47
-
48
-
49
 |
 |

Changing
the
Light
Bulb
The
built-in
15-watt
sewing
light
illuminates
the
area
of
stitching
perfectly.
To
change
the
light
bulb,
remove
the
face
cover,
push
the
bulb
into
its
socket,
turn
left,
and
pull
out.
When
inserting
new
light
bulb,
be
sure
to
slide
bulb
pins
into
socket
slots.
Press
bulb
in
and
turn
right.
Removing
the
Face
Cover
To
change
the
light
bulb
or
oil
the
parts
at
the
needle-bar
end,
remove
the
face
cover
by
pulling
it
upwards.
Replacing
the
Face
Cover
4
Slip
tip
d
into
slot
e
and
push
face
cover
up
until
it
snaps
into
place.
l3R12
0R505
24
OR
024
I
L