Pfaff ClassicStyle 2027 Owner's Manual - Page 6
Introduction
 |
View all Pfaff ClassicStyle 2027 manuals
Add to My Manuals
Save this manual to your list of manuals |
Page 6 highlights
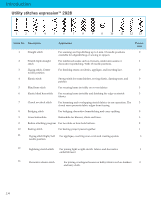
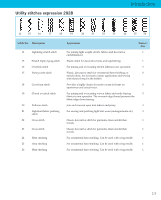
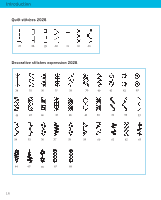
Introduction TABLE OF CONTENTS 1. Introduction Utility stitches expression 2028 1:4 Utility stitches expression 2028 1:5 Decorative stitches 1:6 2. Preparations Carrying case 2:1 Lid 2:1 Electrical connection 2:2 Connecting the foot control 2:2 Voltage Switch 2:2 Accessory tray 2:3 Removing the accessory tray 2:3 Bobbin winding 2:4-5 Thread tension 2:6 Inserting the bobbin 2:6 Threading the needle 2:7 Integrated Needle threader 2:8 Presser foot lifter 2:8 Drawing-up the bobbin thread 2:9 Bobbin thread 2:9 Thread cutter 2:9 Changing the presser foot 2:9 Setting the needle thread tension 2:10 Winding a bobbin through the needle 2:10 Changing the needle 2:12 Threading the twin needle: 2:12 The IDT (Integrated Dual Feed) 2:13 Lowering the feed dog 2:13 3. Sewing Stitch selection 3:1 Altering stitches 3:1 Altering the stitch width 3:1 Altering the needle position 3:1 Altering the pattern width e.g. Stitch 25 3:2 Altering the stitch/pattern length 3:2 Altering the stitch density 3:2 Balance 3:3 Reverse sewing 3:3 "Pattern mirror" 3:3 "Lock" button 3:4 Twin needle 3:4 Explanation of the sewing recommendations table 3:6 Sewing in zippers 3:6 Basting stitch 3:7 Top stitching 3:7 Blind hem stitch 3:8 Overlock stitches 3:9 Free Motion Sewing 3:10 Bridging stitch 3:11 Cross hem stitch 3:11 Rolled hem with hemmer No. 7 3:12 Shell edging 3:12 Buttonholes 3:13 Inserting the sensormatic buttonhole guide: 3:13 Attaching buttonhole foot 3:13 Fully automatic buttonhole 3:13 Semi-automatic buttonhole 3:14 Manual buttonhole 3:15 1:2
-
 1
1 -
 2
2 -
 3
3 -
 4
4 -
 5
5 -
 6
6 -
 7
7 -
 8
8 -
 9
9 -
 10
10 -
 11
11 -
 12
12 -
13
-
14
-
15
-
16
-
17
-
18
-
19
-
20
-
21
-
22
-
23
-
24
-
25
-
26
-
27
-
28
-
29
-
30
-
31
-
32
-
33
-
34
-
35
-
36
-
37
-
38
-
39
-
40
-
41
-
42
-
43
-
44
-
45
-
46
-
47
-
48
-
49
-
50
-
51
-
52
 |
 |
