Pfaff Fabric Mover Owner's Manual - Page 2
Setting, Cont'd, Quick, Start - and stitch regulator
 |
View all Pfaff Fabric Mover manuals
Add to My Manuals
Save this manual to your list of manuals |
Page 2 highlights
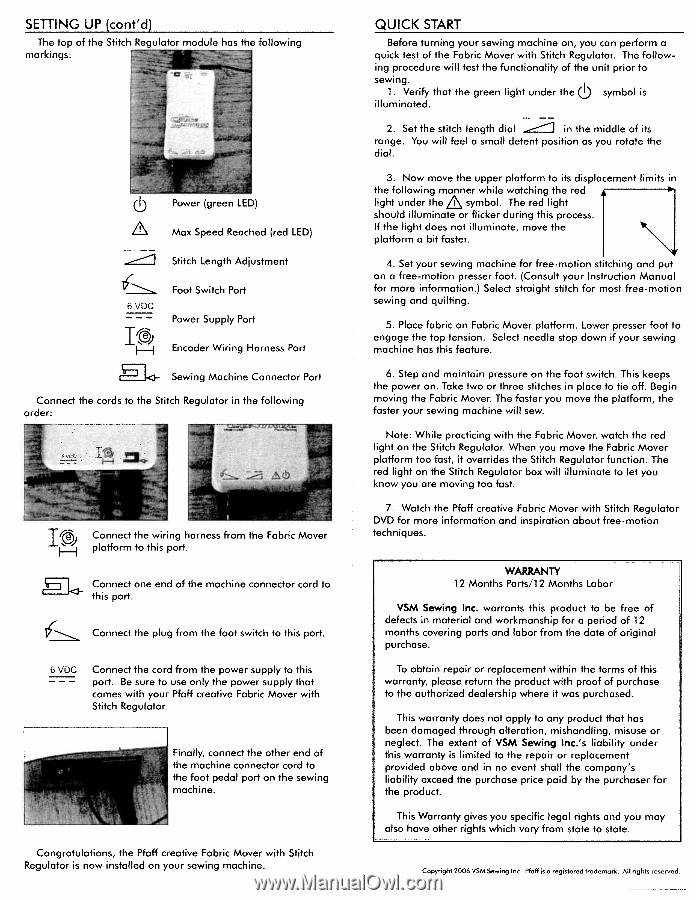
SETTING UP (cont'd) The top of the Stitch markings: or module has the following () Power (green LED) Max Speed Reached (red LED) Stitch Length Adjustment 6 VDC I) FH Foot Switch Port Power Supply Port Encoder Wiring Harness Port Sewing Machine Connector Port Connect the cords to the Stitch Regulator in the following order: I) Connect the wiring harness from the Fabric Mover platform to this port. Connect one end of the machine connector cord to this port. Connect the plug from the foot switch to this port. 6 VOC - - - Connect the cord from the power supply to this port. Be sure to use only the power supply that comes with your Pfaff creative Fabric Mover with Stitch Regulator. j Finally, connect the other end of the machine connector cord to the foot pedal port on the sewing machine. Congratulations, the Pfaff creative Fabric Mover with Stitch Regulator is now installed on your sewing machine. QUICK START Before turning your sewing machine on, you can perform a quick test of the Fabric Mover with Stitch Regulator. The follow ing procedure will test the functionality of the unit prior to sewing. () 1. Verify that the green light under the symbol is illuminated. 2. Set the stitch length dial .-1 in the middle of its range. You will feel a small detent position as you rotate the dial. 3. Now move the upper platform to its displacement limits in the following manner while watching the red light under the /j\ symbol. The red light should illuminate or flicker during this process. If the light does not illuminate, move the platform a bit faster. 4. Set your sewing machine for free-motion stitching and put on a free-motion presser foot. (Consult your Instruction Manual for more information.) Select straight stitch for most free-motion sewing and quilting. 5. Place fabric on Fabric Mover platform. Lower presser foot to engage the top tension. Select needle stop down if your sewing machine has this feature. 6. Step and maintain pressure on the foot switch. This keeps the power on. Take two or three stitches in place to tie off. Begin moving the Fabric Mover. The faster you move the platform, the faster your sewing machine will sew. Note: While practicing with the Fabric Mover, watch the red light on the Stitch Regulator. When you move the Fabric Mover platform too fast, it overrides the Stitch Regulator function. The red light on the Stitch Regulator box will illuminate to let you know you are moving too fast. 7. Watch the Pfaff creative Fabric Mover with Stitch Regulator DVD for more information and inspiration about free-motion techniques. WARRANTY 12 Months Parts/i 2 Months Labor VSM Sewing Inc. warrants this product to be free of defects in material and workmanship for a period of 12 months covering parts and labor from the date of original purchase. To obtain repair or replacement within the terms of this warranty, please return the product with proof of purchase to the authorized dealership where it was purchased. This warranty does not apply to any product that has been damaged through alteration, mishandling, misuse or neglect. The extent of VSM Sewing lnc's liability under this warranty is limited to the repair or replacement provided above and in no event shall the company's liability exceed the purchase price paid by the purchaser for the product. This Warranty gives you specific legal rights and you may also have other rights which vary from state to state. Copyright 2006 VSM Sewing Inc. Pfoff iso registered trademark. All rights reserved.
-
 1
1 -
 2
2
 |
 |