Pfaff Tiptronic 1029 Owner's Manual - Page 40
Darning
 |
View all Pfaff Tiptronic 1029 manuals
Add to My Manuals
Save this manual to your list of manuals |
Page 40 highlights
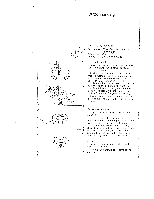
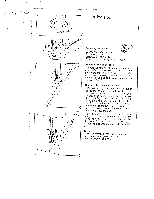
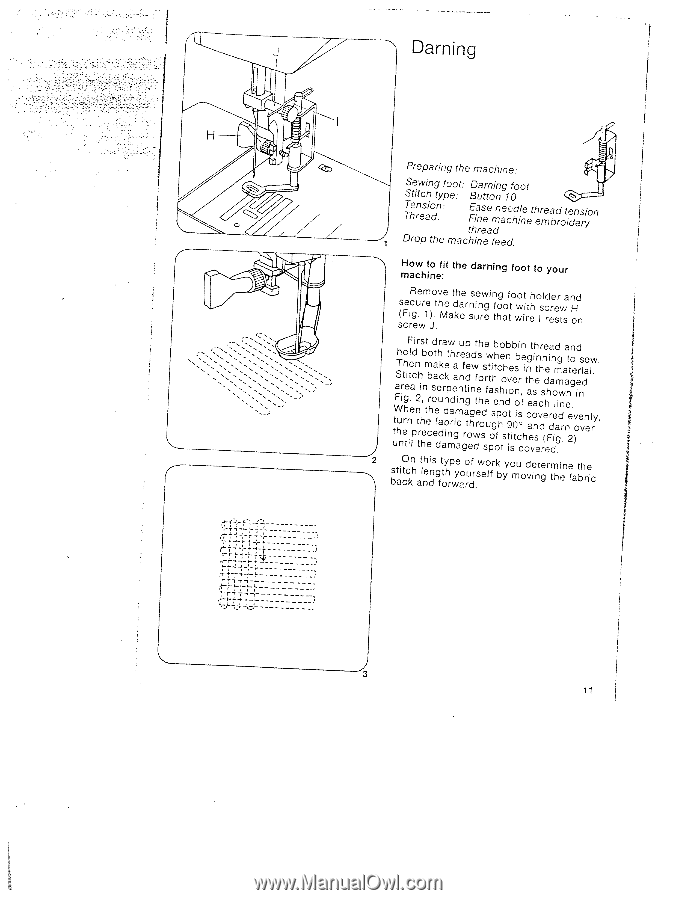
Darning H- 0 // Preparing the machine: Sewing foot: Stitch type: g1ot Tension: Thread: tFEhianreseeamdnaecehdilneethemrebadrotiednesryion Drop the machine feed. How to fit machine: the darning foot to your s(sFcericRgeu.werme1>Jo..tvhMee atdkhaeernssuienrwgeintfhgoaotftowwotiirtehhoIslcdrreeesrwtsanHodn ) uttWFaShTuhnriertohgtheiniFl.telaedcpinn2trhtrihsh,ebntmteecobrhsoedtaaefdhedurckaaarkindbepnwmtdrahegiaamicarnnnuegftrgadpaetioehgnwddwttrefeshhoosdsseerufwttpaogihsebothsfphcnhoetooshdnibv9ttioesibeOntsoibicrsc,fnehiotngcaaeehvtosinasheentvcdhrrsn(heedeehFiraddanoiedmla.mggwidrn.anaanet2tegn.oe)voderiensivdnaeellwr.y., 2 On stitch back atlnhedinsgfttoyhrpwyeaoroudfr.swelofrkbyyomuodveintegrmthienefatbhreic 11
-
 1
1 -
2
-
3
-
4
-
5
-
6
-
7
-
8
-
9
-
10
-
11
-
12
-
13
-
14
-
15
-
16
-
17
-
18
-
19
-
20
-
21
-
22
-
23
-
24
-
25
-
26
-
27
-
28
-
29
-
30
-
31
-
32
-
33
-
34
-
 35
35 -
 36
36 -
 37
37 -
 38
38 -
 39
39 -
 40
40
 |
 |
How
to
fit
the
darning
foot
to
your
machine:
Remove
the
sewing
foot
holder
and
secure
the
darning
foot
with
screw
H
(Fig.
1>.
Make
sure
that
wire
I
rests
on
screw
J.
First
draw
up
the
bobbin
thread
and
hold
both
threads
when
beginning
to
sew.
Then
make
a
few
stitches
in
the
material.
Stitch
back
and
forth
over
the
damaged
area
in
serpentine
fashion,
as
shown
in
Fig.
2,
rounding
the
end
of
each
line.
When
the
damaged
spot
is
covered
evenly,
turn
the
fabric
through
9O
and
darn
over
the
preceding
rows
of
stitches
(Fig.
2)
until
the
damaged
spot
is
covered.
On
this
type
of
work
you
determine
the
stitch
length
yourself
by
moving
the
fabric
back
and
forward.
Darning
H—
0
//
Preparing
the
machine:
Sewing
foot:
Stitch
type:
Tension:
Thread:
g1ot
Ease
needle
thread
tension
Fine
machine
embroidery
thread
Drop
the
machine
feed.
)
2
11