Pfaff select 1540 Owner's Manual
Pfaff select 1540 Manual
 |
View all Pfaff select 1540 manuals
Add to My Manuals
Save this manual to your list of manuals |
Pfaff select 1540 manual content summary:
- Pfaff select 1540 | Owner's Manual - Page 1
select 1520 1530 1540 Instruction manual - Pfaff select 1540 | Owner's Manual - Page 2
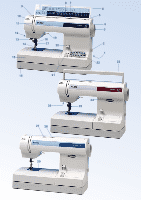
9 10 11 12 13 14 15 16 87 18 19 17 20 21 6 5 4 3 2 1 22 23 26 27 28 24 25 29 - Pfaff select 1540 | Owner's Manual - Page 3
Parts of your select sewing machine 1 Connection socket "foot control with main 1530) 18 Needle holder with fixing screw 19 Presser foot lifter 20 Button for "reverse sewing" 21 Stitch length dial 22 Stitch selection 1540 23 Carrying handle 24 Stitch selection 1530 & 1520 25 Thread guide 26 Sewing - Pfaff select 1540 | Owner's Manual - Page 4
- Pfaff select 1540 | Owner's Manual - Page 5
needle, changing needle, threading bobbin, or changing presser foot, etc. 20. Always unplug sewing machine from the electric outlet when removing covers, lubricating, or when making any other user servicing adjustments mentioned in the instruction manual. 21. Hold plug when rewinding into cord reel - Pfaff select 1540 | Owner's Manual - Page 6
Gathering foot 59 Gathering with elastic thread 36 Gathering with the straight stitch 36 General information on sewing 23 trouble-shooting Monograms 2 67-70 48 Needle table Needle thread tension Needle threader Non-elastic stitches 64-65 15,23 11 24-25 27 26-29 2 Oiling the sewing machine - Pfaff select 1540 | Owner's Manual - Page 7
38 Sewing on zippers 40-41 Sewing table Introduction Shirring foot 79 Shell-edging 44 Smocking 35 Special accessories table 58 Stabilizing edges 42 Standard buttonhole 33 Standard buttonhole with gimp thread 33 Stitch density 17 Stitch length adjustment dial 17 Stitch selection - Pfaff select 1540 | Owner's Manual - Page 8
Stitch table (non-elastic stitches) select 1540 select 1530 & select 1520 Stitch Description 1540 1530/1520 A/B/C A/B/C Buttonhole D H for tapering, eyelet embroidery and cording work Straight stitch: For all sewing and top-stitching operations which require a left needle position. Zigzag - Pfaff select 1540 | Owner's Manual - Page 9
stitches) select 1540 select 1530 & select 1520 Stitch Description 1540 1530/1520 stitch, 15 needle positions Stitch width knob 0.5 - 5 For sewing elastic bands on elastic materials or seams on stretch materials Left needle stitch A decorative stitch also used as a covering stitch Cord - Pfaff select 1540 | Owner's Manual - Page 10
Introduction Stitch table (stretch stitches) select 1540 Stitch 1540 1530/1520 LC - LD - LG - LI - EK - EL - Description Dutch stitch, narrow Dutch stitch Border stitch Weaving stitch Spiral stitch Diagonal coverstitch FG - ID - IF - Turkish stitch with zigzag Branch stitch Floss stitch LK - - Pfaff select 1540 | Owner's Manual - Page 11
Operate your Pfaff select Operate your Pfaff select Electrical connection Removable accessory tray Bobbins Bobbin case Threading the needle Needle threader Pulling up the bobbin thread Presser foot lifter Thread cutter Changing the presser foot IDT System/Integrated Dual Feed Changing the needle - Pfaff select 1540 | Owner's Manual - Page 12
your Pfaff select Carrying-case Place the cords, foot control and instruction book in the compartment of the carrying-case Top cover Open the folding cover (6) upwards The stitches of the sewing machine are illustrated on the inside of the top cover. 220 V 120 V Connecting the foot control - Pfaff select 1540 | Owner's Manual - Page 13
Operate your Pfaff select Accessory tray Your Pfaff select sewing machine has a removable accessory tray (15) which is also used as an extended work support. Model 1540, has a special removable accessory organizer. The enclosed accessories are numbered. Sort the enclosed accessories into the - Pfaff select 1540 | Owner's Manual - Page 14
Operate your Pfaff select Preparing the machine for bobbin winding Hold the handwheel (4) firmly and turn the handwheel release disc (3) until it stops in the direction of the arrow. This stops the needle from moving while the machine is winding the bobbin. Placing the bobbin Switch off the main - Pfaff select 1540 | Owner's Manual - Page 15
Pfaff select B A D Winding the bobbin from the spool holder Place the sewing thread on the spool holder (8). To guarantee free movement of the thread and to give additional hold to the thread spool, fit a spool cap corresponding to the size of the thread spool Threading Place the thread into guide - Pfaff select 1540 | Owner's Manual - Page 16
Pfaff select C B Winding from the second spool holder Push the second spool holder (7) into its hole and place a spool of thread with the corresponding spool cap on it. Threading Place the thread into guide place. TIP: If the machine is already threaded, you can easily wind thread from the - Pfaff select 1540 | Owner's Manual - Page 17
Pfaff select D Winding through the needle Even if the machine has been completely threaded, you can still wind the bobbin. Raise presser foot lifter (19). Pass the needle thread through the presser foot the guide hook D. Then wind the thread several times around the bobbin. Press the foot control - Pfaff select 1540 | Owner's Manual - Page 18
Operate your Pfaff select Bobbin Case/Hook Cover Switch off the main switch Hold the side pull out the bobbin case. Release the lever and remove the empty bobbin. Thread tension To ensure perfect sewing and a durable seam, the top and bottom thread-tensions must be well adjusted to each other and the - Pfaff select 1540 | Owner's Manual - Page 19
Operate your Pfaff select Inserting the bobbin Insert the full bobbin into the bobbin case. In doing so, pull the thread sideways through slot A, then under the tension plate B - Pfaff select 1540 | Owner's Manual - Page 20
Pfaff select Threading the needle thread Switch off the main switch Raise the presser foot lifter (19) and turn the handwheel until the take-up lever (9) has moved to the top. Place the thread on the spool holder (8) and fit the corresponding spool cap. Now, using guides (25). To thread the - Pfaff select 1540 | Owner's Manual - Page 21
Pfaff select Needle threader (Model 1540) To make threading the needle easier and quicker, you have been provided with the PFAFF needle threader (13). Lower the presser foot. into thread guide (25) and thread the needles. Note: You cannot use the needle threader for a twin needle (Model 1540). 11 - Pfaff select 1540 | Owner's Manual - Page 22
Operate your Pfaff select Drawing up the bobbin thread Turn off the main switch Raise the presser foot. Hold the needle thread and turn the handwheel bobbin case/hook cover and pull the thread under the presser foot to the left. Thread cutter Pull the threads from the back to the front over the thread - Pfaff select 1540 | Owner's Manual - Page 23
Operate your Pfaff select Presser foot lifter The presser foot is raised or lowered with the presser foot lifter (19). Removing the presser foot Turn off the main switch Position the needle at its highest point Press the presser foot upwards at the front and downwards at the back at the same time so - Pfaff select 1540 | Owner's Manual - Page 24
Operate your Pfaff select The Intigrated dual feed/IDT System (Models 1530 and 1540) PFAFF offers the ideal solution for sewing difficult materials: the intigrated dual feed. This system feeds the material from the top and bottom simultaneously as is done in industrial sewing machines. The fabric is - Pfaff select 1540 | Owner's Manual - Page 25
your Pfaff select Changing the needle Switch off the main switch To remove: Lower the presser foot and move the needle to its highest point. Now loosen the fixing screw A (18) and pull the needle downwards. To insert: The flat side A of the needle must face to the rear. Lower the presser foot - Pfaff select 1540 | Owner's Manual - Page 26
Pfaff select Stitch width dial The stitch width can be adjusted with this dial (27). When selecting sewing" (pages 21-44), you will find recommendations in the tables for the stitch width selection of individual stitches. During sewing have selected the right needle position, you can now use the width - Pfaff select 1540 | Owner's Manual - Page 27
Operate your Pfaff select Reverse sewing The machine sews in reverse only as long as the reverse sewing button (20) is pressed. Stitch length adjustment dial With the stitch length adjustment dial (21) you can adjust the stitch length between 0 and 6 mm by - Pfaff select 1540 | Owner's Manual - Page 28
Operate your Pfaff select Stitch selection, push button controls - select 1540 Utility stitches Each stitch has been given a letter that you can find on the push button controls. By pressing the correct button, the stitch is selected and the machine is ready to sew. Button B releases the buttons that - Pfaff select 1540 | Owner's Manual - Page 29
Operate your Pfaff select Stitch selection, stitch dial - select 1530, 1520 Utility stitches Each stitch is identified by a letter. The stitches and their corresponding letters are shown on A the inside of the lid, a chart - Pfaff select 1540 | Owner's Manual - Page 30
Operate your Pfaff select 20 - Pfaff select 1540 | Owner's Manual - Page 31
aids Non-elastic stitches Elastic stitches Overlock stitches Covering stitches Buttonhole Button sewing Hemming with the twin needle Smocking Gathering Darning Sewing on zippers Stabilizing edges Sewing lace Shell edging 22 23 24-25 26-27 28-29 30-31 32-33 34 35 35 36 37-38 39-41 42 43 - Pfaff select 1540 | Owner's Manual - Page 32
when sewing the selected stitches. The choice of the sewing foot, the setting of the needle thread tension and whether the sewing is carried out with the top feed switched on or off. Always use the "center" needle position if not otherwise specificed in the instructions. 1540 1530 1520 stitch - Pfaff select 1540 | Owner's Manual - Page 33
page 8. Perfect tension Too high tension Too low tension Topstitching Straight stitch G (1540)/E (1530, 1520) can be sewn using any of 15 various needle positions in such a way that you can always guide the sewing foot along the fabric edge for topstitching work. The top-stitch needle position is - Pfaff select 1540 | Owner's Manual - Page 34
fabric edge. In this way you can sew beautiful smooth seams. The raw edge must be guided along edge guide B. You can adjust this edge guide with adjusting screw A. Important: When the blind stitch foot is used for overcasting with the zigzag stitch, select the right needle position. Choose a stitch - Pfaff select 1540 | Owner's Manual - Page 35
sewing A B stitch 1540 H/D 5- 1-2 1530 - /H 5- 1-2 1520 - /H 5- 1-2 3-5 0/3 3-5 0/3 3-5 0/3 Blind stitch (Model 1540) Blind stitch H is best suited for invisible hems; sewing the sewing foot so that the crease line runs along edge guide B. • Using the needle positioning knob 28, select the - Pfaff select 1540 | Owner's Manual - Page 36
Utility stitches and practical sewing select select 1540 G 1530 E 1520 E 0 Stretch 0 Stretch 0 Stretch 3-5 0/1 3-5 0/1 3-5 0/1 Stretch triple straight stitch This stitch is used for sewing all seams where great strength is needed, e.g. inside trouser seams. Turn the stitch length dial away from - Pfaff select 1540 | Owner's Manual - Page 37
Utility stitches and practical sewing select select 1540 M 5- 1-2,5 1530 F 5- 1-2,5 1520 F 5- 1-2,5 3-5 0/1 3-5 0/1 3-5 0/1 Elastic stitch Because of its high elasticity, this stitch can be used for sewing elastic on swimwear, skirts or lingerie. • Mark elastic and fabric in quarters. • Pin - Pfaff select 1540 | Owner's Manual - Page 38
and knits, the select models offer overlock stitches which sew two fabric layers together and overcast simultaneously. They are more elastic than normal seams, very durable and quickly sewn. Tip: We recommend using blind stitch foot No. 3 when sewing overlock seams. It guides particularly well and - Pfaff select 1540 | Owner's Manual - Page 39
is being sewn. Remember! When overlocking, if you select a needle position other than center, and stitch width other than 5 , make sure the needle does not strike the bar of sewing foot 3. 1540 H 5- Stretch 1530 - - - 1520 - - - 3-5 0/1 -- -- Pullover stitch (Model 1540) This stitch is - Pfaff select 1540 | Owner's Manual - Page 40
sewing What is a covering stitch? You can use the following stitches for sewing a flat covering seam. This produces a so called "flatlock effect" which lends a professional look to collar plackets or raglan seams. The covering stitches are only available on select 1540. stitch 1540 L 5- Stretch 1530 - Pfaff select 1540 | Owner's Manual - Page 41
Utility stitches and practical sewing stitch stitch 1540 L 5- 1-2 1530 - - - 1520 - - - 3-5 0/1 -- -- Fancy elastic stitch (Model 1540) The fancy elastic stitch is very useful for materials that require a flat seam, e.g. terry cloth and fleece. • Place the two fabric edges so that they overlap - Pfaff select 1540 | Owner's Manual - Page 42
of 0.5 cm. They are a guide when determining the length of the buttonhole. stitch 1540 CBA 5- 1530 - - h 1520 - - 3-5 0/1 3-5 - 3-5 - 1540 - Standard buttonhole • Insert the buttonhole foot and slide the foot forward as far as it will go. • Select stitch 1 (C) and sew the right side of the - Pfaff select 1540 | Owner's Manual - Page 43
Utility stitches and practical sewing stitch 1540 - - - 1530 ABC 5- 0/1 1520 ABC 5- 0/1 1520/1530 - Standard buttonhole • Insert the buttonhole foot and slide the foot forward as far as it will go. • Select stitch A. Sew the left side of the buttonhole to the required length. Clip the top - Pfaff select 1540 | Owner's Manual - Page 44
Utility stitches and practical sewing stitch 1540 G 4 - 1530 E 4 - 1520 E 4 - 2-3 - 2-3 - 2-3 - Sewing on buttons With zigzag stitch G/E (stitch width 4 mm) you can sew on two- and four-hole buttons. • Remove the sewing foot and lower the feed dog • Turn the handwheel towards you and move the - Pfaff select 1540 | Owner's Manual - Page 45
sewing stitch stitch 1540 G 0 3 1530 E 0 3 1520 E 0 3 3-5 0/1 3-5 0/1 3-5 0/1 1540 G 1530 E 1520 E 0 3-4 0 3-4 0 3-4 3-5 0/1 3-5 0/1 3-5 0/1 Hemming with the twin needle Use the twin needle to make beatiful topstitch seams. Using that you select the Sew a test seam to determine the level of - Pfaff select 1540 | Owner's Manual - Page 46
an elastic thread. • Mark the first gathering seam on the reverse side of the fabric. • Sew a few stitches using stitch M/F. Leave the needle in the fabric. The needle must be in the center of the presser foot. Raise the presser foot and lay the elastic thread around the needle. • Lower the presser - Pfaff select 1540 | Owner's Manual - Page 47
the presser foot lifter into a notch (B) on the back side of the sewing machine into the darning position. A • Place the darning work in the darning hoop. • Drop the feed dog. • Pull up the bobbin thread and hold the threads when you start sewing. • Darn the damaged area by guiding the fabric - Pfaff select 1540 | Owner's Manual - Page 48
the elastic stitch is especially suitable for repairing damaged areas. • Sew over the damaged area in rows until it is well covered. Take care to ensure that the rows overlap. Repairing tears On tears, frayed edges or small holes it is useful to lay a piece of material under the reverse side of - Pfaff select 1540 | Owner's Manual - Page 49
available. We recommend using a metal zipper for strong fabrics such as denim. For all other materials we recommend a plastic zipper. It is important for all types of zippers to sew very close to the edge of the teeth of the zipper. This is why it is possible to insert the zipper foot either on the - Pfaff select 1540 | Owner's Manual - Page 50
Utility stitches and practical sewing Fully concealed, sew-in zipper • Insert the zipper foot on the right side. • Baste in the zipper and lay it underneath the presser foot so that the teeth of the zipper run alongside the foot. • Stitch in half of the zipper, leave the needle in the fabric, raise - Pfaff select 1540 | Owner's Manual - Page 51
along the edge of the zipper. • Just before the end of the seam, open the zipper and finish sewing the seam. • Close the zipper and baste the overlap evenly to the other half of the zipper. • Then sew through the basted seam. Tip: To achieve a perfect seam, we recommend using the edge guide. 41 - Pfaff select 1540 | Owner's Manual - Page 52
Utility stitches and practical sewing stitch 1540 G 0 3 1530 E 0 3 1520 E 0 3 3-5 7 3-5 Optional 3-5 Optional hemmer and sew a few stitches. • Leave the needle in the fabric, raise the presser foot and insert the fabric into the hemmer foot scroll. • Lower the presser foot and guide the fabric - Pfaff select 1540 | Owner's Manual - Page 53
stitches and practical sewing stitch 1540 G 1530 E 1520 E 0 2,5 0 2,5 0 2,5 3-5 0/1 3-5 0/1 3-5 0/1 Inserting lace You can achieve a beautiful effect by inserting lace, e.g. on babywear and children's clothing. • First the lace is basted onto the right side of the fabric. • Sew on both sides - Pfaff select 1540 | Owner's Manual - Page 54
sewing select 1540 K 1530 I 1520 I 4,5 1,5 4,5 1,5 4,5 1,5 4-5 0/1 4-5 0/1 4-5 0/1 Shell-edging Shell-edging is especially attractive on thin, soft fabrics such as silk and viscose. It is often used presser foot while sewing. This intensifies the effect of the shelledging. Tip: By sewing a - Pfaff select 1540 | Owner's Manual - Page 55
and embroidery techniques Decorative sewing and embroidery techniques Sewing table for decorative sewing 46 Decorative stitches 47 Monograms 48 Embroidering with the dense zigzag stitch/Tapering 49-51 Appliqué 51 Richelieu 52 Eyelet embroidery 52 Patchwork quilt 53 - Pfaff select 1540 | Owner's Manual - Page 56
, you can produce decorations by selecting different stitches, using different thread/fabric colors or vary length and width of the stitches. For decorative stitches we recommend using special embroidery threads which are available from your Pfaff dealer. Use stabilizer under the fabric to be - Pfaff select 1540 | Owner's Manual - Page 57
turn the material and embroider back down the border in reverse. Combinations with colored thread (only on select 1540) An additional effect can be produced with different colored thread. Multi-colored thread was used for the middle border in this example. You can purchase it in a great variety of - Pfaff select 1540 | Owner's Manual - Page 58
Monograms Whether working with stretch or woven fabric, with the help of the darning foot and the stitch G (1540), E (1530/1520), stitch width 2.5-5 , you can embroider initials of your own design. Sewing this way without a set pattern does, however, require a little practice. • Draw the initials - Pfaff select 1540 | Owner's Manual - Page 59
is easy with your select sewing machine. By adjusting the width of this dense zigzag stitch you can create interesting embroidery. Even embroidering • Place stabilizer under the fabric. • Set needle thread tension to "buttonhole", select zigzag stitch G (1540), E (1530/ 1520), set stitch length - Pfaff select 1540 | Owner's Manual - Page 60
), E (1530/1520), set stitch length to "buttonhole" and stitch width 5 mm. • Select right needle position and embroider a straight line. • Embroider corner: After the needle has penetrated the material to the right, reduce the stitch width using the width dial (27) by 0.5 mm to 4.5 mm. Sew a stitch - Pfaff select 1540 | Owner's Manual - Page 61
because it has a special cutout on the underside for the buttonhole seam. Use a fusible backing fabric to iron the appliqué onto the material, making it easier for you to appliqué. • Insert the appliqué foot in the sewing machine. • Transfer your drafted pattern to the face side, smooth side, of the - Pfaff select 1540 | Owner's Manual - Page 62
sewing machine. • Using a magic marker, draw your motif onto the right side of the fabric. • Then place two layers of water-soluble stabilizer underneath the fabric to be embroidered and hoop both the fabric and the stabilizer into an embroidery hoop. • Insert decorative embroidery foot the selected - Pfaff select 1540 | Owner's Manual - Page 63
the quilt onto the batting and the bottom quilt layer. • Use your Pfaff select model to sew all layers together. Work from the inside of the quilt out. Use a straight stitch for long seams. Use stitches such as FG or L stretch (select 1540) to add a decorative touch. Experiment with other stitches - Pfaff select 1540 | Owner's Manual - Page 64
for very fine, think materials. It is particularly suitable for valances and ruffles. • Using the Stretch stitch (G/E), width 2-3 mm, sew at a presser foot's width along the edge of the fabric. • Using a small pair of scissors, trim off the excess fabric on the hemstitch edge. Wale hemstitch seam - Pfaff select 1540 | Owner's Manual - Page 65
Accessories and needles Accessories and needles Presser feet (normal accessories) Special accessories table Felling foot Gathering foot Cording foot Bias-tape binder Ruffler Cording foot Appliqué foot Fringe foot Needle table 56-57 58 59 59 60 61 61 62 62 63 64-65 55 - Pfaff select 1540 | Owner's Manual - Page 66
No. 98-694 814-00 (select 1540) 1 Clear view foot (Fancy-stitch foot not suitable for top feed) Part No. 98-694 864-01 3 Blind stitch and overlock foot Part No. 98-694-890-00 (pictured) (select 1540 and 1530) Part No. 98-694 845-00 (select 1520) 4 Zipper-and edge-stitching foot Part No. 98-694 884 - Pfaff select 1540 | Owner's Manual - Page 67
No. 93-036 990-91 6 Darning foot Part No. 93-035 960-91 (select 1540) 7 Hemmer Part No. 98-694 818-00) (select 1540) 8 Edge guide Part No. 98-802 422-00 1 2 3 7 9 456 8 1-3 Spool cap 1. Part No. 93-036 048-44 2. Part No. 93-035 050-44 3. Part No. 93-036 - Pfaff select 1540 | Owner's Manual - Page 68
foot Compass guide Fagotting guide Patchwork foot (without top feed) Patchwork foot (with top feed) Cording decorative stitch foot Braiding foot 7/9 hole foot Free-form embroidery foot Finger guard Lamp changer Part No. 93-042 941-91 93-036 931081 98-054 484-91 93-042 950-91 93-042 953-91 Sewing - Pfaff select 1540 | Owner's Manual - Page 69
with this technique. You can make these seams particularly decorative by using a sewing thread of a contrasting color. The felling foot is available in two different widths. • Attach the felling foot to the presser foot holder. • Place the fabrics' wrong sides together. • Overlap the raw edge - Pfaff select 1540 | Owner's Manual - Page 70
center front of the needle plate. • Replace the needle plate. The notch between the needle plate and the sewing machine provides space for the gimp thread while sewing. Feed the gimp thread under the work support so that it does not become knotted during sewing. • Gently pull the fabric taut while - Pfaff select 1540 | Owner's Manual - Page 71
fler can be used in three different ways: 1. Folding pleats in fabric. 2. Folding and securing pleats in fabric in one operation. 3. Folding and securing pleats in fabric, while attaching lace in one operation. When you buy the ruffler from your PFAFF dealer, full operating instructions are included - Pfaff select 1540 | Owner's Manual - Page 72
1530 C 1520 C 2 0,35-1 2 0,35-1 2 0,35-1 3 Cording 3 foot 3 1540 G 1530 E 1520 E 2 0,35-1 2 0,35-1 2 0,35-1 2-3 Appliqué 2-3 foot 2-3 Cording foot foot Appliqués are easily sewn and always produce a beautiful effect. By using stabilizer under your work area. • Sew over the edges of the appliqué - Pfaff select 1540 | Owner's Manual - Page 73
. • Attach the fringe foot. • Embroider the motif row by row. For circles you must work from the outside in. • When using heavier threads, you should select a slightly longer stitch length. Always sew a test seam first. • When you have finished, pull the work carefully from the machine by holding the - Pfaff select 1540 | Owner's Manual - Page 74
Accessories and needles Needle chart Using the correct needle guarantees better stitching of the and Simplex Medium ball point Heavy ball point Stretch-fabric needle developed especially for Pfaff. Particularly suitable for delicate stretch and knitted fabrics Wide-meshed corsetry, Lycra, Simplex - Pfaff select 1540 | Owner's Manual - Page 75
, check whether needles can penetrate easily, by turning the handwheel. In this way, needle breakage is avoided as much as possible. Zigzag sewing Classification Stitch length Stitch width Needle Suitable for spacing 130/705 H-ZWI size: 80 size: 80 size: 80 0,5-1,5 mm 0,5-1,5 mm 0,5-1,5 mm - Pfaff select 1540 | Owner's Manual - Page 76
Accessories and needles 66 - Pfaff select 1540 | Owner's Manual - Page 77
Maintenance and trouble-shooting Maintenance and trouble-shooting Changing the needle plate 68 Cleaning and oiling 68 Replacing the sewing lamp 69 Trouble-shooting 70 67 - Pfaff select 1540 | Owner's Manual - Page 78
Maintenance and trouble-shooting Changing the needle plate Switch off the main switch It is very important to clean and oil your sewing machine, because it will rewardyou with a longer service life. The more often you use the machine, the more care it needs. Removal: • Raise the sewing foot and - Pfaff select 1540 | Owner's Manual - Page 79
and trouble-shooting Changing the sewing lamp Switch off the main switch • Disconnect the mains plug and the foot control plug from the machine. • Take off the removable accessory tray (15). The sewing lamp is located inside the left side of the sewing machine Removal: • Hold the sewing machine - Pfaff select 1540 | Owner's Manual - Page 80
and trouble-shooting Trouble-shooting Problem: The machine skips stitches The needle is not properly inserted. The wrong needle is inserted Needle is bent or blunt. Machine is not properly threaded. Needle is too small for thread. Remedy: Push needle fully upwards, flat side facing the back. Use - Pfaff select 1540 | Owner's Manual - Page 81
- Pfaff select 1540 | Owner's Manual - Page 82
29-629-002-01/000 • English • Inhouse • © 2001-2003 VSM Group AB • All rights reserved • Printed in Sweden on environmentally-friendly paper
-
 1
1 -
 2
2 -
 3
3 -
 4
4 -
 5
5 -
 6
6 -
 7
7 -
8
-
9
-
10
-
11
-
12
-
13
-
14
-
15
-
16
-
17
-
18
-
19
-
20
-
21
-
22
-
23
-
24
-
25
-
26
-
27
-
28
-
29
-
30
-
31
-
32
-
33
-
34
-
35
-
36
-
37
-
38
-
39
-
40
-
41
-
42
-
43
-
44
-
45
-
46
-
47
-
48
-
49
-
50
-
51
-
52
-
53
-
54
-
55
-
56
-
57
-
58
-
59
-
60
-
61
-
62
-
63
-
64
-
65
-
66
-
67
-
68
-
69
-
70
-
71
-
72
-
73
-
74
-
75
-
76
-
77
-
78
-
79
-
80
-
81
-
82
 |
 |
select
1520
1530
1540
Instruction manual