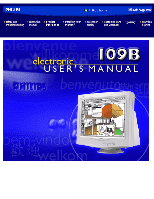
Philips 109B20 User manual - Page 6
Language Selection, Installation, Notes, Uninstall, Operating LightFrame™, Icon and Colors, French
 |
View all Philips 109B20 manuals
Add to My Manuals
Save this manual to your list of manuals |
Page 6 highlights
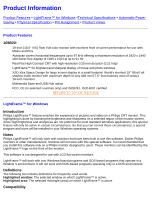
109B Product Information This version of LightFrame™ is compatible with Windows 95 Windows 98 Windows NT Windows 2000 Professional Edition. Language Selection While English is the default language of LightFrame™, the User Interface can be set up to operate in Dutch, French, German, Italian, Portuguese, or Spanish. Installation 1. To install LightFrame™, place the CD in the CD-ROM drive. 2. Next, when the menu of items on the CD appears on your screen, click on 'Install LightFrame™'. 3. Now, follow the on-screen prompts to properly install the program. The software checks to see if you have a compatible monitor. You must say yes to the license agreement for the software to install. 4. After installation, LightFrame™ automatically loads and the icon appears in the taskbar. Notes LightFrame™ is installed in the Start menu, under Programs. Unless otherwise selected during installation, LightFrame™ is installed in "C:\Program Files\Philips\LightFrame. " A shortcut is installed in the StartUp folder and on the desktop. (If needed, LightFrame™ can be operated manually from the StartUp folder.) If LightFrame™ detects that your monitor is not LightFrame™ compatible, an message appears on the monitor screen. See Error Message number 1 under the heading Error Messages. If you see this message, you can select to abort or continue the installation. However, if you continue the installation, LightFrame™ will probably not work on the monitor. Uninstall Should you need to remove the LightFrame™ software, please follow these steps. 1. First, click on the Start Menu. 2. Next, highlight Settings. 3. Then, click on Control Panel. 4. Now, click on Add/Remove Programs 5. Finally, select LightFrame from the list and then click on the Add/Remove button. Operating LightFrame™ After installation, LightFrame™ starts up automatically whenever the computer is started. At system start up, LightFrame™ checks the selected resolution of the monitor and if the monitor is LightFrame™ capable. Icon and Colors An icon of a monitor represents LightFrame™ on your desktop. This icon appears as a shortcut on the Windows desktop. LightFrame™ has three (3) modes of operation: Active, Inactive, and Suspended. The same icon with a different color in its center represents each mode. Active = LightFrame™ icon has bright green center. Inactive = The icon has a gray center. Suspended = The icon has a yellow center with a red cross. file:///C|/rita wu/gs3LF/ENGLISH/109B/product/product.htm (2 of 7) [10/12/2000 1:55:06 AM]
-
 1
1 -
 2
2 -
 3
3 -
 4
4 -
 5
5 -
 6
6 -
 7
7 -
 8
8 -
 9
9 -
 10
10 -
 11
11 -
 12
12 -
13
-
14
-
15
-
16
-
17
-
18
-
19
-
20
-
21
-
22
-
23
-
24
-
25
-
26
-
27
-
28
-
29
-
30
-
31
-
32
-
33
-
34
-
35
-
36
-
37
-
38
-
39
-
40
-
41
-
42
-
43
-
44
-
45
-
46
-
47
-
48
-
49
-
50
-
51
-
52
-
53
-
54
-
55
-
56
-
57
-
58
-
59
-
60
-
61
-
62
-
63
-
64
-
65
-
66
-
67
-
68
-
69
-
70
-
71
-
72
-
73
-
74
-
75
-
76
-
77
-
78
-
79
-
80
-
81
-
82
-
83
-
84
-
85
-
86
-
87
-
88
 |
 |
