Philips 42PFL7332D User manual - Page 30
Connect Accessory Device, Set Top Box to TV, Set-Top Box to TV
 |
View all Philips 42PFL7332D manuals
Add to My Manuals
Save this manual to your list of manuals |
Page 30 highlights
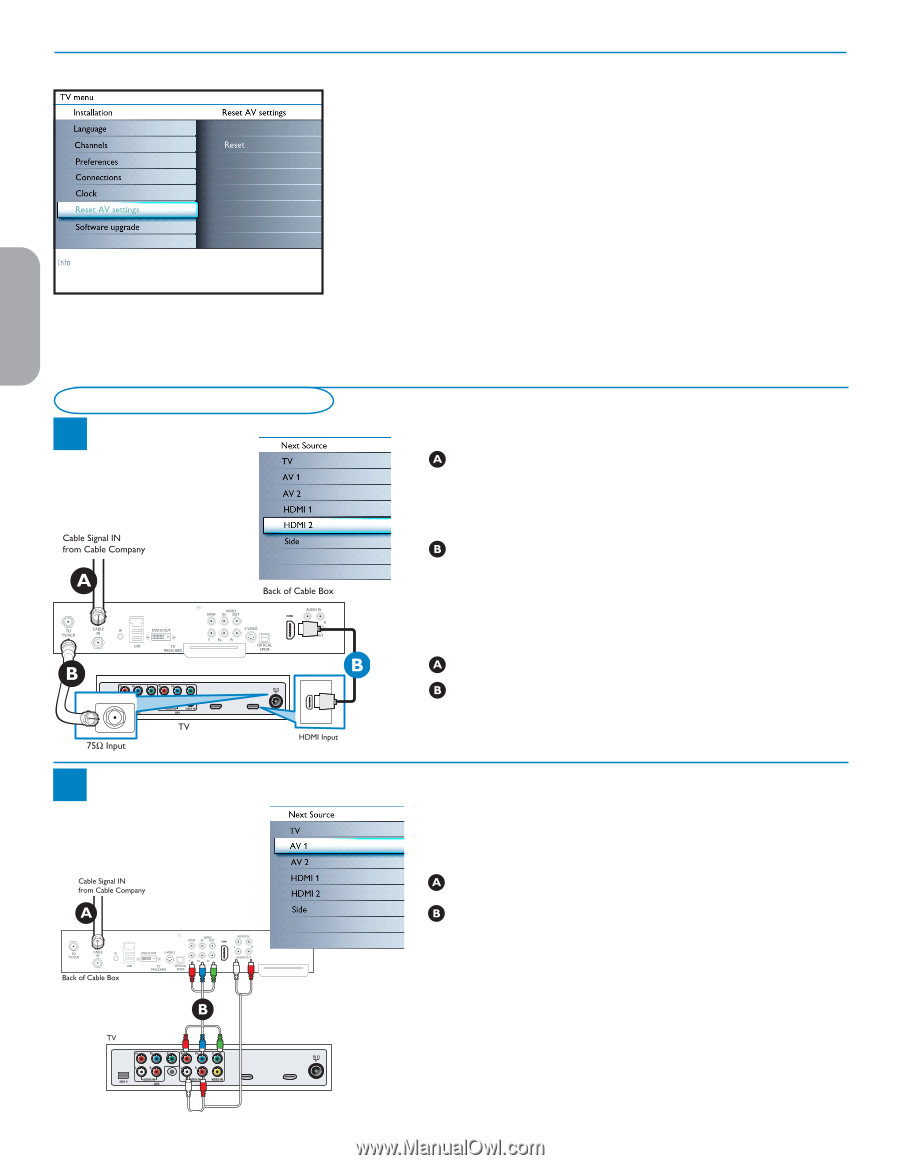
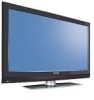
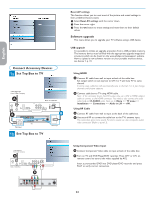
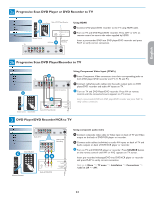
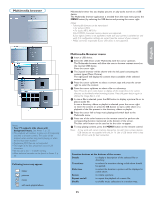
Español Française English Connect Accessory Devices 1a Set Top Box to TV AUDIO OUT (DIGITAL) HDMI 2 CABLE / ANTENNA HDMI 1 1b Set-Top Box to TV AUDIO OUT (DIGITAL) HDMI 2 CABLE / ANTENNA HDMI 1 Reset AV settings This function allows you to reset most of the picture and sound settings to their predefined factory states. & Select Reset AV settings with the cursor down. é Press the cursor right. " Press the OK button to erase settings and reset them to their default values. Software upgrade This menu allows you to upgrade your TV software using a USB device. USB upgrade It is possible to initiate an upgrade procedure from a USB portable memory. The memory device must be filled with the appropriate upgrade image (and structure) which can be found on the www.philips.com/usasupport website. How to upload a new software version on your portable memory device, see Annex 1, p. 31. Using HDMI Connect RF cable from wall to input at back of the cable box. Set output switch on set-top box to CH 3 or 4 and tune TV to same channel. In some cases, cable box will automatically tune to channel 3 or 4. Just change channels until picture appears. Connect cable box to TV using HDMI cable. Note : If the accessory device has DVI output only, use a DVI to HDMI adapter cable to connect to the HDMI connector. You need to also connect the audio cable to L and R AUDIO jacks. Next, go to Menu => TV menu => Installation => Connections => Audio in L/R => AV1. Using RF Cable Connect RF cable from wall to input at the back of the cable box. Use second RF to connect the cable box to the TV's antenna input. This connection gives mono sound. For stereo sound use also composite audio/ video connection (Refer to panel 3). Using Component Video Input Connect Component Video cable to input at back of the cable box. Turn on TV and DVD Player/DVD recorder. Press CH+ or CH- on remote control to tune to the video supplied by AV2. Insert a prerecorded DVD into DVD player/DVD recorder and press PLAY to verify correct connection. 22
-
 1
1 -
2
-
3
-
4
-
5
-
6
-
7
-
8
-
9
-
10
-
11
-
12
-
13
-
14
-
15
-
16
-
17
-
18
-
19
-
20
-
21
-
22
-
23
-
24
-
 25
25 -
 26
26 -
 27
27 -
 28
28 -
 29
29 -
 30
30 -
 31
31 -
 32
32 -
 33
33 -
 34
34 -
 35
35 -
36
-
37
-
38
-
39
-
40
-
41
-
42
-
43
-
44
-
45
 |
 |