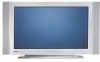
Philips 50PF7320A User manual
Philips 50PF7320A - 50" Plasma TV Manual
 |
UPC - 037849962619
View all Philips 50PF7320A manuals
Add to My Manuals
Save this manual to your list of manuals |
Philips 50PF7320A manual content summary:
- Philips 50PF7320A | User manual - Page 1
model with PHILIPS power to keep you happy with your purchase for many years to come. As a member of the PHILIPS "family," you're entitled to protection by one of the most comprehensive warranties and outstanding service SERVICEABLE PARTS INSIDE. REFER SERVICING TO QUALIFIED SERVICE problems la plus - Philips 50PF7320A | User manual - Page 2
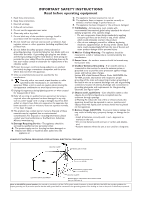
time. EXAMPLE OF ANTENNA GROUNDING AS PER NATIONAL ELECTRICAL CODE (NEC) GROUND CLAMP ANTENNA LEAD IN WIRE ANTENNA DISCHARGE UNIT (NEC SECTION 810-20) ELECTRIC SERVICE EQUIPMENT GROUNDING CONDUCTORS (NEC SECTION 810-21) GROUND CLAMPS POWER SERVICE GROUNDING ELECTRODE SYSTEM (NEC ART 250, PART - Philips 50PF7320A | User manual - Page 3
Help? If this instruction manual does not give an answer or if 'Before Calling Service' does not solve your TV problem, you can call your Local Philips Customer or Service Centre. See the supplied Worldwide guarantee booklet. Please, have the Model and Serial number which you can find at the back of - Philips 50PF7320A | User manual - Page 4
into the CableCARD slot. Do not insert the power plug in a wall socket before all connections are made. Place the TV on a solid surface or place the TV on the supplied stand. For the mounting instructions of the stand, see the Quick Start Guide leaflet supplied. For ventilation, leave at least 4" to - Philips 50PF7320A | User manual - Page 5
decodes and displays the four basic DTV picture resolution standards. - SDTV (Standard Definition TV) are broadcast as 480i (480-line interlaced) or 480p (480-line progressive scan) video. - HDTV (High-Definition TV) are broadcast either in the 1080i or 720p formats, always with a widescreen picture - Philips 50PF7320A | User manual - Page 6
indicator on the front of the TV lights up. Press the +CH/PAGE- buttons or the POWER button on the remote control. First time installation Note: The first time (and only the first time) you turn on your set you see an installation introduction screen. The Installation procedure consists of a series - Philips 50PF7320A | User manual - Page 7
system mode the remote control will remain in this mode for 60 seconds and will then return to TV mode. DEMO Demo menu on/off See p. 9. CLOCK on/off Time display (for max. 10 minutes) Color buttons When functions attached to the color buttons, the color buttons are shown on screen. = MY CONTENT - Philips 50PF7320A | User manual - Page 8
POWER DVD/R CBL TV VCR AUX ‡ DEMO SELECT CLOCK Ò º π † MY CONTENT = ® ® OK ® ® MENU PIP + + VOL MUTE CH/ PAGE the cursor up/down. Note: With HD sources not all screen formats will be available. FAVORITES • VIEW To display a list of all channels marked as favorite (incl. - Philips 50PF7320A | User manual - Page 9
POWER DVD/R CBL TV VCR AUX ‡ DEMO SELECT CLOCK Ò remote control can be used to enter digits and text. Multi-tap entry can be used to enter alphanumeric information when necessary. The characters displayed to the next character position after the specified time out or by pressing the cursor right. - Philips 50PF7320A | User manual - Page 10
highlight up and down in the list of menu items. " Press the cursor right to go deeper into the structure. • Television: TV channels leading to the list of TV channels; the left panel will contain the analog channel numbers, the one-part channel numbers and the major channel numbers in case of two - Philips 50PF7320A | User manual - Page 11
guiding instructions, help texts and messages will be displayed on your TV when using the menus or when trying to execute an action. Please, follow the instructions and read the help text which are being displayed visible on the screen. Use the features that are part of the television. & Select Demo - Philips 50PF7320A | User manual - Page 12
autoprogram. If requested, enter your PIN code to unlock all channels. See Menu preferences in the Settings, TV menu, p. 15. § Press the green button "Start" to start autoprogramming. The menu screen disappears and the progress of autoprogramming is displayed.The progress bar indicates the number of - Philips 50PF7320A | User manual - Page 13
digital subchannel, a display appears with the TV software using a USB device. USB upgrade It is possible to initiate an upgrade procedure from a USB portable memory. The memory device must be filled with the appropriate upgrade image (and structure) which can be found on the www.philips.com/support - Philips 50PF7320A | User manual - Page 14
Setup menu Notes: PIP format: PC formats via HDMI will always be displayed full screen. This menu is used to control the settings of special TV functions, features and accessory devices. The Preferences menu allows you to change settings that will typically be accessed only occasionally. The Source - Philips 50PF7320A | User manual - Page 15
channel during the transmission of a Closed Caption program. ' See Closed Caption in the TV, Features menu, see p. 22, to turn the Caption service On or Off. Note: This television provides display of television closed captioning conforming with the EIA-608 standard and in accordance with Sections 15 - Philips 50PF7320A | User manual - Page 16
Digital caption options This allows you to modify how digital captions are displayed on your TV. Select from the following options to change the visual characteristics of your TV's digital captioning. • Reset to default Select this option to reset the digital caption options back to the captions - Philips 50PF7320A | User manual - Page 17
you only want the messages with high priority to be displayed. Set/Change PIN & Select Set or Change PIN with the cursor down. é If no PIN-code exists yet, the menu item is set to Set PIN. Follow the instructions on screen. If a PIN-code has previously been entered, the menu item is set to - Philips 50PF7320A | User manual - Page 18
to identify which type of accessory device is attached to this input.The TV detects the presence of the connected device and the signal is routed when you press the AV+ button on the remote control. Digital Audio Select Digital Audio In when the TV expects digital audio for a connected device to - Philips 50PF7320A | User manual - Page 19
the cursor right to instruct the TV to get the time automatically or manually. Most of the TV channels are not time zone. Broadcasted time information will correct the clock display for your local time. & Select Time zone with the cursor down. é Press the cursor right to select your local time - Philips 50PF7320A | User manual - Page 20
inserted into the CableCARD slot at the bottom of your television. See CableCARD, p. 2. It enables you to decode digitally messages displayed on screen. The messages will remain on screen until the OK button or the corresponding color button is pressed. Removing your CableCARD & Turn off the TV. - Philips 50PF7320A | User manual - Page 21
remote control to summon the Settings menu. The TV picture Select Auto picture to display a list of predefined . Note: This Philips TV has been set at bright parts in the picture but keep the dark parts eliminates the flicker. • Pixel Plus = for everyday viewing, Pixel Plus is the most ideal setting - Philips 50PF7320A | User manual - Page 22
picture areas more noticeable as the image on the screen changes. Normally select Medium. It may be preferred to the FORMAT button on the remote control. See Use of the remote control, p. 6. Active Control The TV continuously measures and corrects time out to dismiss the Active Control display. 20 - Philips 50PF7320A | User manual - Page 23
TV Settings menu. é Press the cursor right to enter the sound menu. " Select the menu items with the cursor up/down and adjust the settings with the cursor left/right. Remember, control settings are at normal mid-range levels when the bar scale is entered. Auto sound Select Auto sound to display TV - Philips 50PF7320A | User manual - Page 24
be permanently displayed (assuming that the service is available in the broadcast) or only when mute is active. & Press the cursor right after having selected Closed captions. é Select On, Off or On during mute. Sleeptimer This sets a time period after which the TV automatically turns to standby - Philips 50PF7320A | User manual - Page 25
the instructions on screen. é Select Time and press the cursor right.This allows you to set the time after TV ratings lock Your TV is equipped with a V-chip. This allows you to control access to individual programs based on their movie and TV ratings. All settings apply to all AV inputs, except HDMI - Philips 50PF7320A | User manual - Page 26
same group are locked as well. When you select a content-based rating, all identical content-based ratings in the younger age-based categories are also selected. Age-based Rating Content-based Rating All None TV-Y TV-Y7 TV-G TV-PG TV-14 TV-MA none none none (FV) Fantasy Violence none (D) Dialog - Philips 50PF7320A | User manual - Page 27
access to individual movies based on their MPAA ratings (Motion Picture Association of America). & Select Movie ratings lock with the cursor down. A list appears, showing all valid MPAA content ratings. é Press the cursor right to enter the list. You are asked to enter your code. (See Set/Change PIN - Philips 50PF7320A | User manual - Page 28
if its configuration settings are correct (see the manual of your camera). - Philips cannot be responsible if your USB device is not supported. Viewing content from a USB device Inserting a USB device Note: USB devices are not supplied with this TV. Insert a USB device in the USB connector at - Philips 50PF7320A | User manual - Page 29
content types (Music, Picture). The right panel will display the content that is available of the selected content remote control. Notes: • Your TV supports slide shows with background music. See Annex 2, p. 39. • The playback will continue to play even if temporarily switched to browser screens - Philips 50PF7320A | User manual - Page 30
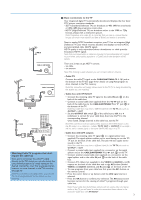
devices that can be connected to your TV.The following connection diagrams show you how to connect them to the TV. AV1 can handle YPbPr, S-VIDEO, RGB AV2 L Pb R Y HDMI 1 HDMI 2 CABLE / ANTENNA DIGITAL AUDIO OUT 75 MONITOR OUT L R VIDEO IR OUT HDMI 1 HDMI 2 CABLE / ANTENNA DIGITAL - Philips 50PF7320A | User manual - Page 31
OUT IN RECORDER Note: Do not place your recorder too close to the screen as some recorders may be susceptible for signals from the display. Keep a minimum distance of 20" from the screen. & Connect the RF Antenna or Cable TV cable (eventually via an optional two-way signal splitter and/or Cable - Philips 50PF7320A | User manual - Page 32
. Use a mono to stereo adapter (not supplied) for sound reproduction via all internal loudspeakers. HDMI 2VIDEO CABLE RF IN L / Mono R DIGITAL AUDIO OUT MONITOR OUT L R VIDEO IR OUT IN OUT RECORDER The MONITOR OUT connector can be used for a daisy chaining or to record programs from your TV - Philips 50PF7320A | User manual - Page 33
2 HDMI 2 CABLE / ANTENNA 75 DIGITAL AUDIO OUT MONITOR OUT L R VIDEO IR OUT 4 AV2 : L + R + VIDEO 1 IN OUT 3 IN OUT STB RECORDER & Use an optional signal splitter. é Connect one of the cable TV signal splitter outputs 1 to the cable box's IN jack. " Connect the other cable TV signal - Philips 50PF7320A | User manual - Page 34
2 AV1 : L + R + VIDEO VIDEO Pr OUT L Pb S-VIDEO AV2 R Y OUT 1 STB OUT IN IN OUT RECORDER CABLE / ANTENNA 3 75 & Connect the RF Antenna or Cable TV cable as described above. é Connect the AV cables 1 to the satellite receiver's or cable box's AV OUT jacks and to the recorder's AV IN - Philips 50PF7320A | User manual - Page 35
TV is capable of displaying instructions for use for definitions and connection details. - This television reviewing will not be stored as Personal setting after switch off. Warning: in case you notice scrolling images, wrong colors or no color, no picture, or even combinations of these on your screen - Philips 50PF7320A | User manual - Page 36
devices from different manufacturers have the possibility of differing output standards which may cause difficulties for the television to properly display. - In case no signal is detected from your HDMI device, turn off the HDMI device and then on again. To get an optimal viewing, it is advised to - Philips 50PF7320A | User manual - Page 37
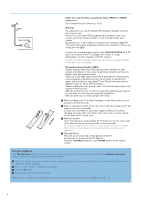
AUDIO inputs 3. Do not connect cable 1 and 2 at the same time. This may cause picture distortion ! Headphone & Insert the plug into the headphone socket as shown. é Press the MUTE button on the remote control to switch off the internal loudspeakers of the TV. The headphone impedance must be between 8 and 4000 - Philips 50PF7320A | User manual - Page 38
or TV, part instructions, may cause harmful interference to radio communications. However, there is no guarantee that interference will not occur in a particular installation. If this equipment does cause harmful interference to radio or television reception, which can be determined by turning Philips - Philips 50PF7320A | User manual - Page 39
remote control goes back to TV mode. POWER to switch to standby º for pause, ® for record, Ò for rewind (VCR, CD); search down (DVD, AMP) ‡ for stop, π for play, † for fast forward (VCR, CD); search up (DVD/AMP) INFO display and unregistered trademarks are the property of their respective owners. 37 - Philips 50PF7320A | User manual - Page 40
. Then re-insert plug into the mains socket and turn on the television again. No picture • Check antenna connections at the bottom of the TV to see if they are properly connected to the TV. • Possible broadcast station trouble.Try another channel. • Adjust the contrast and brightness settings - Philips 50PF7320A | User manual - Page 41
to repair a defective TV yourself. Check with your dealer or call a TV technician. Telephone number Philips Customer Care Center: 1-888-PHILIPS (744-5477) Please, have the Model and Product number which you can find at the back of your television set ready, before calling. Tips Care of the screen - Philips 50PF7320A | User manual - Page 42
the file "autorun.upg" to the root directory of the USB portable memory. Note: Only use software upgrades that can be found on the www.philips.com/support web site. Verifying the version of the TV software Before starting the software upgrade procedure, it is advised to check what the current - Philips 50PF7320A | User manual - Page 43
software upgrade. " Switch on your TV with the POWER button on your remote control. ' At startup the TV will scan the USB portable memory until it finds the update content.The TV will automatically go to the upgrade mode. After a few seconds it will display the status of the upgrade procedure - Philips 50PF7320A | User manual - Page 44
Philips support website (www.philips.com/support). Use the type number of your TV (e.g. 42PF7320A/37) to find this documentation and other related files. - Philips can't be held responsible for any problems preferable that URL's referencing PM content are based on a relative path starting from the - Philips 50PF7320A | User manual - Page 45
display time (in 0,1 second) of a slide. The TV application isn't obliged to support this tag. The TV application can force the use of one or multiple predefined display times Philips AlbumFile Music\Nature.mp3 50 - Philips 50PF7320A | User manual - Page 46
- The software of your TV is upgradeable. If you have problems first check if you have the latest software installed on your TV. The latest software, together with instructions, can be found on the Philips support website. Use the type number of your TV (e.g. 42PF7320A/37) to find this documentation - Philips 50PF7320A | User manual - Page 47
of one (1) year from the date of purchase, Philips will supply, at no charge, new or rebuilt replacement parts in exchange for defective parts. Philips authorized service centers will provide removal and installation of the parts for one (1) year. DISPLAY: For a periode of one (1) year from the date - Philips 50PF7320A | User manual - Page 48
46
-
 1
1 -
 2
2 -
 3
3 -
 4
4 -
 5
5 -
 6
6 -
 7
7 -
8
-
9
-
10
-
11
-
12
-
13
-
14
-
15
-
16
-
17
-
18
-
19
-
20
-
21
-
22
-
23
-
24
-
25
-
26
-
27
-
28
-
29
-
30
-
31
-
32
-
33
-
34
-
35
-
36
-
37
-
38
-
39
-
40
-
41
-
42
-
43
-
44
-
45
-
46
-
47
-
48
 |
 |

Registering your model with PHILIPS makes you eligible for all of the valuable benefits
listed below, so don’t miss out. Complete and return your Product Registration Card at
once to ensure:
Return your Warranty Registration card today to
ensure you receive all the benefits you’re entitled to
For Customer Use
Enter below the Serial No., which is
located on the rear of the cabinet. Retain
this information for future reference.
Model No. __________________________
Serial No.
__________________________
Congratulations on your purchase, and welcome to the
“family!”
Dear PHILIPS product owner:
Thank you for your confidence in PHILIPS.You’ve selected one
of the best-built,best-backed products available today.We’ll do
everything in our power to keep you happy with your
purchase for many years to come.
As a member of the PHILIPS “family,” you’re entitled to
protection by one of the most comprehensive warranties and
outstanding service networks in the industry.
What’s more,your purchase guarantees you’ll receive all the
information and special offers for which you qualify, plus easy
access to accessories from our convenient home shopping
network.
Most importantly, you can count on our uncompromising
commitment to your total satisfaction.
All of this is our way of saying welcome - and thanks for
investing in a PHILIPS product.
P.S.
To get the most from your PHILIPS purchase,be
sure to complete and return your Product
Registration Card at once.
Know these
safety
symbols
This “bolt of lightning” indicates
uninsulated material within your unit
may cause an electrical shock. For the safety
of everyone in your household, please do not
remove product covering.
The “exclamation point” calls attention
to features for which you should read
the enclosed literature closely to prevent
operating and maintenance problems.
WARNING
:To reduce the risk of fire or
electric shock, this apparatus should not be
exposed to rain or moisture and objects
filled with liquids, such as vases, should not
be placed on this apparatus.
CAUTION:
To prevent electric shock,
match wide blade of plug to wide slot, fully
insert.
ATTENTION
: Pour éviter les chocs
électriques, introduire la lame la plus large de
la fiche dans la borne correspondante de la
prise et pousser jusqu’au fond.
CAUTION
RISK OF ELECTRIC SHOCK
DO NOT OPEN
CAUTION: TO REDUCE THE RISK OF ELECTRIC SHOCK, DO NOT
REMOVE COVER (OR BACK). NO USER-SERVICEABLE PARTS
INSIDE. REFER SERVICING TO QUALIFIED SERVICE PERSONNEL.
* Proof of Purchase
Returning the enclosed card
guarantees that your date of
purchase will be on file, so no
additional paperwork will be
required from you to obtain
warranty service.
* Product Safety
Notification
By registering your product you’ll
receive notification - directly
from the manufacturer - in the
rare case of a product recall or
safety defect.
* Additional Benefits of
Product Ownership
Registering your product
guarantees that you’ll receive all
of the privileges to which you’re
entitled, including special money-
saving offers.
Visit our World Wide Web Site at www.usasupport.philips.com
t
s