Philips CD1811G User manual - Page 11
Configure your phone
 |
View all Philips CD1811G manuals
Add to My Manuals
Save this manual to your list of manuals |
Page 11 highlights
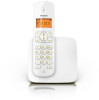
Configure your phone (country dependent) 1 When using your phone for the first time, you see a welcome message. 2 Press MENU/OK. Set the country/language Select your country/language if prompted, then press MENU/OK to confirm. »» The country/language setting is saved. Note •• The country/language setting option is country dependent. If no welcome message is displayed, it means the country/language setting is preset for your country. Then you can set the date and time. Set the date and time Tip •• To set the date and time later, press REDIAL/ C to skip this setting. 1 Press MENU/OK. 2 Select [PHONE SETUP] > [DATE/ TIME], then press MENU/OK to confirm. 3 Press the numeric buttons to enter the date, then press MENU/OK to confirm. »» The time setting menu is displayed on the handset. 4 Press the numeric buttons to enter the time. • If the time is in 12-hour format, press / to select [AM] or [PM]. 5 Press MENU/OK to confirm. Set the date and time format 1 Press MENU/OK. 2 Select [PHONE SETUP] > [DATE/ TIME], then press MENU/OK to confirm. 3 Select the setting. Select [DD/MM] or [MM/DD] as the date display and [12 HOURS] or [24 HOURS] as the time display. Then press MENU/OK to confirm. »» The setting is saved. Note •• The date and time format setting is country dependent. Charge the handset Place the handset on the base station to charge the handset. When the handset is placed correctly on the base station, your hear a docking sound. »» The handset starts charging. Note •• Charge the batteries for 8 hours before first use. •• If the handset becomes warm when the batteries are being charged, it is normal. Your phone is now ready to use. 10 EN
-
 1
1 -
2
-
3
-
4
-
5
-
 6
6 -
 7
7 -
 8
8 -
 9
9 -
 10
10 -
 11
11 -
 12
12 -
 13
13 -
 14
14 -
 15
15 -
 16
16 -
17
-
18
-
19
-
20
-
21
-
22
-
23
-
24
-
25
-
26
-
27
-
28
-
29
-
30
-
31
-
32
-
33
-
34
 |
 |
