Philips DC390/05 User Manual - Page 11
Set time and date, Turn on, Prepare the remote control, Connect power
 |
View all Philips DC390/05 manuals
Add to My Manuals
Save this manual to your list of manuals |
Page 11 highlights
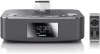
1 Open the battery compartment. 2 Insert 2 x R6/UM-3/AA size batteries with correct polarity (+/-) as indicated. 3 Close the battery compartment. Caution •• Remove battery if it is exhausted or will not be used for a long time. •• Batteries contain chemical substances, so they should be disposed of properly. •• Perchlorate Material-special handling may apply. See www.dtsc.ca.gov/hazardouswaste/ perchlorate. Prepare the remote control Caution •• Risk of explosion! Keep batteries away from heat, sunshine, or fire. Never discard batteries in fire. 1 Open the battery compartment. 2 Insert one button battery with correct polarity (+/-) as indicated. 3 Close the battery compartment. Note •• If you are not going to use the remote control for a long time, remove the batteries. Connect power Caution •• Risk of product damage! Ensure that the power voltage corresponds to the voltage printed on the back or underside of the apparatus. •• Risk of electric shock! When you unplug the AC power cord, always pull the plug from the socket. Never pull the cord. •• Before connecting the AC power cord, ensure you have completed all other connections. 12 EN Note •• The type plate is located on the bottom of the main unit. MP3 LINK FM ANTENNA 1 Connect the AC power cord to the wall outlet. Set time and date 1 In standby mode, press and hold SET TIME for two seconds. »» The hour digits begin to blink. 2 Press to select the 12/24 hour format. 3 Press / to set the hour 4 Press SET TIME to confirm. »» The minutes digits begin to blink. 5 Repeat steps 3-4 to set the minute, year, month, and day. Tip •• In 12 hour format, [MONTH--DAY] is displayed. •• In 24 hour format, [DAY--MONTH] is displayed. •• You can press to toggle between 12 hour format and 24 hour format during the whole process. Turn on 1 Press POWER. »» The unit switches to the last selected source.
-
 1
1 -
2
-
3
-
4
-
5
-
 6
6 -
 7
7 -
 8
8 -
 9
9 -
 10
10 -
 11
11 -
 12
12 -
 13
13 -
 14
14 -
 15
15 -
 16
16 -
17
-
18
-
19
 |
 |
