Philips DCB3070/10 User Manual - Page 11
Connect power, Store DAB stations, Set clock - 79
 |
View all Philips DCB3070/10 manuals
Add to My Manuals
Save this manual to your list of manuals |
Page 11 highlights
English Note If you are not going to use the remote control for a Do not use old and new or different types of batteries in combination. be disposed of properly. 2 Press OK to start to search and store DAB stations. » stations. » is broadcast. Note other radiation source. position of the antenna. Connect power Caution the rear of the main unit. Set clock Note 1 Press to switch the unit to standby. Note The type plate is located on the rear of the main unit. 1 the AC MAINS connector on the rear of the unit. Store DAB stations When you connect AC power and no DAB 1 Connect the unit to the power supply. » 2 Press and hold PROG/CLOCK SET to » SET CLOCK is displayed. » displayed. 3 Press / hour format. 4 Press PROG/CLOCK SET. » 5 Press / to set the hour. 6 Press PROG/CLOCK SET. » 7 Press / to set the minute. 8 Press PROG/CLOCK SET EN 11
-
 1
1 -
2
-
3
-
4
-
5
-
 6
6 -
 7
7 -
 8
8 -
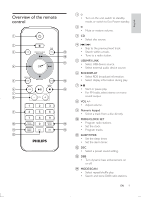 9
9 -
 10
10 -
 11
11 -
 12
12 -
 13
13 -
 14
14 -
 15
15 -
 16
16 -
17
-
18
-
19
-
20
-
21
-
22
 |
 |
