Philips HTS3544 Quick start guide - Page 2
Connect, Set up - remote code
 |
UPC - 609585127784
View all Philips HTS3544 manuals
Add to My Manuals
Save this manual to your list of manuals |
Page 2 highlights
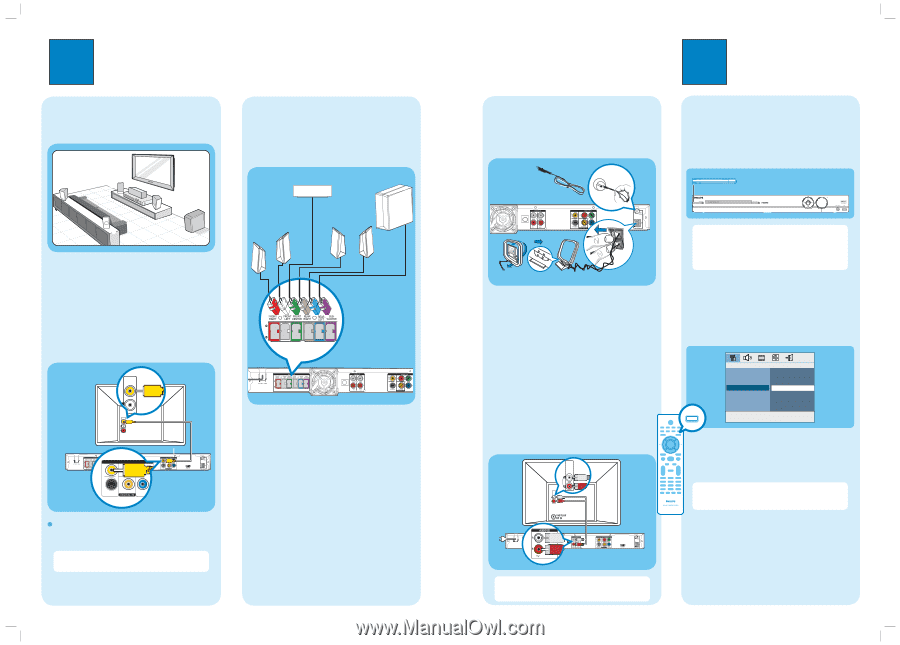
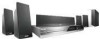
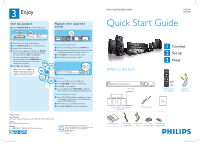
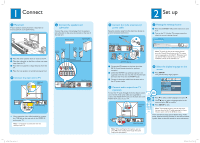
1 Connect A Placement Proper speakers system placement is important to ensure optimum sound performance. REAR LEFT LFERFOTNT CENTER RFRIGOHNTT REAR RIGHT SUBWOOFER A Place the center speaker above or close to the TV. B Place the subwoofer on the floor, at least one meter away from the TV. C Place the front speakers at equal distances from the TV. D Place the rear speakers at normal listening ear level. B Connect the main unit to TV VIDEO IN (CVBS) Television (rear) C Connect the speakers and subwoofer Connect the various colored plugs from the speakers and subwoofer to the same colored jacks at the rear of the main unit. FRONT CENTER SUBWOOFER FRONT RIGHT FRONT LEFT REAR REAR RIGHT LEFT Main Unit (rear) DOCK VIDEO IN (CVBS) CVBS DOCK VIDEO OUT Pr Y Pb S-VIDEO COAXIAL Main Unit (rear) z Use a composite video cable (supplied) to connect the CVBS jack on the main unit to the VIDEO IN jack on your TV. Note It is important to connect the main unit directly to your TV. hts354x_37qsg_eng2.indd 2 2 Set up D Connect the radio antennas and power cable Keep the antennas away from the electronic devices to prevent unwanted interference. FM antenna A Main Unit (rear) DOCK B AM/MW antenna A Connect the FM antenna to the inner pin of the FM 75 jack. Extend the wire for optimum reception. B Unfold the AM/MW loop antenna (optional - not supplied) and fix the claw into the slot. Push the tabs and insert the wires into the AM/MW jacks. C Connect in the power cable from the main unit to the AC power outlet. E Connect audio output from TV (optional) To hear the TV audio through this home theater system, use a red and white audio cables (not supplied) to connect the AUDIO IN-TV jacks on the main unit to the AUDIO OUT jacks on your TV. AUDIO OUT AUDIO OUT AUDIO IN AUDIO OUT Television (rear) Main Unit (rear) Note When watching the TV programs, you can press TV on the remote control to get the sound output from the speakers. A Finding the viewing channel A Press 2 (STANDBY ON) on the main unit to turn it on. B Turn on the TV. Use the TVs remote control to select the correct viewing channel. STANDBY-ON Note To search for the correct viewing channel, press the Channel Down button on the TVs remote control repeatedly (or AV, SELECT, ° button) until you see the Video In channel. If you are using a RF modulator, set the TV to channel 3 or 4. B Select the display language on the screen A Press SETUP. The { General Setup Page } appears. SETUP General Setup Page Disc Lock Display Dim Program OSD Language Screen Saver Sleep DivX(R) VOD Code English Espanõl Français B Press to select { OSD Language } and press . C Use keys to select a language option in the menu and press OK to confirm. D Press SETUP to exit. Note The language set here is only for the menus that are shown on the TV while operating this Home Theater system, not for the DVD disc menu. There are various setup options (Audio Setup, Video Setup, Preference Setup) available on this Home Theater System. Refer to the user manual for more information. 2007-05-02 11:01:12 AM
-
 1
1 -
 2
2
 |
 |