Philips LC7181 User Guide - Page 23
Computer adjustments
 |
View all Philips LC7181 manuals
Add to My Manuals
Save this manual to your list of manuals |
Page 23 highlights
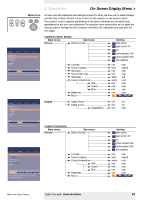
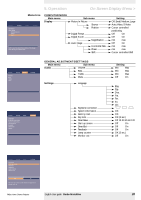
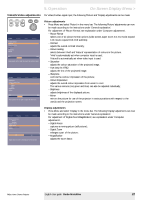
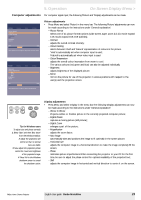
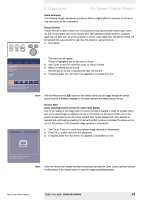
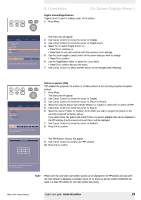
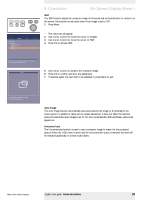
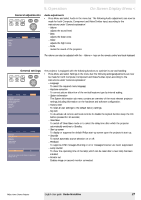
5. Operation On Screen Display Menu > Computer adjustments For computer signal input, the following 'Picture' and 'Display' adjustments can be made. Picture Display Picture format Contrast Colour tracking Saturation Hue Sharpness (more) Audio Settings min max Move pointer left or right to adjust the contrast level. Picture Display (previous) Colour temperature Red Green Blue Brightness Mirror Audio Settings min max Move pointer left or right to adjust the Red level. Picture adjustments • Press Menu and select 'Picture' in the menu bar. The following 'Picture' adjustments can now be made according to the instructions under 'General explanation': - Picture Format selects one of six picture format options (wide screen, super zoom 4:3, 4:3, movie expand 14:9, movie expand 16:9, 16:9 subtitles); - Contrast adjusts the overall contrast intensity; - Colour tracking selects between 'Vivid' and 'Natural' representation of colours in the picture. 'Vivid' is automatically set when computer input is used; 'Natural' is automatically set when video input is used. - Colour Temperature adjusts the overall colour impression from warm to cool. The various colours (red, green and blue) can also be adjusted individually. - Brightness adjusts brightness of the displayed picture; - Mirror mirrors the picture for use of the projector in various positions with respect to the user(s) and the projection screen. AV Mute Stand by Source Lamp Temp Menu OK Tip for Windows users To adjust size and phase correctly 1 Select 'Start' and then 'Shut down' from the Windows Taskbar. 2 Adjust the projectors size control, so that no vertical bars are visible. 3 Now adjust the projectors phase control for maximum brightness of the projected image. 4 Press 'No' in the Windows shutdown screen to cancel the shutdown action. Display adjustments • Press Menu and select 'Display' in the menu bar.The following 'Display' adjustments can now be made according to the instructions under 'General explanation': - Picture In Picture Projects a Video or S-Video picture in the currently projected computer picture; - Digital Freeze captures a moving picture (still picture); - Digital Zoom enlarges a part of the picture; - Magnification adjusts the zoom factor; - Auto image automatically sizes and positions the image to fit optimally in the screen picture; - Horizontal size adjusts the computer image in a horizontal direction to make the image completely fill the screen; - Phase minimises picture imperfections. When connecting the projector to your PC for the first time, be sure to adjust the phase control for optimal readability of the projected text; - Shift adjusts the computer image in horizontal and vertical direction to centre it on the screen. Philips Home Cinema Projector English User guide Garbo Matchline 23
-
 1
1 -
2
-
3
-
4
-
5
-
6
-
7
-
8
-
9
-
10
-
11
-
12
-
13
-
14
-
15
-
16
-
17
-
 18
18 -
 19
19 -
 20
20 -
 21
21 -
 22
22 -
 23
23 -
 24
24 -
 25
25 -
 26
26 -
 27
27 -
 28
28 -
29
-
30
-
31
-
32
-
33
-
34
 |
 |
