Philips MG7770 User manual - Page 4
Disposal, Full Ten-Year Warranty, Storage, Assistance, Cleaning - 28
 |
View all Philips MG7770 manuals
Add to My Manuals
Save this manual to your list of manuals |
Page 4 highlights
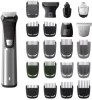
Nose trimmer Use the nose trimmer to trim your nose hair and ear hair. -- Make sure nasal passages are clean. Make sure outer ear channels are clean and free from wax. -- Do not insert the tip more than 3/16in./5mm. -- Always clean the attachment after each use. Trimming nose hair 1 Gently move the tip in and out of nose while turning it around to remove unwanted hairs (Fig. 21). Trimming ear hair 1 Slowly move the tip round the ear to remove hairs that stick out beyond the rim of the ear. 2 Gently move the tip in and out of the outer ear channel to remove unwanted hairs (Fig. 21). Precision shaver Use the precision shaver after trimming, to shave unwanted hairs on cheeks, chin and along the beard with precision. Make sure to pre-trim your beard first, with the full-size hair trimmer without guard, to obtain the best result. Note: Use the precision shaver to remove remaining hairs and detailing your beard style. It is not suitable for a full face shave. 1 Gently press the precision shaver onto the skin and shave along contoured edges to remove any unwanted hairs (Fig. 22). Cleaning Never use scouring pads, abrasive cleaning agents or aggressive liquids such as gasoline or acetone to clean the product. Never dry the trimmer teeth with a towel or tissue, as this may damage the trimmer teeth. After every use: cleaning under the tap 1 Turn off the product and disconnect from the power outlet. 2 Remove any guard or cutting element (see 'Detaching and attaching cutting elements') from the product. 3 Rinse the hair chamber under a warm tap. 4 Clean the cutting element and guard under a warm tap. 5 Carefully shake off excess water and let all parts air dry completely. Thorough cleaning 1 Turn off the product and disconnect from the power outlet. 2 Clean the handle under the tap or wipe the handle clean with a dry or moist cloth. 3 Remove any guard or cutting element (see 'Detaching and attaching cutting elements') from the product. 4 Remove any hairs that have accumulated in the hair chamber with the cleaning brush supplied. 5 Remove any hairs that have accumulated in the cutting elements and/or guards with the cleaning brush supplied. 6 Clean the cutting elements under a warm tap. 7 Clean the guards under a warm tap. 8 Carefully shake off excess water and let all parts air dry completely. Cleaning the nose trimmer Clean the nose trimmer immediately after use and when a lot of hair or dirt has accumulated on the nose trimmer head. 1 Rinse the nose trimmer head with hot water (Fig. 23). 2 Turn on the product and rinse the nose trimmer head once more to remove any remaining hairs. Then turn off the product again. For a thorough clean, immerse the nose trimmer head in a bowl with warm water for a few minutes and then turn on the product to remove stubborn hair/debris. 3 Carefully shake off excess water and let all parts air dry completely. Cleaning the precision shaver 1 Hold the precision shaver at the grooves on each side and pull the top part off the bottom part (Fig. 24). 2 Blow and/or shake out any hair that has accumulated inside the precision shaver (Fig. 25). 3 Clean the top part of the precision shaver under a warm tap (Fig. 26). 4 Carefully shake off excess water and let all parts air dry completely. 5 Reattach the top part onto the bottom part of the precision shaver. Cleaning the body shaver 1 Remove the skin protector upwards off the shaver. 2 Clean the skin protector and body shaver under a warm tap (Fig. 27). 3 Carefully shake off excess water and let both parts air dry completely. 4 Reattach the skin protector onto the body shaver (Fig. 14). This product has no other user-serviceable parts. For assistance call 1-800-243-3050. Storage -- Store the product in the pouch supplied. Make sure the product is dry before you store it in the pouch. -- Be sure the product is switched off. Remove cord from outlet and the product before storing it in a safe, dry location where it will not be crushed, banged, or subject to damage. -- Do not wrap cord around the product when storing. -- Store cord in a safe location where it will not be cut or damaged. -- Do not place or store the product where it can fall or be pulled into a tub or sink, water or other liquid while plugged in. Assistance For assistance, visit our website: www.philips.com/support or call toll free 1-800-243-3050. Online information is available 24 hours a day, 7 days a week. Disposal -- This product contains a rechargeable lithium-ion battery which must be disposed of properly (Fig. 28). Contact your local town or city officials for battery disposal information. You can also call 1-800-822-8837 or visit www.call2recycle.org for battery drop-off locations. -- For assistance, visit our website www.philips.com/support or call 1-800-243-3050 toll free. -- Your product is designed and manufactured with high quality materials and components, which can be recycled and reused. For recycling information, please contact your local waste management facilities or visit www.recycle.philips.com Full Ten-Year Warranty Philips North America LLC warrants this new product (except foil, cutters and guards) against defects in materials or workmanship for a period of ten years from the date of purchase, and agrees to repair or replace any defective product without charge. IMPORTANT: This warranty does not cover damage resulting from accident, misuse or abuse, lack of reasonable care, the affixing of any attachment not provided with the product or loss of parts or subjecting the product to any but the specified voltage or batteries.* NO RESPONSIBILITY IS ASSUMED FOR ANY SPECIAL, INCIDENTAL OR CONSEQUENTIAL DAMAGES. In order to obtain warranty service, simply go to www.philips.com/support for assistance. It is suggested that for your protection you return shipments of product by insured mail, insurance prepaid. Damage occurring during shipment is not covered by this warranty. NOTE: No other warranty, written or oral, is authorized by Philips North America LLC.
-
 1
1 -
 2
2 -
 3
3 -
 4
4 -
 5
5
 |
 |