Philips MX3950D User manual - Page 14
Step 4, Connecting FM/AM, antennas, Step 5, Connecting the power - 37 tv
 |
View all Philips MX3950D manuals
Add to My Manuals
Save this manual to your list of manuals |
Page 14 highlights
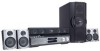
English Connections Step 4: Connecting FM/AM antennas Step 5: Connecting the power cord ➠ fix the claw into the slot AM antenna 1 FM antenna 2 SPEAKER SYSTEMS (4Ω) SUBWOOFER SURROUND CENTER FRONT L AM R FM ANTENNA C AUDIO VIDEO DIGITAL AUX TV LINE OUT Pr SL OUT IN IN OUT CVBS SR L Pb SUB R DIGITAL IN Y S-VIDEO 1 Connect the supplied AM loop antenna to the AM jack. Place the AM loop antenna on a shelf or attach it to a stand or wall. 2 Connect the supplied FM antenna to the FM jack. Extend the FM antenna and fix its ends to the wall. For better FM stereo reception, connect an external FM antenna (not supplied.) AM FM ANTENNA Notes: - Adjust the position of the antennas for optimal reception. - Position the antennas as far as possible from your TV, VCR or other radiation source to prevent unwanted interference. AM FM ANTENNA DIGITAL OUT AUDIO AUX TV LINE IN IN OUT L VIDEO OUT Pr CVBS Pb R DIGITAL IN Y S-VIDEO P-SCAN ON OFF ~ AC MAINS AUDIO OUT COMPONENT VIDEO IN S-VIDEO IN Pr/Cr VIDEO IN Pb/Cb Y ~ AC MAINS Power Outlet After everything is connected properly, plug in the AC power cord to the power outlet. Never make or change any connections with the power switched on. On the DVD system, "AUTO INSTALL - PRESS PLAY" may appear on the display panel. Press ÉÅ on the front panel to store all available radio stations or press Ç to exit (see page 34 "Tuner Operations".) PLAY • PAUSE ISC CHANGER AUTO INSTALL - PR SURR. LEFT LEFT CENTER SUBWOOFER RIGHT SURR. RIGHT PLAY• PAUSE STOP SEATING SOURCE SEARCH SURROUND PROG TUNING CLOCK•TIMER DVD VIDEO DIGITAL SURROUND SYSTEM VOLUME TREBLE BASS 14 pg 001-044_MX39-37-Eng1 14 2/25/03, 10:28 AM 3139 115 21993
-
 1
1 -
2
-
3
-
4
-
5
-
6
-
7
-
8
-
 9
9 -
 10
10 -
 11
11 -
 12
12 -
 13
13 -
 14
14 -
 15
15 -
 16
16 -
 17
17 -
 18
18 -
 19
19 -
20
-
21
-
22
-
23
-
24
-
25
-
26
-
27
-
28
-
29
-
30
-
31
-
32
-
33
-
34
-
35
-
36
-
37
-
38
-
39
-
40
-
41
-
42
-
43
-
44
 |
 |
