Philips SPA5210B User manual - Page 3
Windows Device Manager, System Requirements, Installation - soundbar
 |
UPC - 609585192225
View all Philips SPA5210B manuals
Add to My Manuals
Save this manual to your list of manuals |
Page 3 highlights
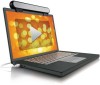
EN NOTE: 1. Before you install the notebook SoundBar, ensure that a working USB controller is listed in Windows Device Manager on your computer. 2. Ensure that the notebook SoundBar is installed properly before using. 3. Never unplug the USB connector while the notebook SoundBar is playing sound. System Requirements: PC Windows® 98SE, Windows® ME, Windows® 2000, Windows® XP, or Windows® Vista™ Certified USB controller Mac Mac OS9/OS® X, or later Built-in USB connection Installation: 11 Slide down the clip (Fig. 1). 22 Clip the notebook SoundBar on the top of the notebook screen and gently tighten the screw on the back (Fig. 1). 33 Plug the USB plug into a USB port on the notebook (Fig. 2). 44 Open your multimedia application software, and then adjust the volume (Fig. 3). 55 When you have finished using the SoundBar, exit the multimedia application software. 66 Unplug the USB cable from the notebook and release gently the screw to remove the SoundBar from the top of the screen. 77 Wrap the USB cable and plug around the SoundBar in the slot, and then store the notebook SoundBar in the pouch (Fig. 4 & 5).
-
 1
1 -
 2
2 -
 3
3 -
 4
4 -
 5
5 -
 6
6 -
 7
7
 |
 |
