Philips SPZ2500 User manual - Page 5
Functional overview - lighting
 |
View all Philips SPZ2500 manuals
Add to My Manuals
Save this manual to your list of manuals |
Page 5 highlights
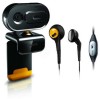
English Functional overview a b c d e f g i h i Cable holder • Hold the cable for cable management k j j Headphone plug • Connect to the socket on the computer k Microphone plug • Connect to the computer socket on the a Focus ring • Adjust the focus of the image manually b Snapshot button • With Philips applications installed, take photos directly c Power LED • Lights up when the webcam is in use d Slide cover • Protect your privacy and the lens e Built-in microphone • Capture voice and sound during video calling and recording f Rotating joint • Change the viewing field of the webcam manually g Clamp with rubber rims • Mount the webcam on your (flat panel) PC monitor or notebook screen h USB connector • Connect the webcam to the USB port of the notebook or desktop PC • Supply power to the webcam when it is connected to the notebook or desktop PC EN 3
-
 1
1 -
 2
2 -
 3
3 -
 4
4 -
 5
5 -
 6
6 -
 7
7 -
 8
8 -
 9
9 -
 10
10 -
 11
11 -
12
-
13
-
14
-
15
-
16
-
17
-
18
-
19
-
20
 |
 |
