Philips SRU4105WM User manual - Page 7
Setting Any Mode to Use its Own Volume - codes
 |
UPC - 609585156661
View all Philips SRU4105WM manuals
Add to My Manuals
Save this manual to your list of manuals |
Page 7 highlights
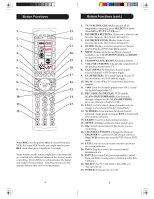
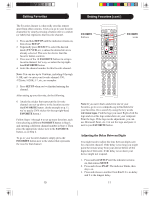
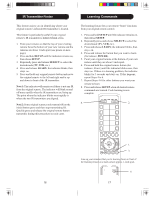
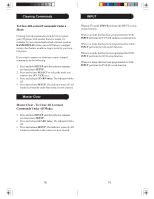
Setup Programming Combo Device Codes Some combo (combination) devices (TV/VCR, TV/DVD, DVD/VCR, etc.) require you to set up 2 different modes to control both parts of the combo. For example, if you have a TV/DVD combo, you might need to set up one code under the TV mode to control the TV and a separate code (under other modes) to control the DVD. VCR/DVD/DVR Punch-Through Feature This remote allows the 6 VCR buttons (PLAY, PAUSE, STOP, SCAN+, SCAN-, and REC) to "punch-through" (transmit or hand-over) control from any mode programmed with TV or Cable codes to the last VCR, DVD, or DVR mode used. For example, if you have 2 DVD, VCR, or DVR devices programmed into this remote, the last device you used controls the 6 VCR buttons. Note: This feature will not operate if the programmed TV, SAT or Cable code has its own VCR transport button control e.g. a TV Combo, SAT/PVR, etc. Volume/Mute Control and Punch-Through Feature Your remote allows you to select which device mode controls VOLUME and MUTE. This remote is initially set for all device modes to use their own Volume/Mute control if present. If the programmed code does not have Volume/Mute operation, then VOLUME and MUTE will "punchthrough" (hand-over) control to the TV-mode device without you needing to change to TV mode. Note: Any mode chosen for Volume/Mute control must have its own Volume/Mute function or else VOLUME and MUTE will not function. Setup (cont.) Setting ALL Volume/Mute Controls to Any Mode You can set all modes to "punch-through" to any mode for Volume/Mute control without needing to change to that mode by doing the following. 1. Press and hold SETUP until the indicator remains on, then release SETUP. 2. Press and hold MUTE until the indicator blinks off, then release the button. 3. Press and release SELECT to select the desired mode (TV, VCR, etc.) for Volume/Mute control; the indicator blinks, then stays on. 4. Press and release MUTE; the indicator turns off. Note: The indicator will blink rapidly for 3 seconds if the mode you have selected does not have Volume/ Mute control. 5. All other modes will now "punch-through" to your chosen mode for Volume/Mute control. Setting Any Mode to Use its Own Volume/ Mute Control You can set any mode to use only its own Volume/Mute control. Note: If your chosen mode does not have Volume/Mute functions, then this remote's VOLUME and MUTE will not operate. 1. Press and hold SETUP until the indicator remains on, then release SETUP. 2. Press and hold MUTE until the indicator blinks off, then release the button. 3. Press and release SELECT to select the desired mode (TV, VCR, etc.); the indicator blinks, then stays on. 4. Press and release VOLUME- (down); the indicator blinks, then stays on. 5. Press and release MUTE; the indicator turns off. 6. All modes will now "punch-through" to the respective modes you have chosen for Volume/ Mute control. 12 13
-
 1
1 -
 2
2 -
 3
3 -
 4
4 -
 5
5 -
 6
6 -
 7
7 -
 8
8 -
 9
9 -
 10
10 -
 11
11 -
 12
12 -
13
-
14
-
15
-
16
-
17
-
18
-
19
-
20
-
21
-
22
-
23
 |
 |