Philips US2-PMDVR8W User manual - Page 5
Battery Installation, Battery Saver, Code Saver, Power-On Default, Code Setup, Audio Functions
 |
View all Philips US2-PMDVR8W manuals
Add to My Manuals
Save this manual to your list of manuals |
Page 5 highlights
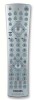
Button Functions, cont. Audio Functions (labeled in Red) PRESET Used to operate preset channels while in Audio Mode. AM/FM Lets you to select the AM/FM band on your audio receiver. CD, TAPE, TUNER, TV, VIDEO 1, and VIDEO 2 Used to select your audio receiver's input source. (Works in AUDIO Mode, i.e. after pressing Red AUDIO button). FUNCTION Selects the different audio input devices. The number buttons also select the function labeled above the buttons when in AUDIO Mode. LEVEL+/LEVEL - Sets the level of the speakers during test tone Mode. DSP ON/OFF Enables the receiver's Digital Signal Processing (DSP) Mode. DSP MODE When the DSP Mode is enabled, pressing this button lets you cycle through the various DSP Modes. PROG Lets you program the playback order of tracks on your disc. DELAY - and DELAY+ Increases or decreases the delay between the surround and main speakers when your receiver is in the surround sound Mode. ON/OFF, SURR, MODE ON/OFF SURR toggles the surround Modes on and off. SURR MODE cycles through your receiver's various surround sound Mode settings. F, C, R, T (Front, Center, Rear, and Test) Adjusts the levels of the front, center, and rear speakers respectively. Used with Level + /Level - . The test tone must be enabled first by pressing the TEST button. TV/VCR/DVR When in TV mode the TV/VCR/DVR button performs the INPUT source switch function. When in a mode that has been programmed for VCR the TV/VCR/DVR button performs the TV/VCR antenna switch function. When in a mode that has been programmed for Cable the TV/VCR/DVR button performs the A.B switch function. When in a mode that has been programmed for SAT the TV/VCR/DVR button performs the TV/SAT switch function. When in a mode that has been programmed for DVD the TV/VCR/DVR button performs the DVD Setup function. 8 Setup Battery Installation 1. On the back of the remote, push down on the tab and lift the cover off. 2. Match the batteries to the + and - marks inside the battery case, then insert 2 AAA Alkaline batteries. 3. Press the battery cover back into place. Battery Saver Your remote automatically turns off if the buttons are depressed more than 30 seconds. This will save your batteries should your remote get stuck in a place where the buttons remain depressed (e.g., between the sofa cushions). Code Saver Codes are stored in permanent memory while you are changing batteries so you will not lose any codes stored in the remote while you are changing batteries. Power-On Default The remote powers on in TV mode. Code Setup The CODE SEARCH button is used to setup the remote. You can either setup the remote using the code for your brand of product, from the code tables (on separate sheet), or you can search through the library of codes until you find a code that works for your product. Please refer to "Code Search" on page 10 for more information on using the code search feature to learn how to search through the library of codes for your products. NOTE: You can store any kind of code under any mode (except TV). I.E. you can store a VCR code under the CBL button, or a DVD code under the VCR button, etc. However, you can only store TV codes under the TV button. 9
-
 1
1 -
 2
2 -
 3
3 -
 4
4 -
 5
5 -
 6
6 -
 7
7 -
 8
8 -
 9
9 -
 10
10 -
 11
11 -
12
-
13
-
14
-
15
-
16
-
17
-
18
-
19
-
20
-
21
-
22
-
23
-
24
-
25
-
26
-
27
-
28
-
29
-
30
-
31
-
32
-
33
-
34
-
35
-
36
-
37
-
38
-
39
 |
 |
