Pioneer 106S Operating Instructions - Page 7
A Hardware Tour - 2 dvd
 |
View all Pioneer 106S manuals
Add to My Manuals
Save this manual to your list of manuals |
Page 7 highlights
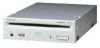
A HARDWARE TOUR Illustrations are provided in this chapter as a visual introduction to the Drive. Please Familiarize yourself with these illustrations and refer to them when necessary to complete the installation and operation of the unit. FRONT VIEW DVD-ROM DRIVE PHONES BUSY 1 54 3 2 1 Disc loading slot Insert the DVD-ROM or CD-ROM with the label facing up. Precautions on playing 8 cm/3-inch Discs ¶ When playing 8 cm/3-inch discs, always use the adapter for 8 cm/3-inch discs. Before loading the disc into the DVD-ROM drive unit, be sure to check that it is secured properly by the catches of the adapter. If discs have been inserted without the adapter by mistake, remove the disc immediately by pressing the eject button. If the disc does not come out with one press, press it once again. ¶ Use 8 cm/3-inch disc adapters labeled with the ' mark (recommended standard product). Do not use adapters which cause the disc to idle, nor adapters which are bent or curved. 2 Eject (0) button This button is used to eject the disc. 3 BUSY indicator Flashes during data access. 4 Volume control (headphone level) This is used to adjust the volume level of the headphone jack. 5 Headphone jack (PHONES) This is a stereo minijack for headphones. 7 En
-
 1
1 -
 2
2 -
 3
3 -
 4
4 -
 5
5 -
 6
6 -
 7
7 -
 8
8 -
 9
9 -
 10
10 -
 11
11 -
 12
12 -
13
-
14
-
15
-
16
-
17
-
18
-
19
-
20
-
21
-
22
-
23
-
24
-
25
-
26
-
27
-
28
-
29
-
30
-
31
-
32
-
33
-
34
-
35
-
36
-
37
-
38
-
39
-
40
-
41
-
42
-
43
-
44
-
45
-
46
-
47
-
48
 |
 |
