Pioneer AVH-P3200DVD Installation Manual
Pioneer AVH-P3200DVD Manual
 |
UPC - 012562975733
View all Pioneer AVH-P3200DVD manuals
Add to My Manuals
Save this manual to your list of manuals |
Pioneer AVH-P3200DVD manual content summary:
- Pioneer AVH-P3200DVD | Installation Manual - Page 1
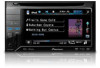
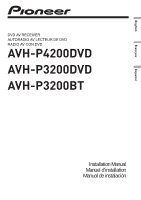
English Français Español DVD AV RECEIVER AUTORADIO AV LECTEUR DE DVD RADIO AV CON DVD AVH-P4200DVD AVH-P3200DVD AVH-P3200BT Installation Manual Manuel d'installation Manual de instalación - Pioneer AVH-P3200DVD | Installation Manual - Page 2
view camera.... 9 When connecting the external video component and the display 10 When using a display connected to rear video output 10 Installation 11 Installation using the screw holes on the side of the unit 11 Installing the microphone (AVH-P3200BT only 12 When installing the microphone - Pioneer AVH-P3200DVD | Installation Manual - Page 3
the car) Important • This unit cannot be installed in a vehicle without ACC (accessory) position on the ignition switch. near the heater white cable. Connect this cable to the system remote control of an external power amp or the vehicle's auto-antenna relay control terminal (max. 300 mA 12 V DC - Pioneer AVH-P3200DVD | Installation Manual - Page 4
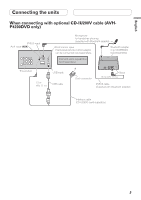
to sparately sold USB device. 1.5 m (4 ft. 11 in.) Black IP-BUS cable (Supplied with Bluetooth adapter) Connecting the system (AVH-P3200BT) IP-BUS input Wired remote input Hard-wired remote control adaptor can be connected (sold separately). HD radio tuner (sold separately) This product - Pioneer AVH-P3200DVD | Installation Manual - Page 5
input (AUX) Microphone for hands-free phoning (supplied with Bluetooth adapter) Wired remote input Hard-wired remote control adaptor can be connected (sold separately). Bluetooth adapter (e.g. CD-BTB200) (sold separately) iPod with video capabilities (sold separately) This product USB input - Pioneer AVH-P3200DVD | Installation Manual - Page 6
(Supplied with Navigation unit) Insert the 26 pin cable in the direction indicated in the figure. RGB input This product Antenna input AUX jack (3.5 ø) (AVH-P4200DVD only) Fuse (10 A) Use a mini plug cable to connect with auxiliary device. Microphone input (AVH-P3200BT only) (AVHP4200DVD - Pioneer AVH-P3200DVD | Installation Manual - Page 7
Connecting the units English 4 m (13 ft. 1 in.) Microphone (AVH-P3200BT only) Wired remote input Hard-wired remote control adaptor can be connected (sold separately). Fuse resistor Violet/white Of the two lead wires connected to the back lamp, connect the one in which the voltage changes when - Pioneer AVH-P3200DVD | Installation Manual - Page 8
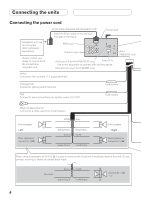
Rear output (AVH-P4200DVD/AVH-P3200BT only) Front output To rear output To front output Subwoofer output This product (AVH- P4200DVD only) terminal of the power amp or auto-antenna relay control terminal. (max. 300 mA 12 V DC). System remote control Left Right Subwoofer Subwoofer - Pioneer AVH-P3200DVD | Installation Manual - Page 9
input (R.C IN) (AVH-P4200DVD/AVH-P3200BT only) CAUTION You must use a camera which outputs mirror reversed images. This product To video output RCA cable (sold separately) (AVH-P4200DVD only) Rear view camera (sold separately) Fuse resistor Violet/white Of the two lead wires connected to the - Pioneer AVH-P3200DVD | Installation Manual - Page 10
video input To audio input Video input (V IN) Rear monitor output (V OUT) (AVH-P4200DVD/AVH-P3200BT only) RCA cables (sold separately) Rear audio output (REAR AUDIO OUT) Mini pin plug cable (sold separately) To video output This product Audio input (AVH-P4200DVD only) (L IN, R IN) To audio - Pioneer AVH-P3200DVD | Installation Manual - Page 11
. If the pawl gets in the way, bend it down. Factory radio mounting bracket • When installing, to ensure proper heat dispersal when using this unit, make sure of vehicles, this unit cannot be properly installed. In such case, use the optional installation kit (ADT-VA133). Note In some types of - Pioneer AVH-P3200DVD | Installation Manual - Page 12
Installation Installing the microphone (AVH-P3200BT only) Installation notes Install the microphone in a position and orientation that will enable it to pick up the voice of the person operating the system. 2. Install the microphone clip on the sun visor. • With the sun visor up, install the - Pioneer AVH-P3200DVD | Installation Manual - Page 13
English Installation 2. Install the microphone clip on the steering column. Double-sided tape Install the microphone clip on the rear side of the steering column. Clamp Use separately sold clamps to secure the lead where necessary inside the vehicle. - Pioneer AVH-P3200DVD | Installation Manual - Page 14
Installation 11 Installation à l'aide des perçages sur le côté de l'appareil 11 Installation du microphone (AVH-P3200BT seulement 12 Installation du microphone sur le pare-soleil .......12 Installation les travaux d'installation et d'entretien de votre écran au personnel de service Pioneer agréé. - Pioneer AVH-P3200DVD | Installation Manual - Page 15
ou un dysfonctionnement. • Pour éviter tout court-circuit, surchauffe ou mauvais fonctionnement, assurez-vous de suivre les instructions ci-dessous. - Déconnectez la borne négative de la batterie avant l'installation. - Fixez le câblage avec des serre-fils ou de la bande adhésive. Pour protéger le - Pioneer AVH-P3200DVD | Installation Manual - Page 16
avec cet appareil) Raccordez-le à un périphérique USB vendu séparément. Noir 1,5 m Câble IP-BUS (fourni avec l'adaptateur Bluetooth) Raccordement du système (AVH-P3200BT) Entrée IP-BUS Cet appareil Entrée pour télécommande câblée Un adaptateur de télécommande câblée peut être connecté à cette - Pioneer AVH-P3200DVD | Installation Manual - Page 17
câblée Un adaptateur de télécommande câblée peut être connecté à cette prise (vendu séparément). iPod avec capacité vidéo (vendu séparément) Adaptateur Bluetooth (par ex. CD-BTB200) (vendu séparément) Cet appareil Entrée USB 1,5 m Câble USB Connecteur Dock Noir 1,5 m Câble IP-BUS (fourni avec - Pioneer AVH-P3200DVD | Installation Manual - Page 18
sur les unités de navigation pouvant être raccordées. Entrée RGB Entrée d'antenne (AVH-P4200DVD seulement) Prise AUX (3,5 ø) (AVH-P4200DVD seulement) Fusible (10 A) Utilisez un câble a fiches mini pour raccorder un appareil auxiliaire. Entrée microphone (AVH-P3200BT seulement) Jaune Connectez - Pioneer AVH-P3200DVD | Installation Manual - Page 19
Raccordements des appareils Français 4 m Microphone (AVH-P3200BT seulement) Entrée pour télécommande câblée Un adaptateur de Coupure du son, câblez ce fil au fil Coupure Audio de cet équipement. Sinon, ne connectez rien au fil Coupure Audio. Méthode de connexion 1. Serrez le conducteur. 2. - Pioneer AVH-P3200DVD | Installation Manual - Page 20
des appareils Raccordements à un amplificateur de puissance vendu séparément Sortie arrière (AVH-P4200DVD/AVH-P3200BT seulement) Sortie avant À la sortie arrière À la sortie avant Sortie du caisson (AVH- de grave Cet appareil P4200DVD seulement) À la sortie du caisson de grave - Pioneer AVH-P3200DVD | Installation Manual - Page 21
ou plus loin qu'en réalité. ATTENTION Entrée de la caméra de recul (R.C IN) (AVH-P4200DVD/AVH-P3200BT seulement) Vous devez utiliser une caméra capable de fournir des images inversées, comme dans un caméra de recul, vous devez régler correctement l'option Camera Polarity dans le menu System. 9 - Pioneer AVH-P3200DVD | Installation Manual - Page 22
du moniteur arrière (V OUT) (AVH-P4200DVD/AVH-P3200BT seulement) Câbles à fiches Cinch (RCA) (vendu séparément) Sortie audio arrière (REAR AUDIO OUT) Câble à fiches mini arrière La sortie vidéo arrière et la sortie audio arrière de cet appareil sont destinées au raccordement d'un écran permettant - Pioneer AVH-P3200DVD | Installation Manual - Page 23
est gênante, tordez-la vers bas. Support de montage d'origine • Lors de l'installation de l'appareil, laissez suffisamment d'espace derriè hicules, cet appareil ne peut pas être installé correctement. Dans ce cas, utilisez le kit d'installation optionnel (ADT-VA133). Remarque Dans certains types - Pioneer AVH-P3200DVD | Installation Manual - Page 24
Installation Installation du microphone (AVH-P3200BT seulement) Notes d'installation Installez et orientez le microphone à un endroit le fil de manière qu'il ne fasse pas obstacle à la conduite. Installation du microphone sur le pare-soleil 1. Fixez le microphone sur l'attache du microphone. - Pioneer AVH-P3200DVD | Installation Manual - Page 25
Français Installation 2. Fixez l'attache du microphone sur la colonne de direction. Bande adhésive double face Installez l'attache du microphone sur l'arrière de la colonne de - Pioneer AVH-P3200DVD | Installation Manual - Page 26
11 Instalación del micróphono (solamente AVH-P3200BT 12 Cuando instale el micrófono en la visera 12 Cuando instale el micrófono en la base del volante deben usarse las funciones de DVD de esta unidad. PRECAUCIÓN • PIONEER no recomienda que sea usted mismo quien instale o revise su pantalla. - Pioneer AVH-P3200DVD | Installation Manual - Page 27
salida) y de entre 4 Ω y 8 Ω (valor de impedancia). No utilice altavoces de 1 Ω a 3 Ω con esta unidad. • El cable negro es el cable a tierra. Cuando instale esta unidad o el amplificador de potencia (vendido por separado), siempre conecte primero el cable a tierra. Compruebe que el cable de tierra - Pioneer AVH-P3200DVD | Installation Manual - Page 28
con esta unidad) Conecte al dispositivo USB vendido separadamente. 1,5 m Negro Cable IP-BUS (suministrado con el adaptador Bluetooth) Conexión del sistema (AVH-P3200BT) Entrada IP-BUS Entrada remota cableada Se puede conectar el adaptador de control remoto cableado (vendido separadamente - Pioneer AVH-P3200DVD | Installation Manual - Page 29
Conexión de las unidades Cuando conecte con el cable CD-IU200V opcional (solamente AVH-P4200DVD) Entrada IP-BUS Entrada AUX (AUX) Micrófono para telefonía de manos libres (suministrado con el adaptador Bluetooth) Entrada remota cableada Se puede conectar el adaptador de control remoto cableado ( - Pioneer AVH-P3200DVD | Installation Manual - Page 30
-P4200DVD) Fusible (10 A) Utilice un cable con enchufe miniatura para conectar a un dispositivo auxiliar. Entrada del micrófono (solamente AVH-P3200BT) Amarillo Conecte el terminal de suministro de 12 V constante. Anaranjado/blanco Conecte al terminal de interruptor de iluminación. Resistencia de - Pioneer AVH-P3200DVD | Installation Manual - Page 31
Micrófono (solamente AVH-P3200BT) Entrada remota audio sin ninguna conexión. Método de conexión 1. Apriete el cable. 2. Apriete firmemente con alicates de punta de aguja. Nota: · La posición del freno de estacionamiento depende del modelo del vehículo. Para conocer detalles, consulte el manual - Pioneer AVH-P3200DVD | Installation Manual - Page 32
Conexión de las unidades Cuando conecte a un amplificador de potencia vendido separadamente Salida trasera (solamente AVH-P4200DVD/AVH-P3200BT) Salida delantera A la salida trasera A la salida delantera Salida de altavoz de (solamente subgraves AVHEste producto P4200DVD) A salida de altavoz - Pioneer AVH-P3200DVD | Installation Manual - Page 33
realmente están. Entrada para cámara de vista trasera (R.C IN) (solamente AVH-P4200DVD/AVH-P3200BT) PRECAUCIÓN Se debe utilizar una cámara que genere imágenes invertidas de hacia atrás. • Se requiere ajustar Camera Polarity adecuadamente en el menú System cuando conecte la cámara de vista trasera. - Pioneer AVH-P3200DVD | Installation Manual - Page 34
posterior (V OUT) (solamente AVH-P4200DVD/ AVH-P3200BT) Salida de audio trasera (REAR AUDIO OUT) Cable RCA (vendido audio trasera de este producto son para la conexión de una pantalla que permite la contemplación de DVD, etc. a los pasajeros en los asientos traseros. ADVERTENCIA No instale - Pioneer AVH-P3200DVD | Installation Manual - Page 35
abajo. Ménsula de montaje de radio de fábrica Español • Cuando instale, para asegurar la dispersión apropiada del calor durante el uso de esta unidad se puede instalar esta unidad adecuadamente. En este caso, utilice el kit de instalación opcional (ADT-VA133). Utilice tornillos de cabeza redonda - Pioneer AVH-P3200DVD | Installation Manual - Page 36
Instalación Instalación del micróphono (solamente AVH-P3200BT) Notas acerca de la instalación Instale el micrófono en una posición u orientatión que permita captar bien las voces de la persona que utilice el sistema mediante voz. 2. Instale la presilla de micrófono en la visera. • Con la visera - Pioneer AVH-P3200DVD | Installation Manual - Page 37
la presilla de micrófono en la base del volante. Cinta con adhesivo de doble cara Instale la presilla del micrófono en el lado trasero de la base del volante. Abrazadera Utilice abrazaderas vendidas separadamente para asegurar el cable en el - Pioneer AVH-P3200DVD | Installation Manual - Page 38
- Pioneer AVH-P3200DVD | Installation Manual - Page 39
- Pioneer AVH-P3200DVD | Installation Manual - Page 40
ELECTRONICS OF CANADA, INC. 300 Allstate Parkway, Markham, Ontario L3R 0P2, Canada TEL: 1-877-283-5901 TEL: 905-479-4411 PIONEER ELECTRONICS DE MEXICO, S.A. de C.V. Blvd.Manuel Avila Camacho 138 10 piso Col.Lomas de Chapultepec, Mexico, D.F. 11000 TEL: 55-9178-4270 Published
-
 1
1 -
 2
2 -
 3
3 -
 4
4 -
 5
5 -
 6
6 -
 7
7 -
8
-
9
-
10
-
11
-
12
-
13
-
14
-
15
-
16
-
17
-
18
-
19
-
20
-
21
-
22
-
23
-
24
-
25
-
26
-
27
-
28
-
29
-
30
-
31
-
32
-
33
-
34
-
35
-
36
-
37
-
38
-
39
-
40
 |
 |

English
Français
Español
Installation Manual
Manuel d’installation
Manual de instalación
DVD AV RECEIVER
AUTORADIO AV LECTEUR DE DVD
RADIO AV CON DVD
AVH-P4200DVD
AVH-P3200DVD
AVH-P3200BT