Pioneer AVH-P5200DVD Owner's Manual - Page 11
Front - sd card
 |
UPC - 012562975924
View all Pioneer AVH-P5200DVD manuals
Add to My Manuals
Save this manual to your list of manuals |
Page 11 highlights
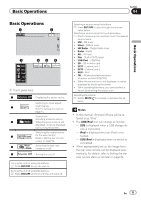
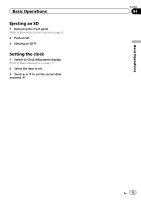
Basic Operations Section 04 Basic Operations Basic Operations 1 2 Wed 28 may 12:45 PM 3 Radio Disc iPod SD SD AUX 45 6 Rear Front Rear View 1 Touch panel keys 1 Displaying the source menu. Switching to clock adjust- 2 Wed 28 may 12:45 PM ment display. Refer to Setting the clock on page 15. Source icon Selecting a favorite source. 3 Radio When the source icon is not displayed, it can be displayed by touching the screen. Switching the output source 4 Rear Front for the rear monitor. Refer to Setting rear monitor output on page 69. 5 Rear Switching the rear view View image on or off. 6 Turning the unit off. Turning the unit on using the buttons 1 Press SRC/OFF to turn the unit on. Turning the unit off using the buttons 1 Press SRC/OFF and hold until the unit turns off. Selecting a source using the buttons 1 Press SRC/OFF to cycle through the sources listed below: Selecting a source using the touch panel keys 1 Touch the source icon and then touch the desired source name. ! XM - XM tuner ! Sirius - SIRIUS tuner ! HD Radio - Digital Radio tuner ! Radio - Radio ! AV - AV input ! Disc - Built-in DVD player ! USB/iPod - USB/iPod ! SD - SD memory card ! EXT1 - External unit 1 ! EXT2 - External unit 2 ! AUX - AUX ! TEL - Bluetooth telephone/audio (Function of AVH-P5200DVD) ! When the source icon is not displayed, it can be displayed by touching the screen. ! While operating the menu, you cannot select a source by touching the source icon. Adjusting the volume 1 Rotate MUTE/ to increase or decrease the vo- lume. Notes ! In this manual, iPod and iPhone will be referred to as "iPod". ! The USB/iPod icon will change as follows: - USB is displayed when a USB storage device is connected. - iPod is displayed when an iPod is connected. - USB/iPod is displayed when no device is connected. ! When appropriately set up, the image from the rear view camera can be displayed automatically. For details, refer to Setting the rear view camera (back up camera) on page 65. En 11
-
 1
1 -
2
-
3
-
4
-
5
-
 6
6 -
 7
7 -
 8
8 -
 9
9 -
 10
10 -
 11
11 -
 12
12 -
 13
13 -
 14
14 -
 15
15 -
 16
16 -
17
-
18
-
19
-
20
-
21
-
22
-
23
-
24
-
25
-
26
-
27
-
28
-
29
-
30
-
31
-
32
-
33
-
34
-
35
-
36
-
37
-
38
-
39
-
40
-
41
-
42
-
43
-
44
-
45
-
46
-
47
-
48
-
49
-
50
-
51
-
52
-
53
-
54
-
55
-
56
-
57
-
58
-
59
-
60
-
61
-
62
-
63
-
64
-
65
-
66
-
67
-
68
-
69
-
70
-
71
-
72
-
73
-
74
-
75
-
76
-
77
-
78
-
79
-
80
-
81
-
82
-
83
-
84
-
85
-
86
-
87
-
88
-
89
-
90
-
91
-
92
-
93
-
94
-
95
-
96
 |
 |
