Pioneer AVIC-5100NEX Installation Manual
Pioneer AVIC-5100NEX Manual
 |
View all Pioneer AVIC-5100NEX manuals
Add to My Manuals
Save this manual to your list of manuals |
Pioneer AVIC-5100NEX manual content summary:
- Pioneer AVIC-5100NEX | Installation Manual - Page 1
English Français Installation Manual Manuel d'installation MULTIMEDIA NAVIGATION RECEIVER RECEPTEUR DE NAVIGATION MULTIMEDIA AVIC-8100NEX AVIC-7100NEX AVIC-6100NEX AVIC-5100NEX - Pioneer AVIC-5100NEX | Installation Manual - Page 2
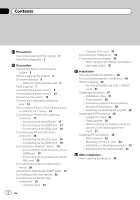
connected to rear video output 25 Installation Precautions before installation 26 To avoid electromagnetic interference 26 Before installing 26 - For AVIC-8100NEX and AVIC-7100NEX users 27 Installing this product 27 - Installation notes 27 - Parts supplied 28 - Installation using the screw holes on - Pioneer AVIC-5100NEX | Installation Manual - Page 3
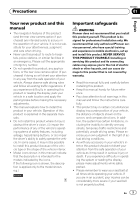
. If you experience difficulty in operating this product or reading the display, park your vehicle in a safe location and apply the parking brake before making the necessary adjustments. ! This manual explains how to install this product in your vehicle. Operation of this product is explained in the - Pioneer AVIC-5100NEX | Installation Manual - Page 4
Section 01 Precautions ! Certain country and government laws may prohibit or restrict the placement and use of this product in your vehicle. Please comply with all applicable laws and regulations regarding the use, installation and operation of this product. 4 En - Pioneer AVIC-5100NEX | Installation Manual - Page 5
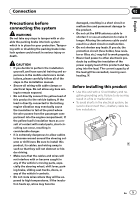
parking brake interlock system could result in serious injury or death. CAUTION ! If you decide to perform the installation yourself, and have special training and experience in the mobile electronics installations, please carefully follow all of the steps in the installation manual the wire passes - Pioneer AVIC-5100NEX | Installation Manual - Page 6
installing this unit or power amp (sold separately), make sure to connect the ground wire first. Ensure that the ground wire is properly connected to metal parts of the car's body. The ground wire to the owner's manual for details on connecting control terminal, the auto-antenna relay control terminal - Pioneer AVIC-5100NEX | Installation Manual - Page 7
Connection Parts supplied Parts marked (*) are supplied with AVIC8100NEX, AVIC-7100NEX and AVIC-6100NEX. This product Power cord GPS antenna Microphone Mini-jack extension cable USB cable Lock tie* Section 02 En 7 English - Pioneer AVIC-5100NEX | Installation Manual - Page 8
Section 02 Connection Connecting the power cord (1) Yellow To terminal supplied with power regardless of ignition switch position. Red To electric terminal controlled by ignition switch (12 V DC) ON/OFF. Orange/white To lighting switch terminal. Black (ground) To vehicle (metal) body. Front - Pioneer AVIC-5100NEX | Installation Manual - Page 9
Audio Mute lead free of any connections. Note Audio source will be set to mute or attenuate, while the following sounds will not be muted or attenuated. For details, refer to Operation Manual. - Voice guidance of the navigation - Incoming ring tone and incoming voice of the cellular phone that is - Pioneer AVIC-5100NEX | Installation Manual - Page 10
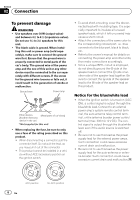
pulse wire be connected for accuracy of navigation and better performance. Note The position of the speed detection circuit and the position of the parking brake switch vary depending on the vehicle model. For details, consult your authorized Pioneer dealer or an installation professional. Light - Pioneer AVIC-5100NEX | Installation Manual - Page 11
properly, and thus the position of your vehicle detected by the sensor may be misaligned from the actual position. Note When you use a rear view camera, please make sure to connect this lead. Otherwise you cannot switch to the rear view - Pioneer AVIC-5100NEX | Installation Manual - Page 12
instruction manual for SiriusXM Connect Vehicle Tuner (sold separately). Antenna jack Wired remote input Please refer to the instruction manual for the Hard-wired never be used while the vehicle is being driven except for navigation purposes. And, also rear displays should not be in a location - Pioneer AVIC-5100NEX | Installation Manual - Page 13
on the followings (refer to Operation Manual.): - the label on the packaging of this product - the label on this product - the "Firmware Information" screen 8100NEX 7100NEX ! Make sure to connect the microphone supplied with this product when using Android Auto. English Section 02 En 13 - Pioneer AVIC-5100NEX | Installation Manual - Page 14
remote control Front speaker Rear speaker Subwoofer Notes · You can change the RCA output of the subwoofer depending on your subwoofer system. (Refer to Operation Manual.) · The subwoofer output of this product is monaural. 14 En - Pioneer AVIC-5100NEX | Installation Manual - Page 15
Section 02 English Connecting an iPhone, iPod, Android device or a MirrorLink™ device Find your device 17. 5100NEX Refer to Connecting via the RGB input on page 18. Note For any of the connections mentioned above, aha, AVICSYNC App and Pandora are available for use. iPhone 3GS/iPod touch ( - Pioneer AVIC-5100NEX | Installation Manual - Page 16
19. MHL port Refer to Connecting an Android device with an MHL port on page 20. 8100NEX 7100NEX Android Auto Refer to Connecting the Android or MirrorLink™ device on page 20. Note For any of the connections mentioned above, aha, AVICSYNC App and Pandora are available for use. MirrorLink device - Pioneer AVIC-5100NEX | Installation Manual - Page 17
on how to connect an external device using a separately sold cable, refer to the manual for the cable. ! For details concerning the connection, operations and compatibility of iPhone, refer to Operation Manual. Connecting via the USB port The USB interface cable for iPod / iPhone (CDIU52) (sold - Pioneer AVIC-5100NEX | Installation Manual - Page 18
High Speed HDMI® Cable on page 21. Connecting via the RGB input 5100NEX The following cables are required for the connection. ! VGA/USB interface cable the manual for the cable. ! For details concerning the connection, operations and compatibility of iPhone, refer to Operation Manual. Connecting - Pioneer AVIC-5100NEX | Installation Manual - Page 19
7100NEX 6100NEX App Connectivity Kit (CD-AH200) (sold separately) is required for the connection. Notes ! For details on how to connect an external device using a separately sold cable, refer to the manual for the cable. ! For details concerning the connection and operations of Android device, refer - Pioneer AVIC-5100NEX | Installation Manual - Page 20
Cable (Type A - A) (supplied with CD-AH200) MHL adapter (supplied with CD-AH200) Android device USB port 2 Android or MirrorLink device USB cable (supplied with CD-MU200) USB - micro USB cable (Type USB an external device using a separately sold cable, refer to the manual for the cable. 20 En - Pioneer AVIC-5100NEX | Installation Manual - Page 21
Connection Securing the High Speed HDMI® Cable 8100NEX 7100NEX 6100NEX Be sure to fix the High Speed HDMI® Cable with the lock tie, when you connect the external device with the High Speed HDMI® Cable. 1 Insert the High Speed HDMI® Cable into the HDMI port. 2 Wrap the lock tie around the hook above - Pioneer AVIC-5100NEX | Installation Manual - Page 22
SIGNAL INPUT) For more details about the wiring, refer to Connecting the power cord (2) on page 10. Notes ! This mode is available when the rear view camera setting is set to "On". (For details, refer to Operation Manual.) ! Connect this product to the rear view camera only. Do not connect to any - Pioneer AVIC-5100NEX | Installation Manual - Page 23
video output External camera (sold separately) External video component (sold separately) Note This mode is available when the setting of AV input is set to "Source". (For details, refer to Operation Manual.) Note This mode is available when the setting of AV input is set to "Camera". (For details - Pioneer AVIC-5100NEX | Installation Manual - Page 24
use a mini-jack AV cable (CD-RM10) (sold separately) for wiring. If you use other cables, the wiring position might differ resulting in disturbed images and sounds. OK L VGR L is available when the setting of AUX input is set to "On". (For details, refer to Operation Manual.) ! When connecting an - Pioneer AVIC-5100NEX | Installation Manual - Page 25
Notes ! For details concerning the operations of HDMI device, refer to Operation Manual. ! When you connect the High Speed HDMI® Cable, use the lock . When using a rear display connected to rear video output WARNING NEVER install the rear display in a location that enables the driver to watch the - Pioneer AVIC-5100NEX | Installation Manual - Page 26
lines, brake lines, electronic components, communication wires or power lever. Be sure to install this product, its cables, and wiring away in such so refer to your vehicle's owner's manual for reference to the deployment area of In order to prevent interference, set the following items as far as - Pioneer AVIC-5100NEX | Installation Manual - Page 27
Section 03 English For AVIC-8100NEX and AVIC7100NEX users Do not install this product in a position where the opening of the LCD panel is obstructed by any obstacles, such as the shift lever. Before installing this product, be sure to leave sufficient space so that the LCD panel does not - Pioneer AVIC-5100NEX | Installation Manual - Page 28
navigation mechanism to dissipate heat. Do not cover this area. ! The semiconductor laser will be damaged if it overheats, so don't install this product anywhere hot - for instance, near a heater outlet. Installation with AVIC-6100NEX and AVIC-5100NEX. If the pawl interferes with installation, you - Pioneer AVIC-5100NEX | Installation Manual - Page 29
Installation Fastening the detachable faceplate 6100NEX 5100NEX If you do not plan to remove the detachable faceplate, the detachable faceplate can be fastened with the supplied screw. Screw (2 mm × 4 mm) English Section 03 En 29 - Pioneer AVIC-5100NEX | Installation Manual - Page 30
surface where radio waves will be blocked as little as possible. Radio waves cannot be received by the antenna if reception from the satellite is blocked. Metal sheet 1 2 1 Dashboard 2 Rear shelf ! When installing the GPS antenna inside the vehicle, be sure to use the metal sheet provided with - Pioneer AVIC-5100NEX | Installation Manual - Page 31
antenna inside the vehicle (on the dashboard or rear shelf) WARNING Do not install the GPS antenna over any sensors or vents on the dashboard of the vehicle that does not allow signals from GPS satellites to pass through. On such models, install the GPS antenna on the outside of the vehicle. En 31 - Pioneer AVIC-5100NEX | Installation Manual - Page 32
lead into the groove. 1 2 1 Microphone lead 2 Groove 2 1 Microphone clip 2 Clamps Use separately sold clamps to secure the lead where necessary inside the vehicle. Install the microphone on the sun visor when it is in the up position. It cannot recognize the driver's voice if the sun visor is in - Pioneer AVIC-5100NEX | Installation Manual - Page 33
Section 03 English Installation on the steering column 1 Detach the microphone base from the microphone clip 2 Tab 3 Microphone base 4 Microphone clip 2 Mount the microphone on the steering column. Install the microphone on the steering column, keeping it away from the steering wheel. 1 2 En 33 - Pioneer AVIC-5100NEX | Installation Manual - Page 34
road until the GPS starts receiving the signal normally. Note After installing this product, be sure to check at a safe place that the vehicle is performing normally. 6100NEX 5100NEX p Some of the settings and recorded contents will not be reset. 4 Change the settings as desired. = For details - Pioneer AVIC-5100NEX | Installation Manual - Page 35
séparément 48 Connexion d'un iPhone, iPod, appareil Android ou appareil MirrorLink™ 49 Connexion d'un iPhone avec connecteur installation 61 - Pour les utilisateurs de AVIC-8100NEX et AVIC-7100NEX 61 Installation de ce produit 61 - Remarques sur l'installation 61 - Pièces fournies 62 - Installation - Pioneer AVIC-5100NEX | Installation Manual - Page 36
Votre nouveau produit et ce manuel ! La fonction de navigation de ce produit (et la caméra de rétrovisée airbags ou les touches de feux de détresse, ou (iii) d'empêcher le conducteur de conduire le véhicule en toute sécurité. Dans certains cas, il peut ne pas être possible d'installer ce produit - Pioneer AVIC-5100NEX | Installation Manual - Page 37
01 Français Importantes mesures de sécurité AVERTISSEMENT Pioneer vous recommande de ne pas installer ce produit vous-même. Ce produit doit être exclusivement installé par un professionnel. Nous recommandons que seul le personnel d'entretien Pioneer agréé, qui dispose d'une formation et d'une exp - Pioneer AVIC-5100NEX | Installation Manual - Page 38
raccordé à la batterie, les vibrations du moteur peuvent finir par user les câbles au niveau de la jonction avec l'habitacle et provoquer un enrouler autour de la colonne de direction ou du levier de vitesse. Assurez-vous d'installer ce produit, ses câbles et les fils de telle façon qu'ils n' - Pioneer AVIC-5100NEX | Installation Manual - Page 39
comprise entre 4 W et 8 W. N'utilisez pas de haut-parleurs 1 W à 3 W avec cet appareil. ! Le câble noir est celui de la mise à la terre. Lors de l'installation de cette unité ou de l'amplificateur (vendu séparément), connectez toujours le fil de mise à la terre en premier. Assurez-vous que le fil de - Pioneer AVIC-5100NEX | Installation Manual - Page 40
de courant excessif et un mauvais fonctionnement. Pièces fournies Les parties marquées d'un astérisque (*) sont fournies avec AVIC-8100NEX, AVIC-7100NEX et AVIC-6100NEX. Ce produit Cordon d'alimentation Antenne GPS Microphone Rallonge pour câble mini-jack Câble USB Attache de blocage* 40 Fr - Pioneer AVIC-5100NEX | Installation Manual - Page 41
Connexion Section 02 Français Fr 41 - Pioneer AVIC-5100NEX | Installation Manual - Page 42
Section 02 Connexion Branchement du cordon d'alimentation (1) Jaune Vers la borne fournie avec l'alimentation quelle que soit la position du contacteur d'allumage. Rouge Vers la borne électrique commandée par le contacteur d'allumage (12 VCC) ON/OFF. Orange/blanc Vers la borne du contacteur d'é - Pioneer AVIC-5100NEX | Installation Manual - Page 43
que les sons suivants ne seront ni coupés ni atténués. Pour en savoir plus, reportez-vous au Manuel de fonctionnement. - Guidage vocal de la navigation - La tonalité de sonnerie entrante et la voix entrante du téléphone portable connecté à ce produit via la technologie sans fil Bluetooth Bleu/blanc - Pioneer AVIC-5100NEX | Installation Manual - Page 44
est vivement conseillé de connecter le fil de vitesse pour une navigation plus précise et de meilleurs performances. Remarque La position du circuit plus de détails, contactez votre revendeur Pioneer agréé ou un installateur professionnel. Vert clair (PARKING BRAKE) Usato per rilevare lo stato ON/ - Pioneer AVIC-5100NEX | Installation Manual - Page 45
Connexion Ce produit Alimentation Cordon d'alimentation Violet/blanc (REVERSE-GEAR SIGNAL INPUT) Il est connecté afin que ce produit puisse détecter si le véhicule avance ou recule. Connectez le fil violet/blanc sur le fil dont la tension varie lorsque la marche arrière est enclenchée. S'il n'est - Pioneer AVIC-5100NEX | Installation Manual - Page 46
m Entrée de commande à distance câblée Reportez-vous au manuel d'instructions de l'adaptateur de commande à distance câblée (vendu séparément). en aucun cas être utilisé alors que le véhicule roule sauf à des fins de navigation. Par ailleurs, les écrans arrière ne doivent pas être placés là où ils - Pioneer AVIC-5100NEX | Installation Manual - Page 47
- l'étiquette sur ce produit - l'écran "Info sur le micrologiciel" 8100NEX 7100NEX ! Assurez-vous de connecter le microphone fourni avec ce produit lors de l'utilisation de Android Auto. Français Section 02 Fr 47 - Pioneer AVIC-5100NEX | Installation Manual - Page 48
Section 02 Connexion Connexion à un amplificateur de puissance vendu séparément Sorties arrière (REAR OUTPUT) 15 cm Sorties avant (FRONT OUTPUT) Câbles RCA (vendus séparément) Amplificateur de puissance (vendu séparément) Amplificateur de puissance (vendu séparément) Amplificateur de puissance - Pioneer AVIC-5100NEX | Installation Manual - Page 49
iPod, appareil Android ou appareil MirrorLink™ vous à la page 51, Connexion via le port HDMI. 5100NEX Reportez-vous à la page 52, Connexion via l'entrée mentionnées ci-dessus, aha, AVICSYNC App et Pandora sont disponibles pour l'utilisation. iPhone 3GS/iPod touch (2e et 3e génération)/iPod classic - Pioneer AVIC-5100NEX | Installation Manual - Page 50
54, Connexion d'un périphérique Android via un port MHL. 8100NEX 7100NEX Android Auto Reportez-vous à la page 54, Connexion d'un appareil Android ou MirrorLink™. Remarque Pour n'importe quelles des connexions mentionnées ci-dessus, aha, AVICSYNC App et Pandora sont disponibles pour l'utilisation - Pioneer AVIC-5100NEX | Installation Manual - Page 51
Connexion Section 02 Français Connexion d'un iPhone avec connecteur Lightning Remarques ! Pour en savoir plus sur la connexion d'un périphérique externe à l'aide d'un câble vendu séparément, reportez-vous au manuel du câble. ! Pour en savoir plus sur la connexion, le fonctionnement et la - Pioneer AVIC-5100NEX | Installation Manual - Page 52
02 Connexion = Pour en savoir plus, reportez-vous à la page 55, Fixation du câble HDMI® haute vi- tesse. Connexion via l'entrée RGB 5100NEX Les câbles suivants sont nécessaires pour la connexion. ! Câble d'interface VGA/USB pour iPod / iPhone (CD-IV202AV) (vendu séparément) ! Câble d'interface - Pioneer AVIC-5100NEX | Installation Manual - Page 53
de blocage pour le fixer fermement. = Pour en savoir plus, reportez-vous à la page 55, Fixation du câble HDMI® haute vitesse. Connexion d'un périphérique Android via un port HDMI Ce produit Port USB 2 Câble USB (fourni avec CD-AH200) Port HDMI Câble HDMI® haute vitesse (Type A - A) (fourni avec CD - Pioneer AVIC-5100NEX | Installation Manual - Page 54
MHL (fourni avec CD-AH200) Câble USB (fourni avec CD-MU200) Câble USB - micro USB (Type USB A - micro USB B) (fourni avec CD-AH200) Appareil Android Câble USB - micro USB (Type USB A - micro USB B) (fourni avec CD-MU200) Remarque Pour en savoir plus sur la connexion d'un périphérique externe - Pioneer AVIC-5100NEX | Installation Manual - Page 55
Connexion Fixation du câble HDMI® haute vitesse 8100NEX 7100NEX 6100NEX Veillez à fixer le câble HDMI® haute vitesse à l'aide de l'attache de blocage lorsque vous connectez un périphérique externe à l'aide du câble HDMI® haute vitesse. 1 Insérez le câble HDMI® haute vitesse dans le port HDMI. 2 - Pioneer AVIC-5100NEX | Installation Manual - Page 56
éra de rétrovisée est à utiliser en tant qu'aide pour surveiller une caravane, ou pour se garer en marche arrière dans un emplacement de parking un peu étroit. N'utilisez pas cette fonction dans un but de divertissement. ! Les objets dans la caméra de rétrovisée peuvent paraître plus proches - Pioneer AVIC-5100NEX | Installation Manual - Page 57
Connexion Section 02 Français Connexion d'un élément vidéo externe Utilisation de l'entrée AV Vous pouvez connecter un élément vidéo externe ou une caméra externe à ce produit. Connexion d'une caméra externe Ce produit Connexion d'un composant vidéo Ce produit 23 cm Rouge, blanc (AUDIO INPUT) - Pioneer AVIC-5100NEX | Installation Manual - Page 58
Section 02 Connexion Utilisation d'une entrée AUX Ce produit Entrée AUX Câble AV mini-jack (CD-RM10) (vendu séparément) Rallonge pour câble mini-jack 2 m ATTENTION Veillez à utiliser un câble AV mini-jack (CD-RM10) (vendu séparément) pour le raccordement. Si vous utilisez un autre type de câble, - Pioneer AVIC-5100NEX | Installation Manual - Page 59
-vous à la page 55, Fixation du câble HDMI® haute vitesse. Utilisation d'un écran arrière raccordé à la sortie vidéo arrière AVERTISSEMENT NE JAMAIS installer l'écran arrière dans un endroit permettant au conducteur de regarder la source vidéo en conduisant. La sortie vidéo arrière de ce produit - Pioneer AVIC-5100NEX | Installation Manual - Page 60
enrouler autour de la colonne de direction ou du levier de vitesse. Assurez-vous d'installer ce produit, ses câbles et les fils de telle façon qu'ils n' mes de commande ou dispositifs de sécurité, y compris les airbags ou les touches de commande des feux de détresse, ou (iii) d'empêcher le conducteur - Pioneer AVIC-5100NEX | Installation Manual - Page 61
AVIC-7100NEX N'installez pas ce produit dans une position où l'ouverture du panneau LCD serait gênée par des obstacles, le levier de vitesse par exemple. Avant d'installer ! Installez ce produit dans une zone suffisamment solide pour supporter son poids. Choisissez un endroit où le produit puisse ê - Pioneer AVIC-5100NEX | Installation Manual - Page 62
6100NEX et AVIC-5100NEX. Si le cliquet interfère avec l'installation, vous pouvez le replier complètement vers le bas. 1 Ce produit Vis à tête bombée (5 mm × 8 mm) (6 pièces) Vis à tête plate (5 mm × 9 mm) (6 pièces) Vis* (2 mm × 4 mm) (1 pièce) 3 2 1 Support de montage radio d'usine 2 Tableau - Pioneer AVIC-5100NEX | Installation Manual - Page 63
Installation Fixation de la façade amovible 6100NEX 5100NEX Si vous n'avez pas l'intention de retirer la façade amovible, vous pouvez la fixer en place avec la vis fournie. Vis (2 mm × 4 mm) Français Section 03 Fr 63 - Pioneer AVIC-5100NEX | Installation Manual - Page 64
ou un dysfonctionnement et d'endommager de manière irrémédiable ce produit. Pièces fournies Antenne GPS Plaque métallique Remarques sur l'installation ! L'antenne doit être installée sur une surface plane bien réceptive aux ondes radio. Les ondes radio ne peuvent pas être captées correctement par - Pioneer AVIC-5100NEX | Installation Manual - Page 65
Section 03 Français Installation de l'antenne dans le véhicule (sur le tableau de bord ou la lunette arrière) AVERTISSEMENT N'installez pas l'antenne GPS par dessus un capteur ou - Pioneer AVIC-5100NEX | Installation Manual - Page 66
(ACC OFF) avant de connecter le microphone. 2 Fixez l'agrafe pour micro au pare-soleil. 1 Pièces fournies Microphone Bande adhésive à double face Installation sur le pare-soleil 1 Insérez le fil du microphone dans la fente. 1 2 1 Fil du microphone 2 Fente 2 1 Agrafe pour micro 2 Serre-fils - Pioneer AVIC-5100NEX | Installation Manual - Page 67
Installation Installation sur la colonne de direction 1 Retirez la base du microphone de l'agrafe pour micro en faisant glisser la base du microphone tout en enfonçant - Pioneer AVIC-5100NEX | Installation Manual - Page 68
batterie. 2 Mettez le moteur en marche. 3 Appuyer sur le bouton RESET. Appuyez sur le bouton RESET de ce produit à l'aide d'un objet pointu comme la pointe d' Une fois l'installation terminée, vérifiez le bon fonctionnement du véhicule dans un endroit sécurisé. 6100NEX 5100NEX p Certains réglages - Pioneer AVIC-5100NEX | Installation Manual - Page 69
Français Fr 69 - Pioneer AVIC-5100NEX | Installation Manual - Page 70
70 Fr - Pioneer AVIC-5100NEX | Installation Manual - Page 71
Français Fr 71 - Pioneer AVIC-5100NEX | Installation Manual - Page 72
Box 1540, Long Beach, California 90801-1540, U.S.A. TEL: (800) 421-1404 PIONEER ELECTRONICS OF CANADA, INC. 340 Ferrier Street, Unit 2, Markham, Ontario L3R 2Z5, Canada TEL: 1-877-283-5901 TEL: 905-479-4411 PIONEER EUROPE NV Haven 1087, Keetberglaan 1, B-9120 Melsele, Belgium/Belgique TEL: (0) 3/570
-
 1
1 -
 2
2 -
 3
3 -
 4
4 -
 5
5 -
 6
6 -
 7
7 -
8
-
9
-
10
-
11
-
12
-
13
-
14
-
15
-
16
-
17
-
18
-
19
-
20
-
21
-
22
-
23
-
24
-
25
-
26
-
27
-
28
-
29
-
30
-
31
-
32
-
33
-
34
-
35
-
36
-
37
-
38
-
39
-
40
-
41
-
42
-
43
-
44
-
45
-
46
-
47
-
48
-
49
-
50
-
51
-
52
-
53
-
54
-
55
-
56
-
57
-
58
-
59
-
60
-
61
-
62
-
63
-
64
-
65
-
66
-
67
-
68
-
69
-
70
-
71
-
72
 |
 |

Installation Manual
Manuel d
’
installation
MULTIMEDIA NAVIGATION RECEIVER
RECEPTEUR DE NAVIGATION MULTIMEDIA
AVIC-8100NEX
AVIC-7100NEX
AVIC-6100NEX
AVIC-5100NEX
English
Français