Pioneer BDP-95FD Owner's Manual - Page 21
Press HOME MENU to exit the Initial Setup menu.
 |
View all Pioneer BDP-95FD manuals
Add to My Manuals
Save this manual to your list of manuals |
Page 21 highlights
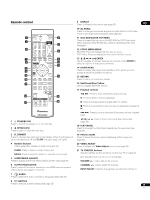
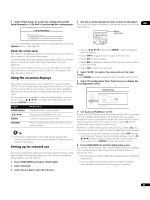
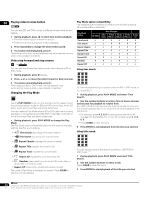
7 Select 'Finish Setup' to accept the settings and exit the 4 Use the on-screen keypad to enter a name for the player. Setup Navigator, or 'Go Back' to go through the settings again. This is how the player will appear to connected devices on the local 04 area network. Setup Navigator Setup is complete! Enjoy using your BD player! Finish Setup Go Back Device name input You can run the Setup Navigator at any time by selecting it from the Options menu - see page 43. About the screen saver If the player is stopped or paused for more than five minutes with no other operation, the screen saver starts. Once the screen saver has started, pressing any button on the front panel or remote will clear it and return the player to normal operation. The screen saver starts for CDs and music files after five minutes pass without any commands input, whether or not playback has been paused or stopped. Using the on-screen displays This player makes extensive use of graphical on-screen displays (OSDs). You should get used to the way these work as you'll need to use them when setting up the player, using some of the playback features, and when making more advanced settings for audio and video. All the screens are navigated in basically the same way, using the cursor buttons to change the highlighted item and pressing ENTER to select it. Button What it does SHFT SPC DEL CLR • Use the buttons and ENTER to select characters from the keypad. • Select SHFT to toggle between upper and lower case. • Select SPC to insert a space. • Select DEL to delete the character at the current cursor position in the name field. • Select CLR to clear the name field. 5 Select 'DONE' to register the name and exit the input screen. Select CANCEL to close the keypad without registering the name. 6 Select 'IP Configuration' then 'Next Screen' to display the IP configuration screen. Initial Setup Video Out Audio Out Language Parental Lock Network Speakers Options IP Configuration Auto set IP Address Off IP Address Subnet mask Default gateway 192 . 255 . 255 . 0 255 . 255 . 255 . 0 192 . 168 . 1 . 0 Set the IP address. HOME MENU ENTER RETURN Display/exit the on-screen display Changes the highlighted menu item Selects the highlighted menu item Returns to the previous menu or screen without saving changes Tip • Information at the bottom of an OSD screen explains the currently selected menu item and shows which buttons can be used for that screen. Setting up for network use If you've connected this player to a local area network (LAN) you may need to make a few settings before you can use the Home Media Gallery feature over the network. 1 Press HOME MENU and select 'Initial Setup'. 2 Select 'Network'. 7 Set 'Auto set IP Address' to 'On'. If there is a DHCP server on the local area network (LAN), this player will automatically be allocated an IP address. If you're using a broadband router or broadband modem that has a DHCP (Dynamic Host Configuration Protocol) server function, select On. The IP address will automatically be determined. If there is no DHCP server on the network and you select On, this player will use its own Auto IP function to determine the IP address. • If you want to set the IP address manually, select Off then set the IP Address, Subnet mask and Default gateway: Use the buttons to select a field; use the number buttons to enter a value. Press ENTER to finish and exit the screen. 8 Press HOME MENU to exit the Initial Setup menu. You should now be able to use the Home Media Gallery (accessible from the Home Menu). See Using the Home Media Gallery on page 32 for more. • For information on DHCP refer to the network device's operating instructions. • You may need to contact your service provider or network administrator when manually entering an IP address. 3 Select 'Device Name' then 'Next Screen'. 21 En
-
 1
1 -
2
-
3
-
4
-
5
-
6
-
7
-
8
-
9
-
10
-
11
-
12
-
13
-
14
-
15
-
 16
16 -
 17
17 -
 18
18 -
 19
19 -
 20
20 -
 21
21 -
 22
22 -
 23
23 -
 24
24 -
 25
25 -
 26
26 -
27
-
28
-
29
-
30
-
31
-
32
-
33
-
34
-
35
-
36
-
37
-
38
-
39
-
40
-
41
-
42
-
43
-
44
-
45
-
46
-
47
-
48
-
49
-
50
-
51
-
52
-
53
-
54
-
55
-
56
-
57
-
58
-
59
-
60
-
61
-
62
-
63
-
64
-
65
-
66
 |
 |