Pioneer CDJ-400 Control Manual to operate CDJ-400(s) through the Pioneer DJS s - Page 5
Precautions when Starting Up, 2-1 Selecting a Player Control - drivers
 |
UPC - 012562878423
View all Pioneer CDJ-400 manuals
Add to My Manuals
Save this manual to your list of manuals |
Page 5 highlights
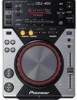
2 Chapter 2 Precautions when Starting Up Before starting to play with your CDJ-400, computer and DJS, select a player control and where the audio is output. 2-1 Selecting a Player Control Connect the CDJ-400 to your computer with a USB cable. For information on each of the cables that come with the CDJ-400 as well as each type of the CDJ-400's cable terminals, please refer to CONNECTIONS in the Operating Instructions of your CDJ-400. 1 Start up your computer. 2 Connect a USB cable to the USB port on the back of your CDJ-400 and to your computer's USB port and then turn on your CDJ-400. • Alternatively, you can also power up your CDJ-400 first and then connect the CDJ400 to your computer. 3 Start up DJS. • Once DJS starts up, the [DJ Play] screen is displayed. 4 Select PC with your CDJ-400's USB select button (SOURCE SELECT). • Each time you press the USB select button, the indicator switches between MEMORY and PC. USB select button (SOURCE SELECT) Display EJECT button (EJECT) Rotary knob (SELECT PUSH) Warning! Before Connecting to your Computer If you are going to connect and use a CDJ-400 with your computer, install the driver software for the CDJ-400 onto your computer. For information on obtaining the driver software for your CDJ-400 and how to install it, please refer to CONNECTIONS of the CDJ-400 as well as the following web page. http://www.prodjnet.com/support/ Warning! Starting up DJS First connect your CDJ-400 and power it up, then start up DJS. Removing a CDJ-400 Always close DJS before disconnecting your CDJ-400 or turning it OFF. 5 Rotate the CDJ-400's rotary knob (SELECT PUSH) to select the DJS player (A or B) you wish to assign. • Assigning a CDJ-400 to DJS Player A When you turn the Rotary dial to the left, PLAYER A? is shown on the Display of your CDJ-400; press the Rotary dial to select it. • Assigning a CDJ-400 to DJS Player B When you turn the Rotary dial to the right, PLAYER B? is shown on the Display of your CDJ-400; press the Rotary dial to select it. When connecting two CDJ-400s After you assign one of your CDJ-400s to a player (Either A or B), assign the other CDJ-400 to the other DJS player (A or B). When connecting one CDJ-400 When PC is selected, if you press the EJECT button (EJECT), the assigned DJS player switches from A to B (or from B to A). '3-3 Switching the Player Control' Warning! When three or more CDJ-400s are connected Even if you connect three or more CDJ-400s, you will not be able to use the third or additional CDJ-400s to operate DJS or to output the DJS audio. DJS Ver. 1.600 5
-
 1
1 -
 2
2 -
 3
3 -
 4
4 -
 5
5 -
 6
6 -
 7
7 -
 8
8 -
 9
9 -
 10
10
 |
 |
