Pioneer DEH-P9400BH Owner's Manual - Page 4
Head unit, Remote control, Set up menu, Operating this unit - installation
 |
View all Pioneer DEH-P9400BH manuals
Add to My Manuals
Save this manual to your list of manuals |
Page 4 highlights
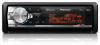
Section 02 Operating this unit Operating this unit Head unit 1234 Remote control 5 Remote controller buttons marked with the same numbers as on the unit operate in the same way as the corresponding unit button re- gardless of button name. e b a 98 7 6 c 9 f k g j h a 3 i d Part 1 (phone/on hook) 2 LEVER 3 /DISP 4 (list) 5 Open button AUX input jack 6 (3.5 mm stereo jack) 7 / Part 8 /DISP OFF 9 BAND/ (iPod) a SRC/OFF b MULTI-CONTROL (M.C.) c Disc loading slot d h (eject) CAUTION Use a Pioneer USB cable when connecting the USB audio player/USB memory device as devices connected to the unit directly will protrude out, which is dangerous. Do not use unauthorized products. 4 En Part Operation e VOLUME Press to increase or decrease volume. f MUTE Press to mute. Press again to unmute. Press to perform manual seek tuning, fast forward, reverse g a/b/c/d and track search controls. Also used for controlling functions. While operating the phone, h press to end a call or reject an incoming call. ie Press to pause or resume playback. Part j k LIST/ ENTER Operation Press to start talking on the phone while operating a phone. Press to display the disc title, track title, folder, or file list depending on the source. While in the operating menu, press to control functions. Set up menu When you turn the ignition switch to ON after installation, set up menu appears on the display. You can set up the menu options below. 1 After installation of this unit, turn the ignition switch to ON. SET UP appears. 1 Turn M.C. to change the year. 2 Press M.C. to select day. 3 Turn M.C. to change the day. 4 Press M.C. to select month. 5 Turn M.C. to change the month. 6 Press M.C. to confirm the selection. Clock (setting the clock) 1 Turn M.C. to adjust hour. 2 Press M.C. to select minute. 3 Turn M.C. to adjust minute. 4 Press M.C. to confirm the selection. Contrast (display contrast setting) 1 Turn M.C. to adjust the contrast level. 0 to 15 is displayed as the level is increased or decreased. 2 Press M.C. to confirm the selection. Demonstration (demo display setting) 2 Turn M.C. to switch to YES. # If you do not operate for 30 seconds, the set up menu will not be displayed. # If you prefer not to set up at this time, turn M.C. to switch to NO. If you select NO, you cannot set up in the set up menu. 3 Press M.C. to select. 4 Perform the following procedures to set the menu. To proceed to the next menu option, you need to confirm your selection. Language select (multi-language) 1 Turn M.C. to select the desired language. English-Français-Español 2 Press M.C. to confirm the selection. Calendar (setting the date) 1 Turn M.C. to set the demo display to off. 2 Press M.C. to confirm the selection. Quit appears. 5 To finish your settings, turn M.C. to select YES. # If you prefer to change your setting again, turn M.C. to switch to NO. 6 Press M.C. to select. Notes ! Because demonstration mode is the function for displaying at stores, do not use this function while driving. ! You can set up the menu options in the initial settings. For details about the settings, refer to Initial settings on page 14. ! You can cancel set up menu by pressing SRC/OFF.
-
 1
1 -
 2
2 -
 3
3 -
 4
4 -
 5
5 -
 6
6 -
 7
7 -
 8
8 -
 9
9 -
 10
10 -
11
-
12
-
13
-
14
-
15
-
16
-
17
-
18
-
19
-
20
-
21
-
22
-
23
-
24
-
25
-
26
-
27
-
28
-
29
-
30
-
31
-
32
-
33
-
34
-
35
-
36
-
37
-
38
-
39
-
40
-
41
-
42
-
43
-
44
-
45
-
46
-
47
-
48
-
49
-
50
-
51
-
52
-
53
-
54
-
55
-
56
-
57
-
58
-
59
-
60
-
61
-
62
-
63
-
64
-
65
-
66
-
67
-
68
-
69
-
70
-
71
-
72
-
73
-
74
-
75
-
76
-
77
-
78
-
79
-
80
-
81
-
82
-
83
-
84
-
85
-
86
-
87
-
88
-
89
-
90
-
91
-
92
-
93
-
94
-
95
-
96
 |
 |
