Pioneer DV-79AVi Owner's Manual - Page 71
SACD Playback, HDMI Settings
 |
View all Pioneer DV-79AVi manuals
Add to My Manuals
Save this manual to your list of manuals |
Page 71 highlights
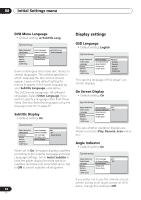
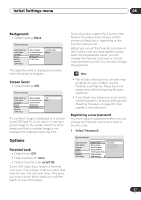
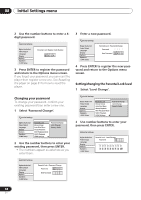
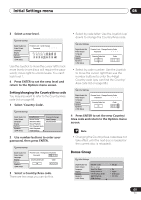
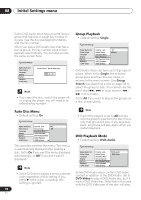
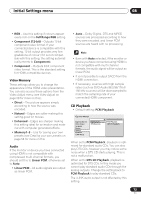
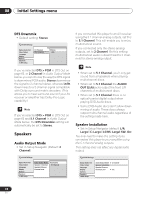
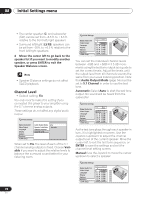
Initial Settings menu 08 • This setting reverts to DVD-Audio (default) when the disc tray is opened, or the power is switched into standby. SACD Playback • Default setting: 2ch Area Initial Settings Digital Audio Out Video Output Language Display Options Speakers i.LINK Setup Parental Lock Bonus Group Auto Disc Menu Group Playback DVD Playback Mode SACD Playback HDMI Settings 2ch Area Multi-ch Area CD Area SACD discs can be divided up into several different areas - stereo audio (2ch Area), multi-channel audio (Multi-ch Area) and, for hybrid SACDs, standard CD audio (CD Area). Select which you want to listen to. HDMI Settings You only need to make this setting if you connected this player to an HDMI-compatible component using the HDMI connector. Initial Settings Digital Audio Out Video Output Language Display Options Speakers i.LINK Setup Parental Lock Bonus Group Auto Disc Menu Group Playback DVD Playback Mode SACD Playback HDMI Settings 3 Off (jp) 3 On 3 Single 3 DVD-Audio 3 2ch Area After selecting HDMI from the Initial Settings menu, the HDMI settings menu appears. For example, if you connected a Pioneer display, the following menu should be displayed: Resolution Aspect Ratio Colour Video Memory Audio 720x480 P 16:9 (Wide) Component (12bit) Direct Linear PCM • For multi-channel audio from the i.LINK and 5.1 channel analog outputs, SACD playback must be set to Multi-ch Area. • If you select an area that isn't on the disc loaded, a different area of the disc will play. For example, if you choose standard CD audio but the disc loaded is not a hybrid SACD, the stereo SACD audio will play. With DVI-compatible devices (with HDCP), the same screen is shown, but with the audio setting grayed-out (there is no audio with DVI): Resolution Aspect Ratio Colour Video Memory Audio 720x480 P 16:9 (Wide) Component (12bit) Direct Linear PCM • Use the joystick (up/down) to select a setting. • Use the joystick (left/right) to adjust the current setting. • After you've finished, press ENTER to confirm any settings you've made and return to the Initial Settings menu. You can adjust any or all of the following HDMI settings (the same options are available for DVI/HDCP-compatible devices): 71 En
-
 1
1 -
2
-
3
-
4
-
5
-
6
-
7
-
8
-
9
-
10
-
11
-
12
-
13
-
14
-
15
-
16
-
17
-
18
-
19
-
20
-
21
-
22
-
23
-
24
-
25
-
26
-
27
-
28
-
29
-
30
-
31
-
32
-
33
-
34
-
35
-
36
-
37
-
38
-
39
-
40
-
41
-
42
-
43
-
44
-
45
-
46
-
47
-
48
-
49
-
50
-
51
-
52
-
53
-
54
-
55
-
56
-
57
-
58
-
59
-
60
-
61
-
62
-
63
-
64
-
65
-
 66
66 -
 67
67 -
 68
68 -
 69
69 -
 70
70 -
 71
71 -
 72
72 -
 73
73 -
 74
74 -
 75
75 -
 76
76 -
77
-
78
-
79
-
80
-
81
-
82
-
83
-
84
-
85
-
86
-
87
-
88
-
89
-
90
-
91
-
92
-
93
-
94
-
95
-
96
-
97
-
98
-
99
 |
 |
