Pioneer DVD Menu Maker Operating Instructions - Page 7
Layer, Duplicate Layer, Button Mask
 |
View all Pioneer DVD Menu Maker manuals
Add to My Manuals
Save this manual to your list of manuals |
Page 7 highlights
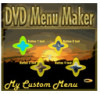
PRV-LX1 DVD Menu Maker 6.0 BUTTON MASK LAYER The Button Mask layer defines the shape of your buttons. Although the PRV-LX1 provides some standard button shapes such as squares and ovals (in pre-set locations), buttons can be any polygonal shape. To ease creation of this layer, copy the Highlight Area (Subpicture) layer if your intent is to have the highlights show around or on top of your buttons. Follow the steps below to create the Button Mask layer. 1. With the Highlight Area (Subpicture) layer selected, click on Layer from the main menu bar. 2. Select the Duplicate Layer command. 3. Change the name of this layer from Highlight Area copy to Button Mask. 4. Move the Button Mask layer to above the Button Image layer. The stacking order from top to bottom should now be Button Mask, Button Image, Button Area, Highlight Area (or Subpicture) and Background. 5. Remove any unnecessary shapes from the Button Mask layer. 6. Keep the area around and between the buttons as black (RGB: 0,0,0). In the following example, the black star patterns inside of the Highlight Area layer's button shapes have been removed from the new Button Mask layer and all the area around the buttons remains filled with black (RGB: 0,0,0). Subpicture (Highlights) Layer Button Mask Layer 7.0 THUMBNAIL AREA LAYER According to the DVD Specifications, Thumbnail Areas must be squares or rectangles. However, applying a mask layer can change the thumbnail shapes (use of a mask layer to create thumbnail shapes is explained in the next section). Note: Refer back section 4.2 Color Order Chart for additional information. Page 7 of 24
-
 1
1 -
 2
2 -
 3
3 -
 4
4 -
 5
5 -
 6
6 -
 7
7 -
 8
8 -
 9
9 -
 10
10 -
 11
11 -
 12
12 -
13
-
14
-
15
-
16
-
17
-
18
-
19
-
20
-
21
-
22
-
23
-
24
 |
 |
