Pioneer FH-P8800 Owner's Manual - Page 41
Position Selector - car stereo
 |
View all Pioneer FH-P8800 manuals
Add to My Manuals
Save this manual to your list of manuals |
Page 41 highlights
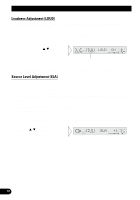
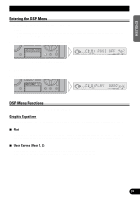
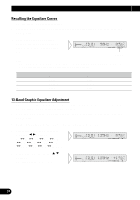
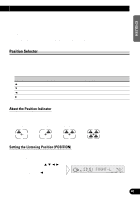
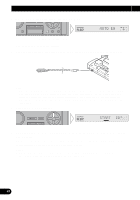
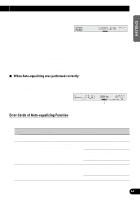
ENGLISH ESPAÑOL 5. Repeat steps 3 to 4 for the other band adjustments. Note: • You can create different User curves for different sources. (The Built-in CD Player and Multi-CD Player are set to the same Equalizer Adjustment setting automatically.) • When you have selected User 1, if you press button 2 for two seconds or more, the User 1 curve is memorized in User 2. This is convenient when you want to return the User 1 curve to its original settings and create a curve for User 2. (When you have selected User 2, if you press button 1 for two seconds or more, the User 2 curve is memorized in User 1.) Position Selector One way to assure a more natural sound is to clearly position the stereo sound image (putting you in the center of the sound field). The Position Selector function adjusts volume level of sound from each speaker to match seat positions and the number of people in the car, and lets you recall settings at the touch of a button. The result is a natural sound regardless of the seat you are sitting in. Button 5 ∞ 2 3 Display FRONT ALL FRONT-L FRONT-R Position Front Seat Right & Left All Seats Front Seat Left Front Seat Right About the Position Indicator This lets you confirm current Position setting without switching to the Position Selector mode. Front Seat Left Front Seat Right Front Seat Right&Left All Seats DEUTSCH FRANÇAIS ITALIANO NEDERLANDS Setting the Listening Position (POSITION) 1. Press the DSP button and select the Position Selector mode (POSITION) in the DSP Menu. 2. Press one of buttons 5/∞/2/3 to select the desired Position. (e.g. Press button 2.) To cancel the listening position, press the same button again. 40
-
 1
1 -
2
-
3
-
4
-
5
-
6
-
7
-
8
-
9
-
10
-
11
-
12
-
13
-
14
-
15
-
16
-
17
-
18
-
19
-
20
-
21
-
22
-
23
-
24
-
25
-
26
-
27
-
28
-
29
-
30
-
31
-
32
-
33
-
34
-
35
-
 36
36 -
 37
37 -
 38
38 -
 39
39 -
 40
40 -
 41
41 -
 42
42 -
 43
43 -
 44
44 -
 45
45 -
 46
46 -
47
-
48
-
49
-
50
-
51
-
52
-
53
-
54
-
55
-
56
-
57
-
58
-
59
-
60
-
61
-
62
-
63
-
64
-
65
-
66
-
67
-
68
-
69
-
70
-
71
-
72
-
73
-
74
-
75
-
76
-
77
-
78
-
79
-
80
-
81
-
82
-
83
-
84
-
85
-
86
-
87
-
88
-
89
-
90
-
91
-
92
-
93
-
94
-
95
-
96
-
97
-
98
-
99
-
100
-
101
-
102
-
103
-
104
-
105
-
106
-
107
-
108
-
109
-
110
-
111
-
112
 |
 |