Pioneer GEX-INNO2BK Quick Start Guide - Page 1
Pioneer GEX-INNO2BK - 1 GB, XM Radio Tuner Manual
 |
UPC - 012562901312
View all Pioneer GEX-INNO2BK manuals
Add to My Manuals
Save this manual to your list of manuals |
Page 1 highlights
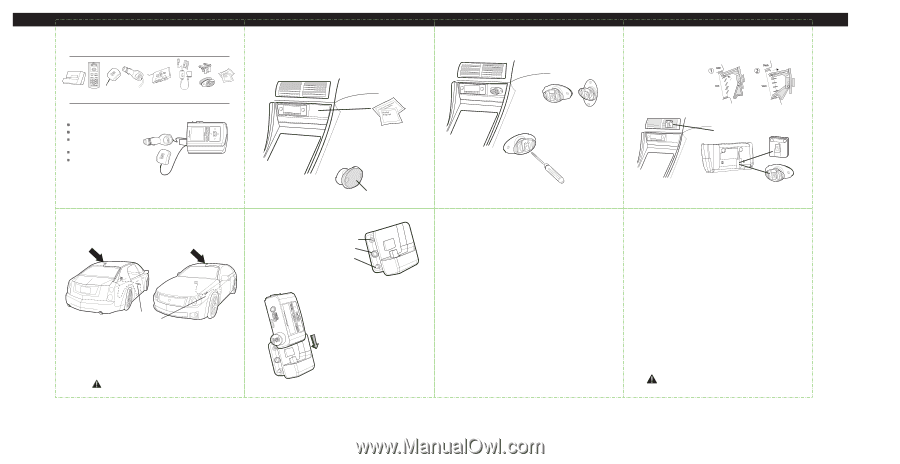
What's in the box? inno™ car kit CD-INCAR2 car cradle remote car antenna power adapter cassette XM SureConnect mounts cleaning kit adapter inno™ car kit Listen to Live XM and recorded XM content* Play MP3 and WMA files Manage your tracks, favorite channels, and playlists Listen in your vehicle Car Kit CD-INCAR2 is not compatible with GEX-INNO1 and was designed to work with GEX-INNO2BK only *Hardware and required monthly subscription sold separately. Installation cost and other fees and taxes, including a one-time activation fee may apply. Subscription fee is consumer only. XM products, programming, services, and fees are subject to change, at any time, without notice. Channels with frequent explicit language are indicated with an XL. Channel blocking is available for XM radio receivers by calling 1-800-XM-RADIO. Subscriptions subject to Customer Agreement available at xmradio.com. XM service only available in the 48 contiguous United States. ©2006 XM Satellite Radio Inc. All rights reserved. How to install the antenna Every vehicle is different; for your safety, follow all instructions carefully. Consult a professional installer if you have questions. option 1 option 2 Keep excess cable behind or under the dashboard. Mount the antenna to the roof or trunk of the vehicle. During installation, make sure you are outdoors and not obstructed by tall buildings. Warning: Failure to properly install the antenna may result in injury to yourself or to others if it becomes detached during an accident. Setup: In Vehicle Choose the best way to mount your car cradle. How to use the swivel mount To install the swivel mount, first find a suitable location. The swivel mount's adhesive is very strong and may be difficult to remove. Do not install this mount on leather surfaces and make sure the air temperature is at least 60ºF. 2. Firmly press the swivel mount to the surface for 30 seconds. Allow 24 hours before using the mount. 1. Clean the mounting surface with the surface preparation kit. Peel away the adhesive liner. Peel off adhesive liner Either orientation may be used. You can adjust the tension of the mount with a screwdriver. Be careful not to loosen it too much when you are adjusting it, or the swivel may come apart. (not included) If you need to remove the mount, carefully lift the adhesive pad with your fingers or a spoon. Warming with a hair dryer for several minutes will help soften the adhesive. How to receive XM through your car stereo Plug in all of the connectors once you have mounted the radio, installed the antenna or used the included XM SureConnect and plugged in the power adapter. The line out should be used with the included cassette adapter for the best sound quality. power line out XM Antenna or XM SureConnect (See included XM SureConnect guide for more information) 1. Insert your inno into the car cradle. 2. Turn your inno player on. 3. Turn on your car stereo. Look for a channel that sounds like it is receiving a weak or no station. (88.1 - 107.9). 4. On your inno player press the XM button. Scroll down to "Settings" choose "FM Modulator" then pick "FM Frequency." You may be in either "Live XM" or "My Music" modes. (You will not hear any music in the "My Music" mode unless you have recorded content or mp3s). 5. Follow the on screen instructions to choose the same frequency as you chose on your car stereo. You should now be able to hear XM through your car stereo. Protect your ears - Take care so that the earbud cable is not caught by your arm or other objects while walking or exercising. - Do not turn up the volume too high. Doctors warn against prolonged exposure to high volume. - Stop using your inno or turn the volume down if you have ringing in your ears. Sound can be deceiving. Over time your hearing "comfort level" adapts to higher volumes of sound. So what sounds "normal" can actually be loud and harmful to your hearing. Set your equipment at a safe level BEFORE your hearing adapts. To establish a safer level: Start your volume control at a low setting; Slowly increase the sound until you can hear it comfortably and clearly, without distortion. Once you have established a comfortable sound level: Set the dial and leave it there; taking a minute to do this now will help to preserve hearing. Pioneer and the Consumer Electronics Association recommend you avoid prolonged exposure to excessive noise. Under constant exposure such as sustained listening, sound levels above 85 decibels can be dangerous without hearing protection. (For reference, a garbage disposal or loud shouting at 3 feet away are around 80 decibels; a food blender or gas lawn mower at 3 feet away are around 90 decibels.) The longer your exposure and/or higher the sound level, the greater the danger of permanent hearing damage. Pioneer disclaims all liability for hearing loss, bodily injury or property damage as a result of use or misuse of this product. On all complaints and concerns call Customer Support at 1-800-421-1404 For hook-up and operation of your unit or to locate an Authorized Service Company, please call or write: PIONEER ELECTRONICS SERVICE, INC. P.O. BOX 1760, LONG BEACH, CALIFORNIA 90810 1- 800 - 421-1404 www.pioneerelectronics.com How to use the vent mount To install the vent mount, find a horizontal vent that is strong enough to hold your inno and its car cradle. 1. To insert the vent mount, push it into the vent as shown. To remove the vent mount, push it into the vent and lift upwards slightly to release the mount's hooks from the vent vane. Installed vent mount or 2. Attach the car cradle to either mount by sliding it into place. FCC Statement Please note that the power cable that has been supplied with your device is supplied with permanently attached ferrite beads. It is the responsibility of the user to use the power cable with the ferrite beads. The user is cautioned that changes or modifications not expressly approved by XM Satellite Radio Inc. can void the user's authority to operate this device. This device complies with Part 15 of the FCC Rules. Operation is subject to the following two conditions: (1) This device may not cause harmful interference. (2) This device must accept any interference received, including interference that may cause undesired operation. This equipment has been tested and found to comply with the limits for a Class B digital device, pursuant to Part 15 of the FCC Rules. These limits are designed to provide reasonable protection against harmful interference in a residential installation. This equipment generates, uses, and can radiate radio frequency energy and, if not installed and used in accordance with the installation instructions, may cause harmful interference to radio communications. However, there is no guarantee that interference will not occur in a particular installation. If this equipment does cause harmful interference to radio or television reception, which can be determined by turning the equipment off and on, the user is encouraged to try to correct the interference by one or more of the following measures: - Reorient or relocate the receiving antenna of the affected receiver. - Increase the separation between the XM equipment and the affected receiver. - Connect the XM equipment into an outlet on a circuit different from that to which the affected receiver is connected. - Consult the dealer or an experienced radio/TV technician for help. Warning: The FCC and FAA have not certified the inno Satellite Radio Receiver for use in any aircraft (neither portable nor permanent installation). Therefore, XM Satellite Radio cannot support this type of application or installation.
-
 1
1 -
 2
2
 |
 |