Pioneer GM-X552 Service Manual - Page 19
General Information
 |
View all Pioneer GM-X552 manuals
Add to My Manuals
Save this manual to your list of manuals |
Page 19 highlights
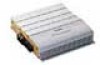
7. GENERAL INFORMATION 7.1 DISASSEMBLY - Removing the Case and the Panel (Fig.1) Remove the four screws. Remove the two screws. Remove the three screws and then remove the Case. Remove the six screws and then remove the Panel. - Removing the Amp Unit (Fig.2) Remove the fourteen screws. Remove the screw. Remove the twelve screws and then remove the Amp Unit. GM-X552 Case Panel Fig.1 Amp Unit Fig.2 19
-
 1
1 -
2
-
3
-
4
-
5
-
6
-
7
-
8
-
9
-
10
-
11
-
12
-
13
-
 14
14 -
 15
15 -
 16
16 -
 17
17 -
 18
18 -
 19
19 -
 20
20 -
 21
21 -
 22
22 -
 23
23 -
 24
24
 |
 |

GM-X552
19
7. GENERAL INFORMATION
7.1 DISASSEMBLY
Case
Fig.1
-
Removing the Case and the Panel (Fig.1)
Remove the four screws.
Remove the two screws.
Remove the three screws and then remove
the Case.
Remove the six screws and then remove the
Panel.
Fig.2
Panel
-
Removing the Amp Unit (Fig.2)
Remove the fourteen screws.
Remove the screw.
Remove the twelve screws and then remove
the Amp Unit.
Amp Unit