Pioneer VSX-43 Owner's Manual - Page 12
Connecting the speakers - help
 |
View all Pioneer VSX-43 manuals
Add to My Manuals
Save this manual to your list of manuals |
Page 12 highlights
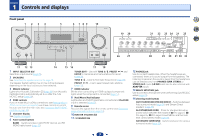
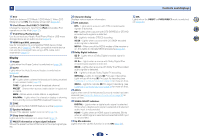
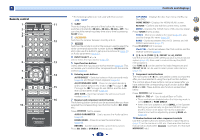
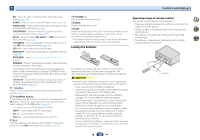
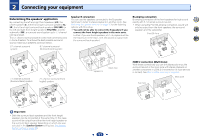
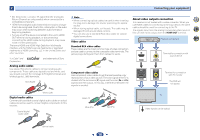
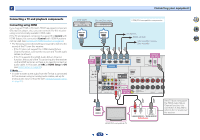
2 Connecting your equipment Some tips for improving sound quality Where you put your speakers in the room has a big effect on the quality of the sound. The following guidelines should help you to get the best sound from your system. • It is best to angle the speakers towards the listening position. The angle depends on the size of the room. Use less of an angle for bigger rooms. • Refer to the chart below for placement of speakers you intend to connect. FHL SW FHR C L R 30 30 120 120 SL 60 SR SBL SB SBR - Place the surround speakers at 120º from the center. If you, (1) use the surround back speaker, and, (2) don't use the front height speakers, we recommend placing the surround speaker right beside you. - If you intend to connect only one surround back speakers, place it directly behind you. - If the surround speakers cannot be set directly to the side of the listening position with a 7.1-channel system, the surround effect can be enhanced by turning off the Up Mix function (see Setting the Up Mix function on page 36). • For the best stereo effect, place the front speakers 2 m to 3 m apart, at equal distance from the TV. • If you're using a center speaker, place the front speakers at a wider angle. If not, place them at a narrower angle. • Place the center speaker above or below the TV so that the sound of the center channel is localized at the TV screen. Also, make sure the center speaker does not cross the line formed by the leading edge of the front left and right speakers. • Surround and surround back speakers should be positioned 60 cm to 90 cm higher than your ears and titled slight downward. Make sure the speakers don't face each other. For DVD-Audio, the speakers should be more directly behind the listener than for home theater playback. • Try not to place the surround speakers farther away from the listening position than the front and center speakers. Doing so can weaken the surround sound effect. • Place the left and right front height speakers at least one meter directly above the left and right front speakers. • If you're going to place speakers around your CRT TV, use shielded speakers or place the speakers at a sufficient distance from your CRT TV. • The subwoofer can be placed on the floor. Ideally, the other speakers should be at about ear-level when you're listening to them. Putting the speakers on the floor (except the subwoofer), or mounting them very high on a wall is not recommended. • When not connecting a subwoofer, connect speakers with low frequency reproduction capabilities to the front channel. (The subwoofer's low frequency component is played from the front speakers, so the speakers could be damaged.) • After connecting, be sure to conduct the Auto MCACC (speaker environment setting) procedure. See Automatically setting up for surround sound (MCACC) on page 23. CAUTION • Make sure that all speakers are securely installed. This not only improves sound quality, but also reduces the risk of damage or injury resulting from speakers being knocked over or falling in the event of external shocks such as earthquakes. Connecting the speakers The receiver will work with just two stereo speakers (the front speakers in the diagram) but using at least three speakers is recommended, and a complete setup is best for surround sound. Make sure you connect the speaker on the right to the right (R) terminal and the speaker on the left to the left (L) terminal. Also make sure the positive and negative (+/-) terminals on the receiver match those on the speakers. You can use speakers with a normal impedance between 6 and 16 . Be sure to complete all connections before connecting this unit to the AC power source. 4 7 62 Bare wire connections 1 Twist exposed wire strands together. 2 Loosen terminal and insert exposed wire. 3 Tighten terminal. 1 2 3 10 mm (3/8 in.) Connect the wires to the B-Speakers terminals as shown below: 1 Twist exposed wire strands together. 2 Push open the tabs and insert exposed wire. 3 Release the tabs. 1 2 3 10 mm (3/8 in.) 12
-
 1
1 -
2
-
3
-
4
-
5
-
6
-
 7
7 -
 8
8 -
 9
9 -
 10
10 -
 11
11 -
 12
12 -
 13
13 -
 14
14 -
 15
15 -
 16
16 -
 17
17 -
18
-
19
-
20
-
21
-
22
-
23
-
24
-
25
-
26
-
27
-
28
-
29
-
30
-
31
-
32
-
33
-
34
-
35
-
36
-
37
-
38
-
39
-
40
-
41
-
42
-
43
-
44
-
45
-
46
-
47
-
48
-
49
-
50
-
51
-
52
-
53
-
54
-
55
-
56
-
57
-
58
-
59
-
60
-
61
-
62
-
63
-
64
-
65
-
66
-
67
-
68
 |
 |
