Pioneer VSX-523-K Owner's Manual - Page 8
Input function buttons - 5 1 ch receiver
 |
View all Pioneer VSX-523-K manuals
Add to My Manuals
Save this manual to your list of manuals |
Page 8 highlights
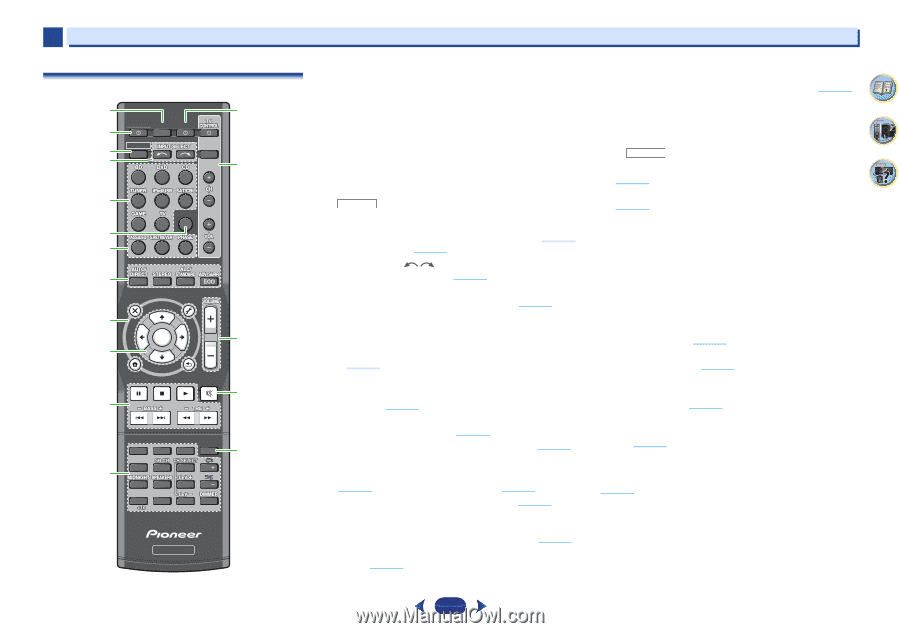
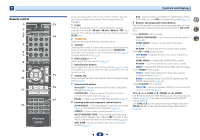
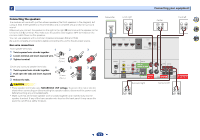
1 Remote control 1 RECEIVER SLEEP SOURCE 2 3 RECEIVER 4 INPUT 13 14 5 SIGNAL SEL 6 7 8 AUDIO PARAMETER TOP 9 MENU TUNE TOOLS MENU PRESET PRESET 10 HOME MENU PTY iPod CTRL ENTER TUNE BAND RETURN MUTE 11 15 16 12 1 2 3 DISP 4 5 6 CH 7 8 9 CH CLR 0 ENTER 17 RECEIVER Controls and displays As for operating other devices, the remote control codes for the Pioneer products are preset. The settings cannot be changed. 1 SLEEP Press to change the amount of time before the receiver switches into standby (30 min - 60 min - 90 min - Off). You can check the remaining sleep time at any time by pressing SLEEP once. 2 RECEIVER Switches the receiver between standby and on. 3 RECEIVER Switches the remote to control the receiver (used to select the white commands above the number buttons (MIDNIGHT, etc)). Also use this button to set up surround sound (page 30) or Audio parameters (page 28). 4 INPUT SELECT Use to select the input source (page 21). 5 Input function buttons Use to select the input source to this receiver (page 21). This will enable you to control other Pioneer components with the remote control. 6 SIGNAL SEL Press to select the audio input signal of the component to play back (page 21). 7 Sound control buttons Acous.EQ - Press to switch on/off Acoustic Calibration EQ setting (page 27). S.RETRIEVER - Press to restore CD quality sound to compressed audio sources (page 27). PHASE - Press to switch on/off Phase Control (page 27). 8 Listening mode and component control buttons AUTO/DIRECT - Switches between Auto surround mode (page 26) and Stream Direct playback (page 27). STEREO - Press to select stereo playback (page 26). ALC/STANDARD SURR - Press for standard decoding and to switch between the modes of 2 Pro Logic II and NEO:6, and the Auto level control stereo mode (page 26). ADV SURR - Switches between the various surround modes (page 27). ECO - Switches between ECO Mode 1/ECO Mode 2. When ECO Mode is turned ON, the display will go dark (page 27). 9 Receiver and component control buttons The following button controls can be accessed after you have selected the corresponding input function button (BD, DVD, etc.). Press RECEIVER first to access: AUDIO PARAMETER - Use to access the Audio options (page 28). HOME MENU - Press to access the Home Menu (page 30). RETURN - Confirm and exit the current menu screen. Press BD or DVD first to access: TOP MENU - Displays the disc 'top' menu of a Blu-ray Disc/DVD. HOME MENU - Displays the HOME MENU screen. RETURN - Confirm and exit the current menu screen. MENU - Displays the TOOLS menu of Blu-ray Disc player. Press TUNER first to access: TOOLS - Memorizes stations for recall, also used to change the name (page 25). BAND - Switches between AM, FM ST (stereo) and FM MONO radio bands (page 25). Press iPod/USB first to access: iPod CTRL - Switches between the iPod controls and the receiver controls (page 23). 10 TUNE /, PRESET /), ENTER Use the arrow buttons when setting up your surround sound system (page 30). Also used to control Blu-ray Disc/DVD menus/options. Use TUNE / can be used to find radio frequencies and PRESET / can be used to select preset radio stations (page 25). 4 6 34 8
-
 1
1 -
2
-
 3
3 -
 4
4 -
 5
5 -
 6
6 -
 7
7 -
 8
8 -
 9
9 -
 10
10 -
 11
11 -
 12
12 -
 13
13 -
14
-
15
-
16
-
17
-
18
-
19
-
20
-
21
-
22
-
23
-
24
-
25
-
26
-
27
-
28
-
29
-
30
-
31
-
32
-
33
-
34
-
35
-
36
-
37
-
38
 |
 |