Pioneer VSX-LX301 Basic Manual English/French/Spanish - Page 25
> Playback - reset
 |
View all Pioneer VSX-LX301 manuals
Add to My Manuals
Save this manual to your list of manuals |
Page 25 highlights
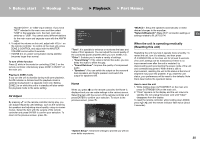
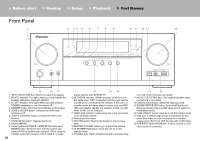
> Before start > Hookup > Setup > Playback > Part Names "BLUETOOTH", or "USB" input selector. If you have "NET" selected in the main room and then select "USB" in the separate room, the main room also switches to "USB". You cannot select different stations for the main room and separate room with the AM/FM radio. 4. To adjust the volume on this unit, adjust with VOL+/- on the remote controller. To control on the main unit, press ZONE 2-CONTROL and adjust with the MASTER VOLUME control within 8 seconds. 0 If ZONE 2 is on, power consumption during standby becomes larger than normal. To turn off the function Press Í while in the mode for controlling ZONE 2 on the remote controller. Alternatively press ZONE 2-ON/OFF on the main unit. Playing in ZONE 2 only If you turn the unit to standby during multi-zone playback, the Z2 indicator is dimmed and the playback mode is switched to playback in a separate room only. Setting ZONE 2 to on while this unit is in standby will also switch the playback mode to the same setting. AV Adjust By pressing on the remote controller during play, you can adjust frequently used settings, such as the switching the speakers and adjusting sound quality, using on-screen menus. Select the item with the cursors of the remote controller and press ENTER to confirm your selection. To return to the previous screen, press . AV Adjust Tone Level MCACC Other Bass Treble BD/DVD "Tone": It is possible to enhance or moderate the bass and treble of front speakers. You can adjust the sound quality of the connected power amplifier when you turn ZONE 2 on. "Other": Enables you to make a variety of settings. 0 "Sound Delay": If the video is behind the audio, you can delay the audio to offset the gap. 0 "Sound Retriever": Improve the quality of compressed audio. 0 "Speakers": You can switch the output on the surround back speakers and height speakers and switch the output for speakers A/B. Home When you press on the remote controller, the Home is displayed and you can make settings in the various menus. Select the item with the cursors of the remote controller and press ENTER to confirm your selection. To return to the previous screen, press . "MCACC": Setup the speakers automatically or make desired changes to the equalizer. "Network/Bluetooth": Make Wi-Fi connection settings or settings related to BLUETOOTH. En When the unit is operating erratically (Resetting this unit) Restarting the unit may help it operate more smoothly. To restart the unit, turn it to standby, and then press Í STANDBY/ON on the main unit for at least 5 seconds. (The unit's settings will be maintained.) If there is no improvement even after the unit is restarted, try disconnecting and reconnecting the power cords of the unit and connected equipment. When there is still no improvement, resetting the unit to the status at the time of shipment may solve the problem. If you reset the unit status, your preferences will be reset to the defaults. Note them down before the operation below. How to reset the unit 1. While holding down AUTO/DIRECT on the main unit, press Í STANDBY/ON on the main unit. 2. "Clear" appears on the display and the unit returns to standby. Do not unplug the power cord until "Clear" disappears from the display. To reset the remote controller, while holding down MODE, press until the remote indicator flash twice (about 3 seconds). "System Setup": Advanced settings to provide you with an even better experience. 25
-
 1
1 -
2
-
3
-
4
-
5
-
6
-
7
-
8
-
9
-
10
-
11
-
12
-
13
-
14
-
15
-
16
-
17
-
18
-
19
-
 20
20 -
 21
21 -
 22
22 -
 23
23 -
 24
24 -
 25
25 -
 26
26 -
 27
27 -
 28
28 -
 29
29 -
 30
30 -
31
-
32
-
33
-
34
-
35
-
36
-
37
-
38
-
39
-
40
-
41
-
42
-
43
-
44
-
45
-
46
-
47
-
48
-
49
-
50
-
51
-
52
-
53
-
54
-
55
-
56
-
57
-
58
-
59
-
60
-
61
-
62
-
63
-
64
-
65
-
66
-
67
-
68
-
69
-
70
-
71
-
72
-
73
-
74
-
75
-
76
-
77
-
78
-
79
-
80
-
81
-
82
-
83
-
84
-
85
-
86
-
87
-
88
-
89
-
90
-
91
-
92
 |
 |
