Pioneer VSX-LX505 ELITE AV Receiver Set-Up Guide - Page 2
Input
 |
View all Pioneer VSX-LX505 ELITE AV Receiver manuals
Add to My Manuals
Save this manual to your list of manuals |
Page 2 highlights
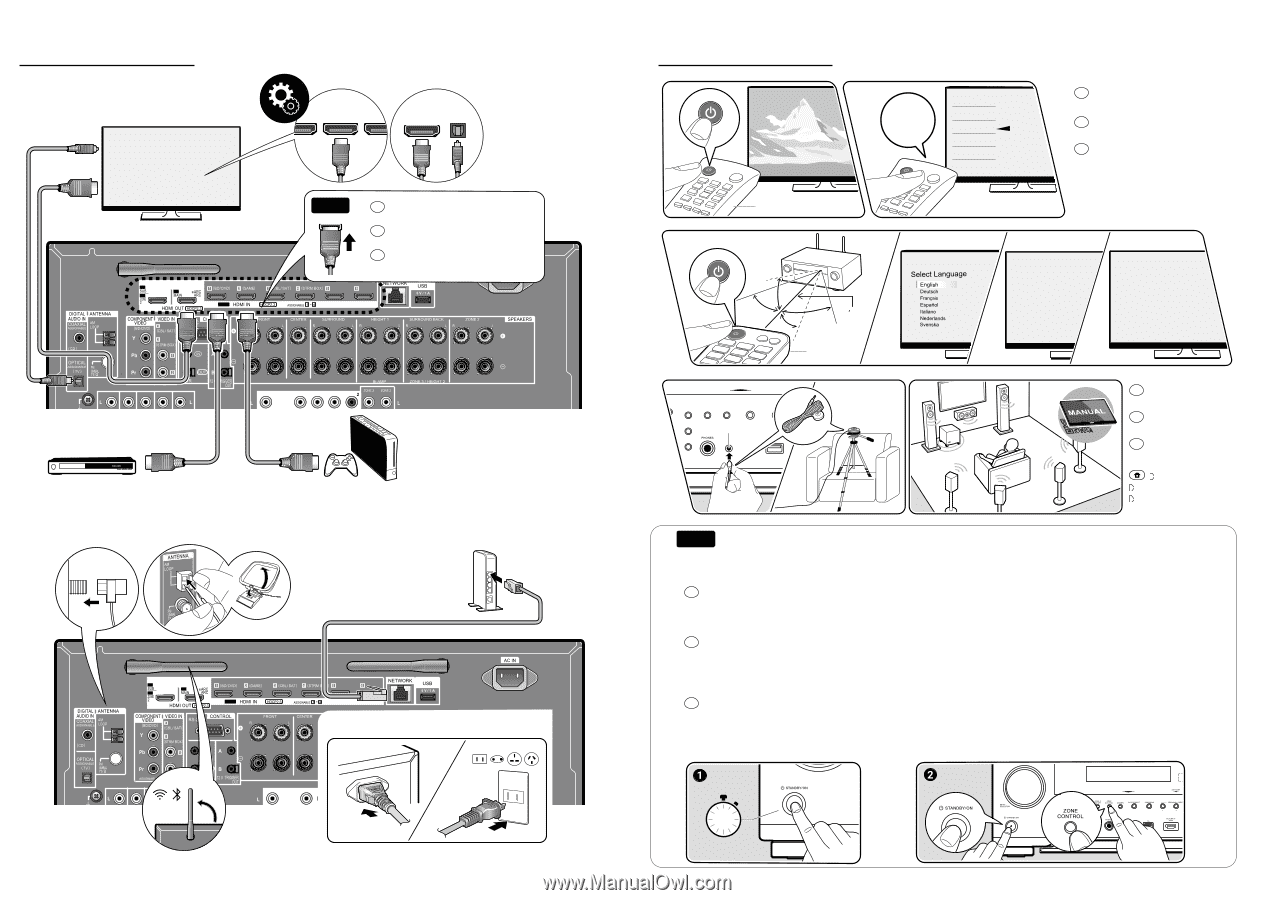
STEP 2 Digital optical cable HDMI cable 8K 8K 4K 8K ARC TV HDMI IN (ARC) Non-ARC TV DIGITAL HDMI IN OPTICAL OUT Info En Be sure to insert the HDMI cable all the way in. Fr Assurez-vous d'avoir inséré le câble HDMI à fond. Es Asegúrese de insertar el cable HDMI del todo. BD/DVD FM AM AB 8K 8K 4K 8K GAME Ethernet cable Finish STEP 3 TV TV's REMOTE INPUT TV Inputs TV HDMI 1 HDMI 2 HDMI 3 En Switch the input on the TV to that assigned to the unit. Fr Réglez l'entrée du téléviseur sur celle assignée à l'appareil. Es Cambie la entrada en la TV a aquella asignada a la unidad. 20° 30° 20° 16 (5 m) 30° This Unit's REMOTE SETUP MIC IInnitiiaallSSeetutpup 1st Step : Speaker Setup 2nd Step : Full Auto MCACC 3rd Step : Multi Zone Sound Check 4th Step : ARC Setup 5th Step : Network Connection Initial Setup Network Connection Initial Setup 1st Step : Speaker Setup 2nd Step : Multi Zone Sound Check 3rd Step : ARC Setup 4th Step : Dirac Live / Full Auto MCACC En To redo the initial setup Fr Pour refaire la configuration initiale Es Para rehacer la configuración inicial "System Setup" "Miscellaneous" "Initial Setup" Info Troubleshooting Dépannage / Solución de problemas En Try restarting the unit. Switch this unit to standby, then do 1. If the problem is not fixed, try the following: • Unplugging the power cord and HDMI cables then replugging them in again • Initializing the settings (do 2 while this unit is ON) • Updating the firmware Fr Essayez de redémarrer l'appareil. Passez l'appareil en veille, puis effectuez 1. Si le problème n'est pas résolu, essayez les choses suivantes: • Débrancher le cordon d'alimentation et les câbles HDMI puis les rebrancher • Initialiser les réglages (effectuer 2 pendant que cet appareil est sur ON) • Mettre à jour le micrologiciel Es Pruebe a reiniciar la unidad. Ponga esta unidad en espera y luego haga 1. Si el problema no se soluciona, intente lo siguiente: • Desenchufar el cable de alimentación y los cables HDMI y luego volver a enchufarlos • Inicializar los ajustes (haga 2 mientras esta unidad está ON) • Actualizar el firmware Restart 5" Initialize 2 1 "Pioneer" and "ELITE" are trademarks of Pioneer Corporation, and are used under license.
-
 1
1 -
 2
2
 |
 |