Polaroid LE User Guide - Page 6
Positioning your subject, Taking the picture
 |
UPC - 074100181525
View all Polaroid LE manuals
Add to My Manuals
Save this manual to your list of manuals |
Page 6 highlights
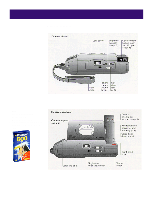
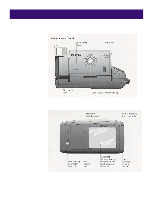
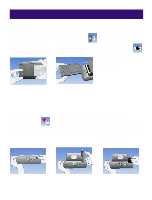
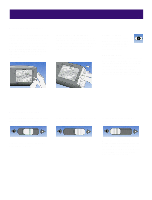
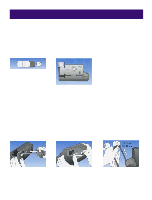
6 Positioning your subject Hold the camera grips as shown, resting your right index finger on the shutter button. Look through the viewfinder to compose your picture; what you see is exactly what your picture will include. Note: If the viewfinder appears black, the camera is not fully opened. Push the flash forward until the camera clicks open. For vertical pictures such as portraits and individual subjects, turn the camera sideways for best results. To minimize shadows, be sure the flash is on top, as shown. The camera orientation symbol on the back of the flash unit will remind you how to hold the camera. Indoors, your subject should be between 2 to 10 ft. (.6 to 3m) away and near a light colorful background for best results. Outdoors, your subject should be at least 2 ft. (.6m) away. Keep the sun behind you or to your side. Taking the picture When the green light is on, the flash is fully charged. If it is not on, touch the shutter button lightly to charge the flash. The flash always fires, outdoors and indoors, in all lighting situations. Press the shutter button to take the picture. The viewfinder will go black; hold the camera steady until you can see the scene through the viewfinder again. The flash will recharge for the next picture within seconds. The picture will advance automatically into the picture storage compartment, on top of the previous picture. The pictures are dry and will not stick together.The image will start to appear in less than a minute. The picture can be removed immediately or stored in the compartment, which can hold all the prints from one pack of film, plus the film cover.
-
 1
1 -
 2
2 -
 3
3 -
 4
4 -
 5
5 -
 6
6 -
 7
7 -
 8
8 -
 9
9 -
 10
10 -
 11
11
 |
 |