Polaroid XS20 Polaroid XS20 Sports Action Camera Manual - Page 4
Waterproof Plug, Charging the Battery, Camera Power Up, Selecting Image-Taking Modes
 |
View all Polaroid XS20 manuals
Add to My Manuals
Save this manual to your list of manuals |
Page 4 highlights
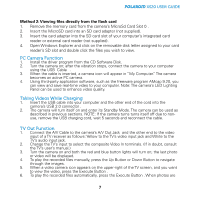
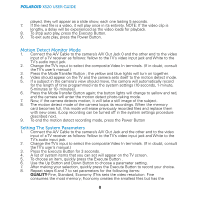
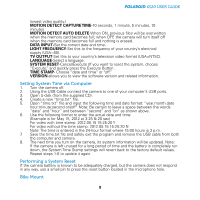
POLAROID XS20 USER GUIDE Waterproof Plug The waterproof housing allows the camera to operate as deep as 60 feet under water. In order to protect the camera when using it in wet conditions, you must seal the camera's operation panel with the Waterproof plug. Failure to properly seal your camera can result in leaks that may damage or destroy your camera. Your warranty does not cover water damage resulting from user neglect. Charging the Battery 1. Remove the Water Seal from the rear of the camera. 2. Insert the USB cable into your computer and the other end of the cord into the camera's USB 2.0 connector . 3. The Charging Indicator Light will light red. 4. Charging is completed when the the charging indicator light turns off. Note: A completely discharged battery will take approximately 3 hours to charge. To lessen charge times, it is recommended that the battery be charged after every use. 5. When the USB Data Cable is connected between the camera and a computer, the battery will charge, but the charge rate is very low. Therefore, it is recommended that you charge the camera battery using a Power Adapter (not included). Camera Power Up 1. Insert a MicroSD card (1GB - 32GB) into the MicroSD card slot. 2. Depress the Power Button for 2 seconds and release. 3. The blue LED indicators light up and the camera's body will vibrate. When the vibrating stops, the camera will enter its Standby Mode. Note: If the blue LEDs flash during the turn-on procedure, it indicates that there is no MicroSD card in the slot. Turn the power off and insert a flash card. There is no internal memory. All images are recorded on the flash card which you provide. 4. To turn the camera off, depress the Power Button for 2 seconds and release. 5. The blue LED blinks 3 times and then goes out; the camera shakes twice, and then it shuts off. Note: The camera will shut off automatically if the flash card becomes full and the loop function is off. Selecting Image-Taking Modes 1. Depress the Power Button for 2 seconds and release. 2. The blue LED indicators light and the camera body will vibrate. When the vibrating stops, the camera will enter its Standby Mode. 4
-
 1
1 -
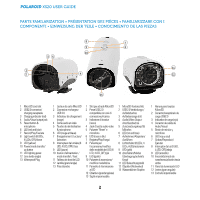 2
2 -
 3
3 -
 4
4 -
 5
5 -
 6
6 -
 7
7 -
 8
8 -
 9
9 -
 10
10 -
11
-
12
-
13
-
14
-
15
-
16
-
17
-
18
-
19
-
20
-
21
-
22
-
23
-
24
-
25
-
26
-
27
-
28
-
29
-
30
-
31
-
32
-
33
-
34
-
35
-
36
-
37
-
38
-
39
-
40
-
41
-
42
-
43
-
44
-
45
-
46
-
47
-
48
-
49
-
50
 |
 |