Polaroid iD640 User Manual - Page 7
Power, Right
 |
View all Polaroid iD640 manuals
Add to My Manuals
Save this manual to your list of manuals |
Page 7 highlights
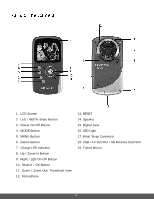
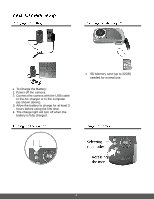
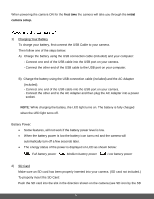
card slot). Push the SD card until you hear a slight clicking sound. This indicates the SD card has been inserted correctly. Note: After the camera is powered on, an SD icon will appear on the LCD display. If you do not see the SD icon on the display, please check if the card was inserted properly. Make sure the SD card is not locked (check the lock switch on the side of the SD card). If the SD card is locked this will prevent the camera from saving captured photos to the SD card. 3) Power On Press the POWER button to turn on the camera. After powering on your camera for the first time, you will be prompted to select a language for the camera. The Language selection menu appears. Select the language of your choice by pressing the UP and DOWN direction control buttons. Then press the OK button to confirm the selection. The next step in the initial camera setup is to set the date and time on the camera. Set the Date and Time as desired by pressing the RIGHT and LEFT direction control buttons to choose the specific setting and the UP and DOWN buttons to change each setting. Once you have completed setting the time and date, press the OK button to confirm the selection and finish the camera setup. 6
-
 1
1 -
 2
2 -
 3
3 -
 4
4 -
 5
5 -
 6
6 -
 7
7 -
 8
8 -
 9
9 -
 10
10 -
 11
11 -
 12
12 -
13
-
14
-
15
-
16
-
17
-
18
-
19
-
20
-
21
-
22
-
23
-
24
-
25
-
26
-
27
-
28
-
29
-
30
-
31
-
32
-
33
-
34
-
35
-
36
-
37
-
38
-
39
-
40
-
41
-
42
-
43
-
44
-
45
-
46
-
47
-
48
-
49
-
50
-
51
-
52
-
53
-
54
-
55
-
56
-
57
-
58
-
59
-
60
-
61
 |
 |
