Polk Audio 255c-RT DIY In-Ceiling and In-Wall Installation Guide - Page 10
Tips to running cable in existing walls - in ceiling
 |
View all Polk Audio 255c-RT manuals
Add to My Manuals
Save this manual to your list of manuals |
Page 10 highlights
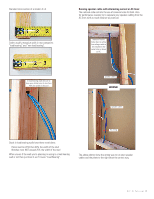
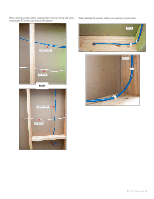
Tips to running cable in existing walls Vertical runs: In a 2 story home where you want to run cabling between floors to some ceiling speakers: Wrong ceiling joist And when using tie wraps or staples be careful to not "over tighten" or "over fasten" the cables: These cables so mashed and attached to these studs that they now rate as part of the structural mass helping hold the house up! proposed cable run Using your stud finder determine which way the joists or structural members above your ceiling run. Then notch out a small section of the drywall on the wall and ceiling as shown: Much Better top plate Leave a bit of room, these cables are not going anywhere, and we have not damaged the integrity of the conductors-Elvis is pleased that his music is not distorted. ceiling joist View from inside the ceiling space D I Y C I T u t o r i a l 10
-
 1
1 -
2
-
3
-
4
-
 5
5 -
 6
6 -
 7
7 -
 8
8 -
 9
9 -
 10
10 -
 11
11 -
 12
12 -
 13
13 -
 14
14 -
 15
15 -
16
 |
 |
