Polk Audio Atrium4 Atrium Series - English - Page 5
Vertical Mount Aimed 45° Down, Receiver Hookup - atrium 4 black
 |
View all Polk Audio Atrium4 manuals
Add to My Manuals
Save this manual to your list of manuals |
Page 5 highlights
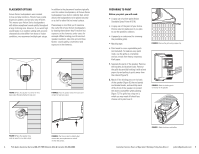
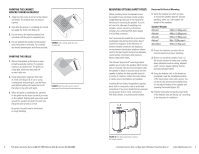
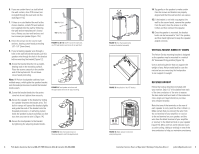
6. If you are certain there is a stud behind the wall surface, drive #10 screws (not included) through the wall and into the stud [figure 11a]. 7. If there is no stud behind the wall at the chosen location, install #10 wall anchors (not supplied) into the wall by following the wall-anchor-manufacturer's instructions. Always use two wall anchors and two screws per speaker [figure 11b]. 8. Drive the screws into the stud or wall anchors, leaving screw heads protruding 1/8"~1/4" (3mm~6mm). 9. If you're feeding speaker wire through a hole in the wall behind the bracket, pull this speaker wire through the hole in the bracket before mounting the bracket [figure 12]. 10. Screw the bracket directly into a weightbearing stud on the mounting surface. Place the screws securely in the smaller end of the keyhole slot. Do not leave screw heads protruding. Note: All Atrium loudspeaker cabinets have molded ramps, which guide the speaker bracket onto threaded protrusions to which the bracket knobs attach. 11. Screw the bracket knobs into the protrusions but do not tighten them securely. 12. Secure the speaker to the bracket by sliding the speaker between the bracket arms. The built-in ramps will spread the bracket slightly and guide the ends of the bracket onto the threaded protrusions. A ratcheting system holds the speaker in place and helps you fine tune how you want to aim it. [figure 14]. 13. Secure the loudspeaker to the bracket by tightening the adjusting bracket knobs. 11a Wall Stud 11b No Wall Stud FIGURE 11a & 11b: Use #10 screw for wall stud, use #10 wall anchors and screw for no wall stud. FIGURE 12: Feed speaker wire from wall through bracket wire hole for easy mounting. FIGURE 13: Slide the bracket down on the screw heads to catch the keyhole slots. 8 Polk Audio Customer Service 800-377-7655 (Outside USA & Canada: 410-358-3600) FIGURE 14: Turn the bracket knobs to remove the bracket assembly. FIGURE 15: Installation of the 45° bracket. FIGURE 16: Make speaker connection using binding posts. 14. Tug gently on the speaker to make certain that the screws and bracket are properly aligned and that the wall anchors are secure. 15. If the bracket is not held snug against the wall by the screw heads, remove the speaker from the wall, drive the screws in a little further and then remount the speaker. 16. Once the speaker is mounted, the bracket knobs can be loosened to "aim" the speaker, and then hand tightened to keep the speaker angled correctly. VERTICAL MOUNT AIMED 45° DOWN The Atrium Series mounting bracket is designed so the speakers may be mounted in a vertical 45° downward firing position [Figure 15]. Use an anchoring device that can support the weight of your Atrium model and be sure the material you are mounting the loudspeaker to can support its weight. RECEIVER HOOKUP Follow the hookup directions included with your receiver. Strip 1/2" of insulation from each of the two conductors of the wire to expose the bare metal and twist each of the conductors into a single un-frayed strand (so you have two unfrayed strands). Note that one of the terminals on the rear of each speaker is red (+) and the other is black (-). Make certain that you connect the wire from the red terminal of your amplifier or receiver to the red terminal on your speaker; and the wire from the black terminal of your amplifier or receiver to the black terminal on your speaker [figure 16]. Most wire has some indicator (such as color-coding, ribbing or writing) on one of the two conductors to help you maintain consistency. Customer Service Hours of Operation: Monday-Friday, 9AM-6PM EST [email protected] 9
-
 1
1 -
 2
2 -
 3
3 -
 4
4 -
 5
5 -
 6
6 -
 7
7 -
 8
8 -
 9
9 -
 10
10 -
 11
11 -
12
-
13
-
14
-
15
-
16
-
17
-
18
-
19
-
20
-
21
-
22
-
23
-
24
-
25
-
26
-
27
 |
 |
