Polk Audio FR1 FR1 Product Manual - Page 3
Increase/Decrease
 |
View all Polk Audio FR1 manuals
Add to My Manuals
Save this manual to your list of manuals |
Page 3 highlights
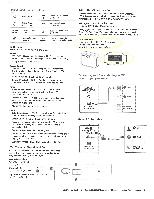
Sound Bar & Remote Buttons Power On/Off OPT 1 Source Select AUX (on Sound Bar) 2 voLumE - Increase/Decrease Volume Mutes and unmutes the sound BASS ±- Optical Source 1 Mode (on Remote) Aux Source 2 Mode (on Remote) Bluetooth Source Mode (on Remote) Increase/Decrease Bass (on Remote for optional sub) LED Guide There are four LEDs on the front of the bar. Power On -Active source (in white) displayed for 3 seconds then fades out until another button is pressed (volume, source, etc.). Sleep/Standby-LED 1 pulses Source Select Source 1 Optical-LED 1 flashes green while recognizing the Dolby signal, then shines green in Dolby Digital; in PCM LED 1 shines white. Source 2 Analog-LEDs 1 and 2 shine white Souce 3 Bluetooth-LEDs 1, 2 and 3 shine white when connected; LEDs 1, 2 and 3 pulse when in discovery mode. Volume Vol Up-Each LED reflects 7 steps of volume increase. When max volume is reached (28 steps) all four LEDs flash twice then turn off. Vol Down-Each LED reflects 7 steps of volume decrease. When Mute is reached (28 steps) LED 1 flashes ix/sec until taken out of Mute. Mute-LED 1 flashes ix/sec until unmuted. Learn Enter Learn Mode-LEDs 1 thru 4 cycle on/off repeatedly until a button to be learned is pressed or it times out. Button Selected on bar-LEDs 1 thru 4 shine white Pressing the remote button to be learned -LEDs 1 thru 4 flash white with every press until command learning is successful or fails. Command learned -LED 1 flashes green 3x Command fail -LEDs 1 and 3 flash together, then LEDs 2 and 4; repeats 3x (after unsuccessful learn, bar will exit Learn mode; display returns to source). Command erased -LED 1 blinks green, then white 3x. Wall M unting Your Sound I .ar If you choose to wall mount your Sound Bar, ensure that your wall anchors secure properly into the wall and that they can bear the weight of 'the Sound Bar. Overall Dimensions 1. 3 7/16" H (8.73 cm) 2. 31" (78.74 cm) Keyhole Slots 3. 19 13/16" W (50.32 cm) OL Top of Bar to Keyhole Slots 4. 1 5/16" (3.33 cm) Adjust Bass Volume on Bar Press and hold MUTE, then press Volume Up or Volume Down. LED 1 flashes green when button pressed; flashes 2 X at minimum volume; LEDs 1-4 all flash white 2X at maximum volume. • Wireless Transmitter Port for Optional FR1 Wireless Subwooler To enjoy greater bass performance, acid an optional FRi Wireless Subwoofer. Your Dish TV representative can help you place and set up the subwoofer (wireless transmitter comes with subwoofer). Want more bass? Upgrade your bar with a Polk Subwoofer. Contact Dish: 888-333-DISH www.dish.com/smarthomeservices 0 Want more ki .:r.sei,•!-' ,Mt Connecting your Sound Bar to your TV Source 1: Digital Optical Hookup TV ANALOG AUDIO OUTPUT R Lo OPT AUX DIGITAL OPTICAL AUDIO OUTPUT POWER DC INPUT 95V Source 2: Analog Hookup TV ANALOG AUDIO OUTPUT R 1- L DIGITAL OPTICAL AUDIO OUTPUT ti OPT Q AUX 7-7 POWER DC INPUT 159 Customer Service Hours of Operation: Monday-Friday, 9AM-5:3OPM EST [email protected] 3
-
 1
1 -
 2
2 -
 3
3 -
 4
4
 |
 |
