Polk Audio LEGEND L800 Owner Manual - Page 6
Legend Series SDA Pro Speaker Positioning
 |
View all Polk Audio LEGEND L800 manuals
Add to My Manuals
Save this manual to your list of manuals |
Page 6 highlights
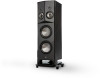
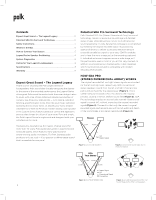
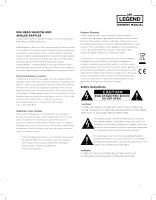
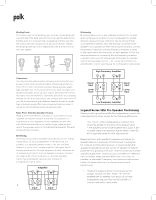
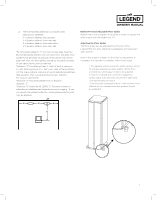
Binding Posts To connect wire to the binding post, unscrew the binding post cap and insert the bare wire into the hole near the base of the binding post. Do not insert the insulated part of the wire into the hole as this will not give you a good connection. Tighten the binding post cap until it seats firmly with the wire, but do not over tighten. Bi-Amping Bi-amping allows you to use separate amplifiers for the high and low frequency sections of your loudspeaker for greater dynamic range and lower distortion. We recommend that your separate amplifiers have identical gain to preserve the speaker's voicing balance. After removing the jumpers, connect the speaker wires from the high frequency amplifier outputs to the upper set of terminal posts on each speaker. Follow the same procedure for connecting the low frequency amplifier outputs to the lower set of terminals. Remember to maintain correct wiring polarity (+ to +, - to -) in all connections. See amplifier/AV receiver user manual for configuration instructions. Connectors You have several options when choosing connectors for your speaker wires, and it's really a matter of personal preference. Three of the more commonly used are banana plugs, spade lugs and bare wire. If you know where you want to locate your speakers and plan to set up your system and leave them there, then bare wire will work fine. Just make sure there are not stray strands of wire that could come into contact with each other. If you like to experiment with different speaker locations, spade lugs or banana plugs offer more convenient options when it comes to disconnecting and reconnecting wires. Basic Floor-Standing Speaker Hookup Make sure that the red (+) and black (-) connectors on your amplifier or receiver connect to the red (+) and black (-) connectors on your speakers. If your speakers sound "thin," with little bass and little or no center image, odds are that one of the speaker wires is connected backwards. Double check all connections. Bi-Wiring Bi-wiring can provide noticeable improvements in the overall transparency of your loudspeakers. After removing the jumpers, run separate speaker wires to the low and high frequency inputs from a single amplifier (the upper set of binding posts are for the high frequency drivers, the lower set of binding posts are for the low frequency drivers). Connect the other ends of both wire sets to the same amplifier inputs. See amplifier/AV receiver user manual for configuration instructions. 1. 6 High Frequency Amplifier - L+ - R+ Upper Input Lower Input -+ L -+ -+ R -+ Upper Input Lower Input - L+ - R+ Low Frequency Amplifier Legend Series SDA Pro Speaker Positioning Placement of Legend Series SDA Pro loudspeakers is much like a standard stereo setup, except for the following differences: • No "toe-in" of the loudspeakers is required. They should be parallel to the plane of the listener's ears • The speakers will be closer together than usual. A 60° included angle is standard for regular stereo, where 3040° is typically better for SDA reproduction Experimentation with speaker-to-speaker and listener-tospeaker distance is necessary to find the best combination for a listener and the listening space. A recommended 6-8' speaker-to-speaker placement and 10'-12' speaker-to-listener placement is a good place to start. Find the combination where apparent stage width, timbral accuracy and direct-to-reflected ratio is the best. Keep side wall reflections as far away as possible, or absorbed if necessary, for maximum performance. Follow the below directions to ensure optimal sound performance. 1. Place both speakers along the same wall facing straight forward. DO NOT ANGLE SPEAKERS INWARD OR OUTWARD. The design of the SDA loudspeakers requires that they be parallel to a common wall and to each other.
-
 1
1 -
 2
2 -
 3
3 -
 4
4 -
 5
5 -
 6
6 -
 7
7 -
 8
8 -
 9
9 -
 10
10
 |
 |