Poulan 172787 User Manual - Page 16
Before Starting Engine, To Start Engine, To Stop Engine
 |
View all Poulan 172787 manuals
Add to My Manuals
Save this manual to your list of manuals |
Page 16 highlights
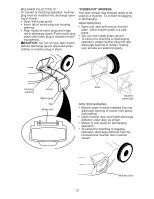
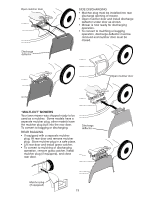
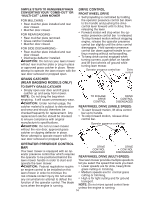
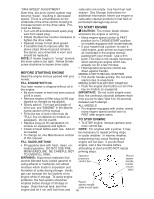
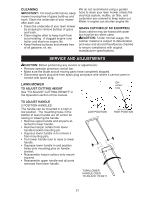
"VARI-SPEED" ADJUSTMENT carburetor are empty. Use fresh fuel next Over time, the drive control system may season. See Storage Instructions for become "loose", resulting in decreased additional information. Never use engine or speed. There is a thumbscrew on the carburetor cleaner products in fuel tank or underside of the drive control housing to permanent damage may occur. increase tension on the drive cable. Pro- ceed as follows: TO START ENGINE • Turn unit off and disconnect spark plug CAUTION: The mower blade rotates wire from spark plug. whenever the engine is running. • Rotate thumbscrew counter-clockwise to tighten the drive cable. • Operate mower to test drive speed. • If condition fails to improve after the above steps (forward speed remains the same), your drive belt is worn and should be replaced. NOTE: If mower begins to "creep" forward, the drive cable is too tight. Rotate thumbscrew clockwise to loosen drive cable. • Move engine speed control to FAST position (or to CHOKE/START position on models equipped with choke feature). • If your mower has a primer, to start a cold engine, push primer as many times as instructed in the engine manual packed with your mower. Use a firm push. This step is not usually necessary when starting an engine which has already run for a few minutes. • Hold operator presence control bar BEFORE STARTING ENGINE Read the engine manual packed with your mower. down against handle. MODELS WITH RECOIL STARTER • Pull starter handle quickly. Do not allow starter rope to snap back. FILL ENGINE WITH OIL MODELS WITH ELECTRIC STARTER Your lawn mower is shipped without oil in • Push the engine start button (or turn the the engine. key on models so equipped). • Be sure mower is level and area around IMPORTANT: Do not crank engine more oil fill is clean. than five continous seconds between each • Remove engine oil filler plug (oil fill cap/ time you try to start. Wait 5 to 10 seconds dipstick on models so equipped). • Slowly add oil. For type and grade of oil to use, see "ENGINE" in the Maintenance section of this manual. • Fill to the top of slot in filler hole (to "FULL" line on dipstick on models so equipped). Do not overfill. between each attempt. ALL MODELS • For engines equipped with choke, slowly move engine speed control lever to FAST after engine starts. TO STOP ENGINE • Replace plug (oil fill cap/dipstick on • To STOP engine, release operator pres- models so equipped) and tighten. ence control bar. • Check oil level before each use. Add oil NOTE: For engines with a primer, it may as needed. be necessary to repeat priming steps • To change oil, see Maintenance section in cooler weather. In warmer weather, of this manual. overpriming may cause flooding and FILL GASOLINE TANK engine will not start. If you do flood • Fill gasoline tank with fresh, clean, un- engine, wait a few minutes before leaded gasoline. DO NOT USE PRE- attempting to start and DO NOT repeat MIUM GASOLINE. BE CAREFUL NOT priming steps. TO OVERFILL TANK. WARNING: Experience indicates that alcohol blended fuels (called gasohol or Operator presence control bar Recoil starter handle using ethanol or methanol) can attract (center moisture which leads to separation and formation of acids during storage. Acidic mount type) gas can damage the fuel system of an engine while in storage. To avoid engine problems, the fuel system should be emptied before storage of 30 days or longer. Drain the fuel tank, start the engine and let it run until fuel lines and Recoil starter handle (side mount type) 16
-
 1
1 -
2
-
3
-
4
-
5
-
6
-
7
-
8
-
9
-
10
-
 11
11 -
 12
12 -
 13
13 -
 14
14 -
 15
15 -
 16
16 -
 17
17 -
 18
18 -
 19
19 -
 20
20 -
 21
21 -
22
-
23
-
24
-
25
-
26
-
27
-
28
 |
 |
